Setting Background Images
Replacing Background Images
You can set a background on a single image, or you can create a batch that lets you replace the background on many images at the same time.
[Menu Proxy — Headings — Online — Depth3 ]
Examples
Example
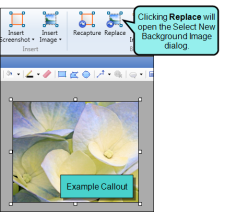
Let's say you have an image with a callout in the Capture Editor. You want to keep the callout, but change the image to which it is referring. You can delete the background image and then add another manually, or you can quickly swap one image out for another using the Replace option.
Let's say you need to remove the logo but keep the callout. Click on the Replace option and select an image in the Select New Background Dialog.
The logo image beneath the callout will be replaced with the new image that you have selected. The callout and its location on the image remain the same.
Example
Let's say you have added callouts and objects to hundreds of images of your company's software and inserted these images into a MadCap Flare project. Later, you receive updated images from your company's marketing team, showing changes to the software's interface. Rather than opening each image and replacing all of the callouts in the images manually, you can create a batch to replace the existing background images with the new background images.
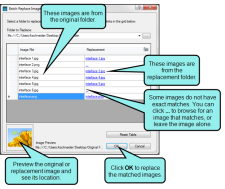
When you create the batch, any images that have the same name and file extension are automatically synced. You can manually set replacement images for images that do not align.
You click OK to replace the images. Any background images you aligned in the batch are replaced. The callouts and objects from the original image are transferred to the new background image.
Example
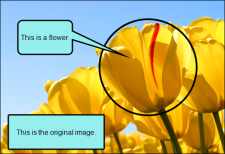
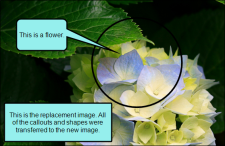
These images show an image with shapes and callouts. The background has been replaced and all of the shapes and callouts from the original image transferred over to the replacement image.
How to Set a Background on a Single Image
-
Open the image whose background you need to replace.
Select Edit > Replace. The Select New Background Image dialog opens.
- Select an image in the dialog and then click Open. The image that is layered deepest in the Capture Editor will be replaced with the image that you have selected.
How to Set a Background for Many Images in a Batch
- Select File > New > Batch Replace Images. The Batch Replace Images dialog opens.
- Next to the Folder to Replace field, click
 .
. -
Find and select the folder containing the images that you want to work with. Click Select Folder.
In the Batch Replace Images dialog, the image files from the original folder appear on the left side of the grid.
-
Replace the original background images with new images. You can sync the original images to images in a replacement folder, or you can replace individual images.
To Sync the Original Images to a Replacement Folder
- On the right side of the grid, click the Sync button
 .
. - In the dialog that opens, find and select the folder containing the new background images. Click Select Folder.
-
A confirmation dialog appears notifying you how many replacement links were set. Click OK. In the Batch Replace Images dialog, the replacement background images appear on the right side of the grid.
Note If Capture cannot find a replacement image that matches the original image's exact name or file type extension, no replacement will be selected. If this occurs, you can replace these images individually.
To Replace Individual Images
-
On the right side of the grid, click the link next to the image file you want to replace. If you have not added a replacement image yet, the link will look like an ellipsis; if you have already added a replacement image, the link will display the image's file name.
- In the dialog that opens, find and select the replacement background image you want to use. Click Open. In the Batch Replace Images dialog, the replacement background image appears on the right side of the grid.
- Continue replacing background images as needed.
- On the right side of the grid, click the Sync button
- (Optional) To preview an original or replacement image, select it in the grid. A preview of the image and its file path appear in the lower-left corner of the dialog.
-
(Optional) If you want to start over, you can clear all of the links in the table. To do this, click Reset Table.
Warning Resetting the table will remove all the links to replacement background images, and you will lose all of your progress. As a best practice, you should only click Reset Table if you have made a serious error and cannot correct it manually.
- Click OK.
- A message asks if you want to overwrite the images. Click Yes. The original images will be replaced with the new background images that you selected. Any objects that were part of the original images will be transferred to the replacement background images.
Note If a replacement image you select has existing callouts or shapes, the shapes are flattened during replacement. Replacement only works for background images.
Note When performing a batch replacement, you can replace images in subfolders. To sync correctly, the subfolders must have the same names in the original folder and the replacement folder. Folders with different names will not sync.


