You can change different aspects of a star to modify its shape.
[Menu Proxy — Headings — Online — Depth3 ]
How to Modify the Tips of a Star
- Open an image that has a star shape.
- Double-click the star shape.
- In the properties dialog, select the Star tab.
-
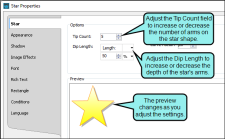
Adjust the number of tips or depth of the arms. As you make changes, watch the Preview area at the bottom of the tab to see the results.
To Adjust the Number of Tips
Change the number in the Tip Count field.
Note You can choose from 3 to 100 tips. The greater the number of tips, the more circular the star becomes.
To Adjust the Depth of the Arms
In the Dip Length field enter a number and select a unit of measurement. The higher the number, the deeper the arms. You can also enter negative numbers.
- Click OK.
- Click
 to save your work.
How to Modify the Curvature of a Star
- Open an image that has a star shape.
- Double-click the star shape.
- In the properties dialog, select the Star tab.
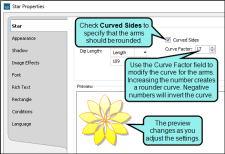
- Click Curved Sides.
- To adjust the amount of curve, change the number in the Curve Factor field. The higher the number, the greater the curve. You can also enter negative numbers. As you make changes, watch the Preview area at the bottom of the tab to see the results.
- Click OK.
- Click
 to save your work.
Note A very useful tool when working with objects is a palette, which lets you store objects for future use. For example, if you are including callouts with some
What's Next?
If necessary, you can continue editing the image (e.g., adding objects, effects, a callout; cropping the image; resizing the image). Otherwise, you can finalize the image by saving it. See Editing Images.


