Applying Profiles to Images
You can apply profiles to existing images. That way, you can quickly add all of the settings from that profile to the image. You can apply a profile to single images, or you can create a batch that lets you apply a profile to many images at the same time.
[Menu Proxy — Headings — Online — Depth3 ]
Examples
Example
You have created two profiles—ProfileA and ProfileB.
Suppose that some of the settings for Profile A are: red border, scale background to a setting of .8, and a shade factor of 3. On the other hand, the only unique setting for ProfileB is torn edges on each side.
If you initially use ProfileA when you capture an image, that image will automatically have the qualities associated with that profile (i.e., red border, scaled to a setting of .8, and shade factor of 3). Later, perhaps you change your mind and want to use the settings from ProfileB for that image. Instead of recapturing the image, you can simply apply ProfileB to the image. That way, you do not need to manually remove the old settings and specify the torn edges. When you apply the profile to the image, all of the settings are changed automatically.
Example
You have created hundreds of images and inserted them into a MadCap Flare project. Later, you might decide that you want all of those images to have a 1-pixel black border. Rather than opening each image and adding the border manually, you can add a profile with border settings, create a batch, and choose to apply that profile to the images in your folder.
How to Apply a Profile to a Single Image
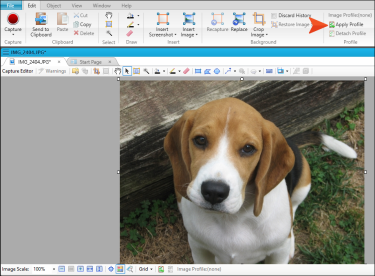
- Select Edit > Apply Profile.
- In the drop-down, select the profile that you want to use.
-
If the profile contains shapes, select any of the options to determine how those shapes are handled.
- Do not apply the profile shapes Even if the profile contains shapes, they will not be added to the image. Any shapes currently on the image will be left alone.
- Add profile shapes If the profile contains shapes, they will be added to the image. Any shapes currently on the image will be left alone.
- Replace profile shapes If the profile contains shapes, they will be added to the image. If the image currently contains any shapes that were previously added from a profile, those shapes will be removed. However, other shapes currently on the image that were previously added manually (rather than via a profile) will be left alone.
- Replace all shapes If the profile contains shapes, they will be added to the image. Any shapes currently on the image will be removed (whether those shapes were previously added from a profile or manually).
- Put profile shapes beneath other shapes By default, profile shapes are added to the top layer of the image when the process takes place. However, you can select this option to specify that the profile shapes are added to the bottom layer instead.
- Click Apply.
- Click
 to save your work.
How to Apply a Profile to Many Images in a Batch
-
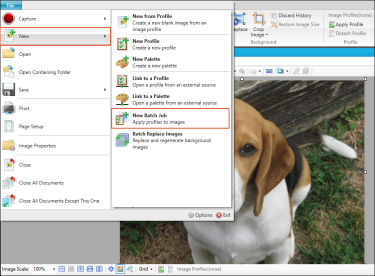
Select File > New > New Batch Job.
A new batch file (CAJOB file) opens in the Batch Job Editor.
- Next to the Folder to scan field, click Browse.
- Find and select the folder containing the images, then click OK.
- (Optional) If you want all images in subfolders to be scanned as well, select Recursive.
-
(Optional) You can use the Include Pattern field to select the type of image files to be included in the scan. Click the down arrow and select the file type.
For example, you might have a folder containing both BMP and GIF files. If you want only the GIF files to use the profile settings, you can specify this.
You can also type the file types into the field manually, separating each of them with a semi-colon (e.g., *.gif; *.jpg).
If you want to scan all types of files, select All Images.
-
Click in the Profile To Apply field and select the profile that you want to use.
In addition to all of your custom profiles listed, you can also select "No Profile." This option is useful if you are a newly registered user and want to remove the trial-mode watermarks on all of your images.
-
(Optional) If the profile contains shapes, you can make a selection in the Replace Shapes Option area to determine how those shapes are handled.
- Do not apply the profile shapes Even if the profile contains shapes, they will not be added to the image. Any shapes currently on the image will be left alone.
- Add profile shapes If the profile contains shapes, they will be added to the image. Any shapes currently on the image will be left alone.
- Replace profile shapes If the profile contains shapes, they will be added to the image. If the image currently contains any shapes that were previously added from a profile, those shapes will be removed. However, other shapes currently on the image that were previously added manually (rather than via a profile) will be left alone.
- Replace all shapes If the profile contains shapes, they will be added to the image. Any shapes currently on the image will be removed (whether those shapes were previously added from a profile or manually).
- Put profile shapes beneath other shapes By default, profile shapes are added to the top layer of the image when the process takes place. However, you can select this option to specify that the profile shapes are added to the bottom layer instead.
-
(Optional) You can specify an output folder where the images are saved as a result of the process. To do this, next to the Output Folder field, click Browse. Then find and select the folder containing the images that you want to work with, and click OK.
If you do not specify an output folder, the images are saved in the same folder that you selected to scan.
- Select the Apply tab.
- Click Scan. The folder is scanned for images that match your settings. When it is finished, the image names are listed on the tab.
- Click Apply Profile. The profile you selected is applied to all of the images.
- Click Save Files. The files are saved with the new profile settings.
- (Optional) If you want to reuse the batch in the future, you can save it. To do this, press CTRL+S or select File > Save to save your work. Then find a folder where you want to store the batch file, provide a name for it, and click Save.


