
After you create custom list formats, you can edit them in a couple of ways.
Warning At this time, custom list formats are supported only in PDF output. After browsers begin to support the CSS3 marker element that makes custom list formats possible, this feature will automatically be supported in browser-based outputs as well. Until then, if you want to generate a browser-based output, you should use the standard method for creating lists instead.
[Menu Proxy — Headings — Online — Depth3 ]
How to Use the Edit List Format Dialog
This is the easier option for users who are not as experienced with cascading stylesheets (CSS). It is essentially the same as the Create New List Format dialog, which is used when creating a custom list format. The only difference is that you are adjusting existing settings, rather than adding everything from scratch.
- Open a content file containing a custom format list.
- If the tag block bars are not shown to the left of the content, click
 at the bottom of the editor.
 - Click the outermost (i.e., first level) structure bar (ol or ul) for the list.
- Select Home >
 (down arrow) and choose Custom List Format > Edit Custom List Format.
 -
Use the Edit List Format make changes to the format.
- Name Give your custom list format a name.
- Comment You can add an internal comment, such as the purpose of the list format.
- Stylesheet
- Level Select the level of the list that you want to work on. When a level is selected, any settings you choose are applied only to that level.
-
Content This field becomes populated based on settings you choose using the buttons next to this field. It is a good idea to begin by clicking the first button to the right (i.e.,
) and selecting a list type or image first (see below). Then use the other options as necessary.You can also type directly into this field.
Note Any text typed directly in this field is supported only in PDF output. If you enter any text, the default list markers (e.g., bullets, numbers) are instead displayed in non-PDF outputs.
-
Select the type of list. If you click the down arrow, you can select any of the following:
Type of List
What is Added to the Content Field?

Bullet list
Nothing

Numbered list
{n}.

Lower-alpha numbered list
{a}.

Upper-alpha numbered list
{A}.

Lower-Roman numbered list
{r}.

Upper-Roman numbered list
{R}.

Select custom bullet image
The path to the image file
-
 You can click this button to insert a special character or symbol.
 Note Custom list characters are supported only in PDF output. If you add characters or symbols to the Content field, the default list markers (e.g., bullets, numbers) are instead displayed in non-PDF outputs. However, custom bullet images are supported in all output formats.
-
 You can click this button to open the Font Properties dialog. This lets you change the look of the list marker, such as the font size or type, color, and effects.
- Click OK. The dialog closes and any lists associated in your project with that custom format are automatically changed.
- Click
") to save your work.
to save your work.
How to Edit Custom List Format Styles
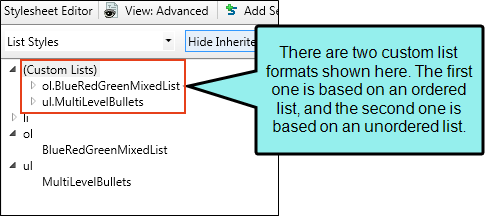
When you view list styles in the Stylesheet Editor, you will see custom formats displayed as classes under the respective ol and ul parent styles, depending on whether the first level of that format is an ordered or unordered list. However, these classes are really limited to the list style type for each.
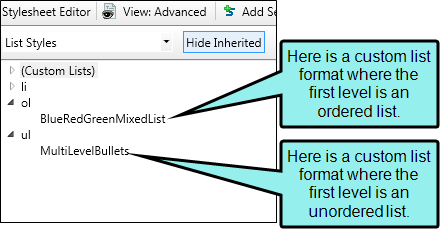
The real editing can take place in a special section called "(Custom Lists)," where all ordered and unordered custom list formats are grouped together.
- Open the stylesheet you want to modify or create a new one.
-
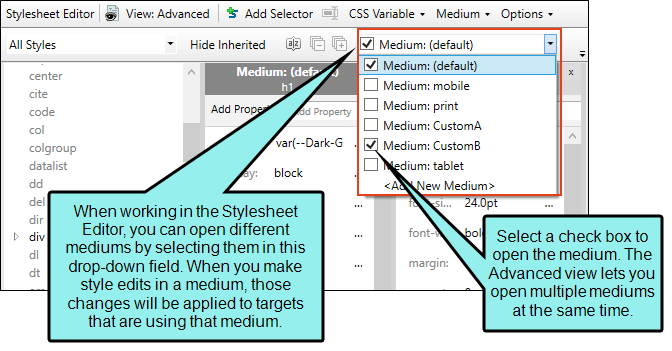
From the Medium drop-down in the Stylesheet Editor, make sure the proper medium is selected before you begin. In the Advanced view, you can open multiple mediums at once; you just need to look at the title at the top of the medium pane and make sure you are working in the correct one. If you are not using stylesheet mediums for your different outputs or if you want all mediums to have the same settings, just leave the medium set to default and continue.
Mediums can be used if you want to use one group of settings for online output types and another group of settings for print-based output types. For example, you might use the default medium for your online outputs and the print medium for your print outputs.
Please note that Contributor remembers the last medium that you used when working in the stylesheet, so it may or may not be the one that you want to use the next time around.
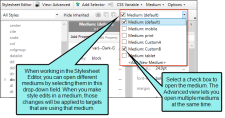
- In the local toolbar, make sure the first button displays
 . If the button displays
  instead, then click it.
 - In the upper-left corner of the editor, click in the drop-down field and select
 .
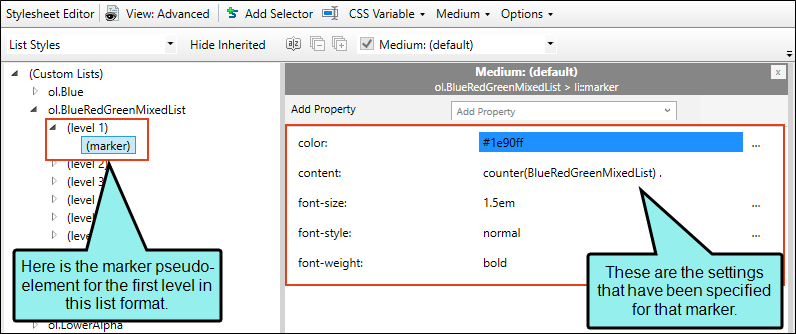
. - Expand (Custom Lists).
-
As you expand each custom list format, you will see nodes for each level that you have formatted. You can change the list style type (e.g., decimal, lower-alpha) or select a custom bullet image on these nodes.
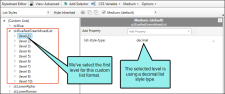
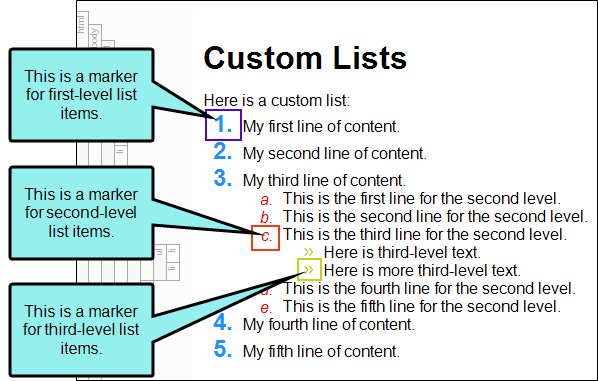
And under each level is a pseudo-element called "(marker)." A marker is the combination of the content and formatting for that level. It is usually a number, letter of the alphabet, symbol, or character, sometimes with punctuation, such as a period. This node is where the bulk of the editing takes place on a custom list format.


- Select the level or marker node that you want to edit.
- From the Show drop-down list on the upper-right side of the editor, select
 . The most relevant properties for that style are shown on the right side of the editor.
 - (Optional) You can use the toggle button in the local toolbar to show properties below in a group view
 or an alphabetical view
  .
. -
Locate the property you want to change.
-
The area to the right of the property is used for selecting and entering values. If you know how to enter the information correctly, you can click in the value field and type it directly. Otherwise, click the ellipsis button
 to the right of the property. Depending on the type of property, the appropriate controls and options display, allowing you to choose or enter values (e.g., select from a drop-down list, click a button, complete fields in a dialog or popup). If you completed values in a popup, click OK at the bottom of the box.
The most common settings that you are likely to change include:
- color
- content
- font-size
- font-style
- font-weight
- list-style-image
- list-style-type
If you do not see the property listed that you want to change, click in the Show drop-down and choose another filter (e.g., All Properties).
- Click to save your work.

Note For more information on the CSS specification for the marker pseudo-element, see:
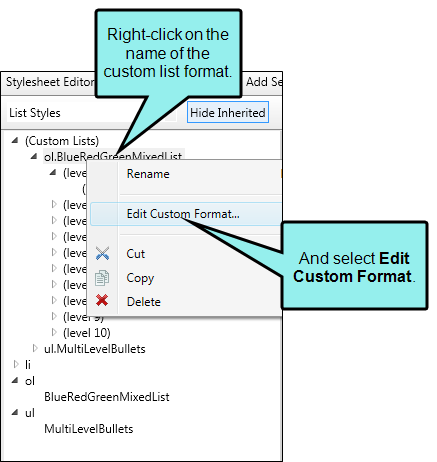
http://dev.w3.org/csswg/css-lists/#marker-pseudo-elementNote By right-clicking on the name of a custom style and selecting Edit Custom Format, you can open the Edit List Format dialog and make your changes there instead.
How to Reset the Style Class
If you no longer want to use a custom list format and want to return to the default style settings for the list, you can reset the style class.
- Click in the list.
- Do one of the following, depending on the part of the user interface you are using:
- Home Ribbon In the Paragraph section, click the down arrow on the list button . Then select Custom List Format > (reset class).
- Format Menu Select List > Custom List Format > (reset class).
- Structure Bar Make sure the structure bars are turned on. Right-click any of the list structure bars (ol or ul) representing levels of the list. From the context menu, select List Type > Custom List Format > (reset class).
- Home Ribbon In the Paragraph section, click the down arrow on the list button