

After you insert an image, you can create multiple hyperlinks for specific sections of the image. This is called an "image map." Image maps engage online users to click linked parts of an image that reveal more information.The image map contains a “hotspot,” which is the part of the image that contains the link as you hover the mouse on it (e.g., text, icon). It also contains a target frame property that determines how the link opens (e.g., popup, tab, window).The foundation of an image map can take on several forms, such as a graphic, photo, or map. The image map is anything with identifiable clickable areas.
[Menu Proxy — Headings — Online — Depth3 ]
How to Create an Image Map
- Open the document or topic.
- In the XML Editor, right-click the image on which you want to create an image map.
- In the context menu, select Image Map. The Image Map Editor opens, with the image displayed.
- In the Standard toolbar of the Image Map Editor, click one of the shape drawing buttons, depending on the area of the image that you want to use as a hyperlink:

Click this button if you want to draw an odd shape over a section of the image.

Click this button if you want to draw a rectangle over a section of the image.

Click this button if you want to draw a circle over a section of the image.
- In the image, click and drag your mouse over the area to be used as a hyperlink. Release the mouse button when you are satisfied with the size and location of the shape. You should now see the shape on top of the image, connected by a series of points.
- In the toolbar, click
 .
. -
From the Link to drop-down field, select a way to identify the topic, bookmark, or file to which you want to link. Based the option you choose, the section below gives you a list of selections or additional fields to complete.
Place in This Document
This option displays any bookmarks, headings, and other elements in the current file. Expand the appropriate section and select the element to which you want to link. If you select anything other than an existing bookmark, Contributor will insert a new bookmark at that destination in the file.
External File
This option lets you search for a file (e.g., HTM, HTML, XML, PDF, Microsoft Office files) outside your
You can also click
 to display and select any bookmarks within the destination file, or
  if you have selected a PDF file.
 Note Because the link usually needs to be relative, based on the final locations of your output files, it is preferable to enter the text directly into the field, rather than clicking the External File button.
Website
This option lets you enter the path to an external file, such as the URL for a website. After you click this option, simply type the path in the field next to the Website field (e.g., http://www.acme.com).
If you want to insert a variable in a field, you can click
 . The variable will appear as syntax in the field, but in the output the variable definition will be shown.
Email
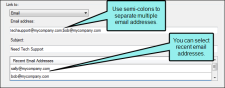
This option lets you add email addresses and subject line so that the user can quickly send an email. To add multiple email addresses, separate them with semi-colons.
Example You might use this feature to help the end user send an email to your company's technical support department. When users click the link, it opens their email program and begins a new email message for them, inserting the email address and subject line for them. After you click this option, complete the E-mail address and Subject fields to the right (or select a recent email address from the list below).
- (Optional) In the Screen Tip field, you can type a phrase that will appear when the end user hovers over the hyperlink in the output.
- (Optional) In the Target Frame field, click the drop-down arrow to select the way the linked destination will open. This option can be used to open the destination topic or file in a popup.
- Page Default The destination file opens in the same window as the output window.
- Parent Frame The destination file opens in the parent frame of the current topic while hiding that topic.
- New Window The destination file opens in a new browser window.
- Same Frame The destination file opens in the same window frame as the current topic.
- Top Frame The destination file opens in the same output window, removing all other framesets. You might use this option, for example, if the destination topic has its own frameset.
- Popup Window The destination file opens in a popup box on top of the current topic.
- (Optional) In the Tab Index field you can enter a value to specify the order in which users can tab through hyperlinks in the image. So when a user presses the TAB key the first time in a topic, the hyperlink with an index value of 1 will be selected first, the hyperlink with a value of 2 will be selected next, and so on. If you want to skip a hyperlink, enter -1 in that field.
- Click OK. The hyperlink is added to the image map.
- If you want to add more hyperlinks to the image, select a shape button again and repeat the steps above.
-
When you are finished creating hyperlinks on the image, click OK in the Image Map Editor.
Notice that when the object is selected in the Image Map Editor, the link property fields at the bottom are populated with the information you provided.
- Click
") to save your work.
to save your work.

Buttons and Sections
|
Edit |
Use this menu to select basic editing options (such as undo, redo, cut, copy, and paste). You can also open the properties for an object or apply conditions to it. |
|
|
Click this button to toggle between seeing a clear image of the picture and a faded image. |
|
|
Click this button to hide the shapes that you draw over areas of the image. |
|
|
Click this button to fill the shapes that you draw over areas of the image. |
|
|
Click this button to open the Area Properties dialog, which lets you find and select a destination file to link to a shape that you've drawn. You must select a shape before this button is enabled. |
|
|
Click this button to delete a selected point in the editor. |
|
|
Click this button to enable "Select" mode so that you can click on shapes that you have drawn in the editor. |
|
|
Click this button to draw a polygon shape over an area of the image. You can then select the shape and link it to a destination file. |
|
|
Click this button to draw a rectangle shape over an area of the image. You can then select the shape and link it to a destination file. |
|
|
Click this button to draw a circle shape over an area of the image. You can then select the shape and link it to a destination file. |
|
|
Click this button to bring a shape up one layer (if it is overlapped by one or more other shapes). |
|
|
Click this button to bring a shape up to the top layer (if it is overlapped by one or more other shapes). |
|
|
Click this button to move a shape down one layer (if it is overlapped by one or more other shapes). |
|
|
Click this button to move a shape down to the bottom layer (if it is overlapped by one or more other shapes). |
|
|
Opens the Condition tags dialog, which lets you apply condition tags to content. |
|
Link |
Displays the path to the linked destination for the selected object. This field is automatically populated after you click |
|
Screen Tip |
Displays the screen tip (or "alt" text) for the selected object. An alt tag provides a textual equivalent for the image. This code allows the page to be usable by persons with graphics turned off or who are blind and using a screen reader. This field is automatically populated after you click |
|
Tab Index |
Displays the tab index value that you entered in the Area Properties dialog for the selected object. The tab index is a value to specify the order in which users can tab through links on an image. So when a user presses the TAB key the first time, the link with an index value of 1 will be selected first, the link with a value of 2 will be selected next, and so on. If you want to skip a link, enter -1 in that field. |


