For the Contribution and New Document workflows, you can apply breaks to page layout frames, similar to the way you can apply page breaks to content such as headings or paragraphs.
In a stylesheet, the following properties are used: frame-break-before, frame-break-after, frame-break-inside. These are not part of the W3C's CSS specification. Instead, they were created by MadCap Software specifically to support this functionality.
By applying these style properties, you can automatically move content to the next frame on the current page in a layout. If no more frames are available on the current page, a page break occurs instead.
This feature can be especially useful when you want to make sure that heading text is the only content in a particular body frame.
Example
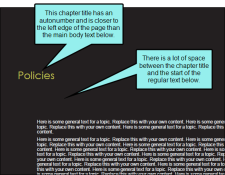
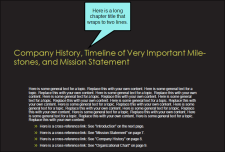
You want chapter titles to appear by themselves in PDF output. In addition, you want the chapter title to start farther to the left than the rest of the body content, with extra space between the title and body content, in case you have long chapter titles that wrap to two lines.
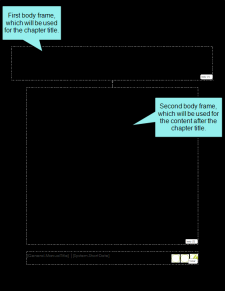
In your page layout, you can create one body frame that you want to be used to display the chapter title, and a second, much larger body frame to display the content following it.
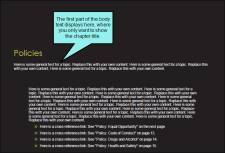
This might work fine when you have long chapter titles that wrap to two lines, but if you have a short, one-line title, the body text from below will creep up and start below it in the first body frame, like this:
To solve the issue, you apply a frame break to the style used for your chapter titles (e.g., h1).
Therefore, even when a chapter title is short, Contributor inserts a break after it. This creates the effect that you want, where only the chapter title appears in the top body frame, and everything else shows up in the second body frame.
How to Use a Style to Set a Frame Break
- Open the stylesheet you want to modify or create a new one.
- In the local toolbar, make sure the first button displays
 . If the button displays
  instead, then click it.
 - In the upper-left corner of the Stylesheet Editor, click in the drop-down field and select
 .
. - Select the appropriate style. In most cases, this will be a heading style (e.g., h1, h2, h3). But you can also place a frame break on other block-level styles, such as paragraphs.
- From the Show drop-down list on the upper-right side of the editor, select
 .
. - (Optional) You can use the toggle button in the local toolbar to show properties below in a group view
 or an alphabetical view
  .
. - If you are using the grouped view, expand the PrintSupport group.
-
Select the appropriate property and set a value for it.
frame-break-before
To the right of the property, click
 and set a frame break before the element.
- always A break will always occur before the element.
- auto A break will neither be forced nor prevented before the element.A
- avoid A break will not occur before the element.
- inherit The break setting of the parent tag is used.
frame-break-after
To the right of the property, click
 and set a frame break after the element.
- always A break will always occur after the element.
- auto A break will neither be forced nor prevented after the element.
- avoid A break will not occur after the element.
- inherit The break setting of the parent tag is used.
frame-break-inside
To the right of the property, click
 and set a frame break inside the "rendering box" of the element.
 - automatic A break will neither be forced nor prevented inside the rendering box of the element.
- avoid A break will not occur inside the rendering box of the element.
- inherit The break setting of the parent tag is used.
- Click
 to save your work.
Note You can also set frame breaks on tables. See Setting Page, Column, and Frame Breaks on Tables.


