Setting Page and Column Breaks


For print-based output, you can apply a page or column break to a paragraph or heading (either via styles or local formatting). For example, you might do this if you want the paragraph or heading to start at the beginning of the next page or column. Alternatively, you can insert a manual page break on a line by itself, independent of any HTML element.
If you are working on a document in the Print Layout mode, you may see icons in the margins next to text. These icons indicate where a paragraph has been moved to another page or column as a result of a page or column break, or due to widow or orphan control.
[Menu Proxy — Headings — Online — Depth3 ]
Icon Types
Following are the types of icons that you might see in a document.
|
|
Explicit Page Break This icon displays if you have created a page break before a paragraph. |
|
|
Explicit Page Break by Previous This icon displays if you have created a page break after a paragraph. |
|
|
Explicit Column Break This icon displays if you have created a column break before a paragraph. |
|
|
Explicit Column Break by Previous This icon displays if you have created a column break after a paragraph. |
|
|
Orphan Controlled This icon displays if a paragraph has been adjusted due to orphan control. |
|
|
Widow Controlled This icon displays if a paragraph has been adjusted due to widow control. |
![]()
Using Independent Page Breaks Instead of Styles
Placing a page break on a style may be the preferred method in many cases, but there may be times when you find that it makes more sense to use an independent page break directly in the content file. This might be the case, for example, if you need a page break to occur after a paragraph and just before a heading, but only in some outputs.
How to Insert an Independent Page Break
- Open the content file.
- Place your cursor on an empty line where you want to insert the page break. When you generate print-based output, the break occurs after this insertion point.
-
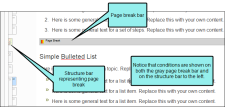
Select Insert > Page Break. If your application is resized so that you cannot see the text, look for the Page Break icon
 .
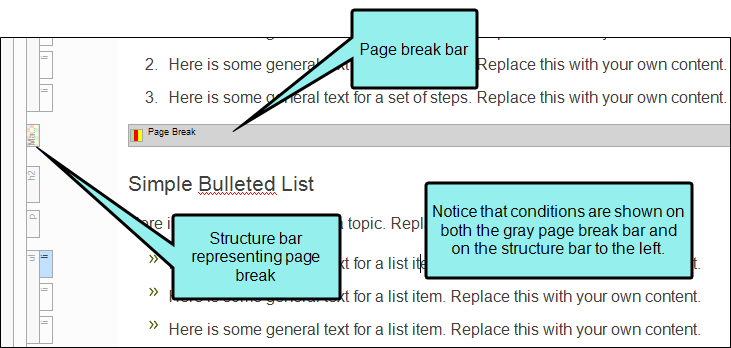
.A gray bar is displayed in the XML Editor, and it is also represented by a structure bar on the left side of the XML Editor. You can apply conditions to the break, in case it should be used in some outputs but not others.
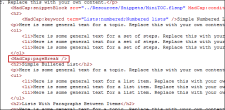
In the code, Contributor uses the MadCap:pageBreak element where a page break is inserted.

How to Set a Page or Column Break Using a Style
- Open the stylesheet you want to modify or create a new one.
-
Complete one of the following sets of steps, depending on whether you want to use the Simplified view or Advanced view in the Stylesheet Editor.
-
Simplified The Simplified view displays styles in a grid view and is often best for brand new users.
This view provides an easy way to apply properties to styles, with format options available from a toolbar and dialogs (similar to the way one would use an interface such as Microsoft Word). In some cases, only the most common property options are available in the Simplified view (e.g., font, letter/word spacing, paragraph alignment/indentation, autonumbering format, borders, background). One advantage of the Simplified view is that you can apply a property to multiple styles at the same time. You can also click a check box to hide the properties in the editor, allowing you to see only the styles.
-
Advanced The Advanced view displays styles in a tree structure, and despite the name, is user friendly for authors of all levels.
For the properties, you can toggle between a grouped display and an alphabetical display. The Advanced view of the Stylesheet Editor lets you edit more settings than are available in the Simplified view. In addition, the Advanced view lets you see and apply settings to multiple mediums and media queries at the same time.
Note With the Advanced view, you can set page breaks only. With the Simplified view, you can set both page and column breaks.
If Using Simplified View
- In the local toolbar, make sure the first button displays
 (which means that the Simplified view is currently shown in the editor). If the button displays
  instead, then click it.
 - In the upper-left corner of the Stylesheet Editor, click in the drop-down field and select
 .
. - Select the appropriate style. For example, you can select the base p tag, or you can select a class that you may have created for that tag (e.g., p.Tip, p.Note). You can also place a page break on a heading style (such as h1).
- In the local toolbar of the editor, click
 . The Properties dialog opens.
 - Select the Breaks tab.
-
Use the Page Break and Column Break sections on the tab to specify the settings for a page or column break, respectively.
Before
You can select one of the options for setting a page or column break before the element.
- Automatic A break will neither be forced nor prevented before the element.
- Always A break will always occur before the element.
- Avoid A break will not occur before the element.
- Force to 'left page' One or two breaks will occur before the element so that the next page is formatted as a left page.
- Force to 'right page' One or two page breaks will occur before the element so that the next page is formatted as a right page.
After
You can select one of the options for setting a page or column break after the element.
- Automatic A break will neither be forced nor prevented after the element.
- Always A break will always occur after the element.
- Avoid A break will not occur after the element.
- Force to 'left page' One or two breaks will occur after the element so that the next page is formatted as a left page.
- Force to 'right page' One or two breaks will occur after the element so that the next page is formatted as a right page.
Inside
To the right of the property, click
 and set a page break inside the "rendering box" of the element.
- Automatic A break will neither be forced nor prevented inside the rendering box of the element.
- Avoid A break will not occur inside the rendering box of the element.
- In the Properties dialog, click OK.
If Using Advanced View
- In the local toolbar, make sure the first button displays . If the button displays instead, then click it.
- In the upper-left corner of the Stylesheet Editor, click in the drop-down field and select .
- Select the appropriate style. For example, you can select the base p tag, or you can select a class that you may have created for that tag (e.g., p.Tip, p.Note). You can also place a page break on a heading style (such as h1).
- From the Show drop-down list on the upper-right side of the editor, select
 .
. - (Optional) You can use the toggle button in the local toolbar to show properties below in a group view
 or an alphabetical view
  .
. - If you are using the grouped view, expand the PrintSupport group.
-
Select the appropriate property and value for it.
column-break-before
To the right of the property, click
and set a column break before the element.- always A break will always occur before the element.
- auto A break will neither be forced nor prevented before the element.
- avoid A break will not occur before the element.
- inherit The break setting of the parent tag is used.
column-break-after
To the right of the property, click
and set a column break after the element.- always A break will always occur after the element.
- auto A break will neither be forced nor prevented after the element.
- avoid A break will not occur after the element.
- inherit The break setting of the parent tag is used.
column-break-inside
To the right of the property, click
and set a column break inside the "rendering box" of the element.- auto A break will neither be forced nor prevented inside the rendering box of the element.
- avoid A break will not occur inside the rendering box of the element.
- inherit The break setting of the parent tag is used.
page-break-before
To the right of the property, click
and set a page break before the element.- always A break will always occur before the element.
- auto A break will neither be forced nor prevented before the element.
- avoid A break will not occur before the element.
- inherit The break setting of the parent tag is used.
- left One or two breaks will occur before the element so that the next page is formatted as a left page.
- right One or two page breaks will occur before the element so that the next page is formatted as a right page.
page-break-after
To the right of the property, click
and set a page break after the element.- always A break will always occur after the element.
- auto A break will neither be forced nor prevented after the element.
- avoid A break will not occur after the element.
- inherit The break setting of the parent tag is used.
- left One or two breaks will occur after the element so that the next page is formatted as a left page.
- right One or two breaks will occur after the element so that the next page is formatted as a right page.
page-break-inside
To the right of the property, click
and set a page break inside the "rendering box" of the element.- auto A break will neither be forced nor prevented inside the rendering box of the element.
- avoid A break will not occur inside the rendering box of the element.
- inherit The break setting of the parent tag is used.
-
- Click
") to save your work.
to save your work.
Note This feature is not supported for MadCap Lingo review package (LIREV) files.
Note You cannot use stylesheets for this feature in the Review (Full Registered) workflow.
Note If you are using a multi-column page layout and set an "Inside" break to "Avoid," you must specify this in both the "Page Break" and "Column Break" fields.
Note It is also possible to use styles to set breaks on lists and tables.
Note The method to insert page breaks independent of an HTML element is not supported for lists or tables. However, you can split a list or table into two separate lists or tables and then insert an independent page break in an empty paragraph between the two.
What’s Next?
After editing a style, you can apply it to content in a topic or snippet.