


You can create a table using the Insert Table dialog, which lets you specify various properties and settings for the table while you create it. Another option is to use the Insert Table grid, which lets you create a simple table by quickly selecting squares displayed from the Insert Table button; this method is faster but does not let you specify properties and settings for the table at the point of creation.
[Menu Proxy — Headings — Online — Depth3 ]
How to Create a Table Using the Insert Table Dialog
- Open the document or topic.
- In the XML Editor place your cursor where you want to add the table.
- Select Table > Inset Table (face of the button). The Insert Table dialog opens.
-
Select the General tab and modify the options as necessary.
Table Size
- Number of columns Enter the number of columns for the table.
- Number of rows Enter the number of rows for the table.
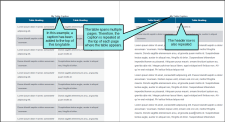
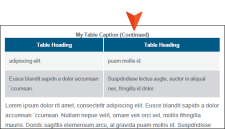
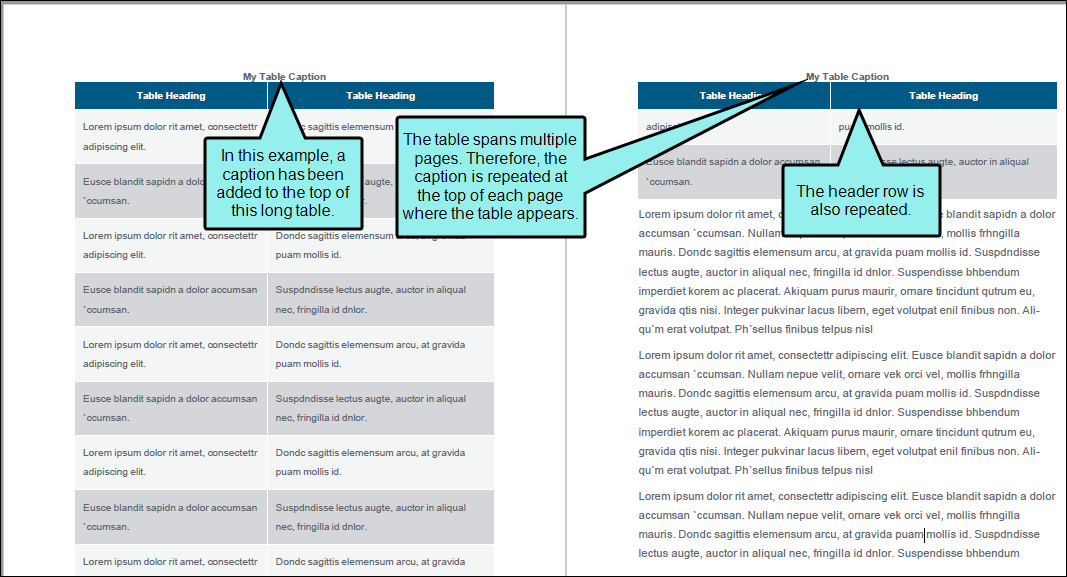
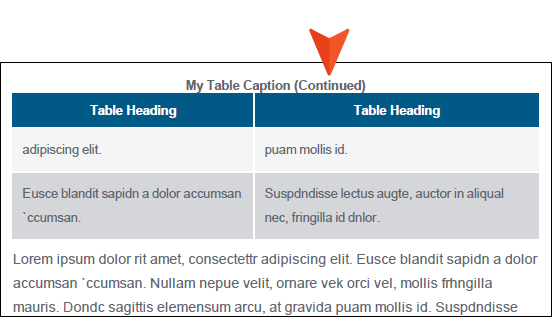
- Number of header rows Enter the number of header rows for the table. A header row can be used to hold titles for the different columns in the table. These rows are automatically repeated at the top of pages in print-based output when a table covers more than one page.
- Number of footer rows Enter the number of footer rows for the table. A footer row can be used to hold footnote information about the table.
- Text Enter a caption (or title) for the table.
-
Side Click in this field and select to place the caption either above or below the table.
-
Repeat If you want captions to repeat on tables that span multiple pages in print-based output, select Repeat from this field.
-
Continuation In this field, you can enter continuation text to the end of captions that repeat (other than the caption appearing on the first page where a table occurs). Typically this text would be something like "(continued)."
Summary
You can enter a summary for a table. This adds the "summary" attribute to the <table> tag and is used to help make your output more accessible to individuals with disabilities. See Accessibility.
- AutoFit to contents Automatically sets the column widths to the same width as the table content.
- AutoFit to window Automatically sets the table width to the same width as the output window.
- Fixed column width Sets the column widths to the width that you specify. Select the down arrow next to this field and set the width in the popup.
Align
Aligns the entire table either to the left, right, or center of the topic.
You can select to use either a special table stylesheet or the table style from a regular stylesheet. Whichever one you choose will control the look of the table that you insert. For more information see Styles and Stylesheets.
-
Table Style Select this option if you want to use a table stylesheet to control the look of the table. You can then select an existing table stylesheet from the drop-down list.
-
 If you do not yet have a table stylesheet that you want to use, click the face of this button to open the Select Table Style Template dialog. This lets you create new table stylesheet. If you click the down arrow next to the button, you can select Print Style. This opens the Select Table Style dialog, which you can use to specify another table style to be used specifically for printed output. However, it is recommended that you use a medium instead of the "Print Style" option.
 -
Style Class Select this option if you want to use a regular stylesheet to control the look of the table. You can then select the main table style from the drop-down, or you can select any class that you have added under that style. You can create classes for the table style in the Stylesheet Editor; those classes will then become available in this drop-down field.
to add a table style to the insert table dialog
- In the Insert Table dialog, the face of the Create New Table Style button , not the down arrow. The Select Table Style Template dialog opens.
- In the Template Folders area, select a folder.
- In the Templates area, select one of the templates from the folder. You can see a preview of how the table will look in the Preview area below.
- (Optional) You can type a new name in the New Style Name field.
- Click OK. The style is added to the Insert Table dialog.
Text to Table
These options are enabled if you have selected text before opening the dialog to insert the table. This lets you create the table and quickly place all of the selected text into table cells.
- None Creates a table but does not include any of the selected text (i.e., text is removed and replaced with new table).
- Paragraphs Converts multiple paragraphs to a table (each paragraph placed in a separate table cell).
- Commas Converts text separated by commas to a table (each segment of text between a comma placed in a separate table cell).
- Tabs Converts text separated by tabs to a table (each segment of text between a tab separator placed in a separate table cell).
- Other Converts text separated by a specific text string (e.g., semicolons) to a table. After selecting this option, enter that text string in the field to the right. Each segment of text between the text string that you specify will be placed in a separate table cell.
-
Select the Borders tab and modify the options as necessary.
- Outer Borders Click in any of the individual fields (Left, Right, Top, Bottom) to specify the settings for the table border. If you click the down arrow to the right of all the fields, the settings will be applied to all of the border fields. When you click the down arrow or in one of the individual fields, a small popup displays. Use the lower-left area of the popup to enter a number for the thickness of the border. Use the lower-middle area to select a unit of measurement (e.g., point, pixel, centimeter) for the number you entered. Use the upper-right area to select a color for the border. And use the lower-right area to select a line type (e.g., solid, double, dashed) for the border. When you are finished, click OK in the small popup.
- Border Radius These fields let you create rounded corners on the table. Click in any of the individual fields (Top-Left, Top-Right, Bottom-Right, Bottom-Left) to specify the settings for a particular corner of the table. If you click the down arrow to the right of all the fields, the settings will be applied to all of the fields. When you click that down arrow or in one of the individual fields, a small popup displays. This popup has two halves. You can complete only the left side of the popup if you like. This will create a curve that is equal horizontally and vertically. If you want a border to have more of a curve either horizontally or vertically, you can complete the fields in the right half of the popup as well, so that you have two values (e.g., 10px 15px) instead of one. For more information on using two sets of border radius properties, see css3.info/preview/rounded-border/. Use the lower-left area of the popup to enter a number for the amount of curve. The greater the number, the more curve that is applied.Use the area to the right of the number field to select a unit of measurement (e.g., point, pixel, centimeter). If you want to provide a second value for the rounded border, complete the same fields on the right half of the popup. When you are finished, click OK in the small popup.
- Cell Border Collapse Select whether you want to collapse the cell borders in the table. If you collapse the cell borders, the row and cell borders of a table are joined in a single border. If you do not collapse the cell borders, the row and cell borders of a table are detached. If you use the border radius properties to create rounded borders, this must be set to "Do not collapse cell borders."
- Cell Border Spacing Use to increase or decrease the cell border spacing (in pixels).
-
Click OK. The table is added. Now you can click in any cells of the table and add content (e.g., text, images, hyperlinks) as necessary.
- Click
") to save your work.
to save your work.
How to Create a Table Using the Insert Table Grid
- Open the document or topic.
- In the XML Editor place your cursor where you want to add the table.
- Select Table > Insert Table (down arrow). The Insert Table dialog opens.
-
Hover over the grid. When you do this, the squares change color to indicate how many rows and columns will be included in the table. As soon as you click, the new table is inserted.
The table initially looks very plain because it has no properties or stylesheet associated with it. Therefore, you will likely want to open the Table Properties dialog at some point to specify settings and/or apply a table stylesheet to it. See Editing Tables and Editing Table Properties.
- Click to save your work.
What’s Noteworthy?
Note When you insert a table, it is set up by default to use standard table tags in the individual cells (e.g., <th> for table headers, <td> for regular table text). However, if you press ENTER at the end of a line, a <p> tag is added within the standard tag. Therefore, in order to keep all of the content in your table cells looking consistent, there are a couple of things you can do. First, if you are editing table styles in a regular stylesheet, you can create advanced selectors (e.g., "td p"). Second, you may want to create a special style class of the p style to be used for table content (e.g., p.tabletext) and apply that style to all of your cells when you first create a table. You can manually apply specific styles to tables by selecting the table cells, clicking Table > Cell Content Style, and choosing the style to be used for those cells. However, rather than repeating all these steps each time you create a table, the easiest way to accomplish this is to set a default cell content style. You can do this in a couple of ways: globally or using a table stylesheet. See Selecting Styles for Table Cell Contents and Editing Table Stylesheets.
Note This feature is not supported for MadCap Lingo review package (LIREV) files.