The Source Control Explorer is used to view and manage source control-related files and settings for your project. This window pane collects all source control information in one place so you do not need to open multiple windows or tabs when working with projects that are bound to source control. It does not replace the Source Control ribbon
[Menu Proxy — Headings — Online — Depth3 ]
How to Open This Explorer
Do one of the following, depending on the part of the user interface you are using:
-
Ribbon Select View > Source Control Explorer.
-
Status Bar In the lower-right of Flare, click
 (a number indicates the number of files with changes that need to be committed). When you click the button, the Source Control Explorer opens. Select the Pending Changes view, which you can use to add a comment and commit the changes.
Note If you do not see this option, make sure View > Status Bar is enabled.
What You Can Do in This Window Pane
Following are the primary tasks that you can perform in the Source Control Explorer.
If Using Git
-
Bind This means to connect your project to Git. After doing this, you can then take advantage of all the automated source control tasks (such as commit, revert, pull, push, and so on).
-
Unbind Provider If you no longer need your project connected to source control, you can remove the connection by "unbinding" the provider.
-
Disable Provider If you do not want to see the source control interface elements in Flare, you can disable the provider. This does not mean you cannot use source control. As long as the provider is still bound to the project, you can perform source control tasks in a third-party tool outside of Flare.
-
Import Project from Source Control If you have a project in Git, you can import it to Flare so you can edit it.
-
View Pending Changes When you make changes to your project in Flare, you can see the files you have changed in the Pending Changes pane. You can also include or exclude changes if you do not want to check in all of your files at once.
-
Commit When you are finished editing files, you can commit them to source control. Committing a file adds your changes to the local Git database. It is a good idea to periodically commit files so that they are organized in logical chunks with a comment that accurately summarizes the changes. When you are ready to add your local commits to the remote repository, you can push these files to the remote. Committing and pushing changes frequently can help to avoid conflicting changes from other users, although conflicts are bound to occur from time to time.
-
Create Branches When you are working in Git, you can create branches.
-
Switch Branches If you have created more than one branch, you can switch to the branch you want to work with. You will see the files associated with the selected branch, and new commits will be sent to the selected branch. By default, the master branch is selected.
-
Publish Branches If you have created a branch, you can publish it, which means to copy it to the remote repository. This lets you push to and pull from that branch.
If another writer on the team wants to get a remote branch that someone else has published and add it locally, they can do the following: (1) Create a new branch locally with the same name as the remote branch; (2) pull the branch from the remote repository.
-
Delete Branches If you no longer need a branch, you can delete it. This also deletes any commits on that branch.
-
Merge Branches There are times where you may have to merge branches into a common branch.
-
View and Modify Network Settings You can view and modify your current source control network settings without having to close Flare. You can make changes to several settings, including SSL configurations, HTTP proxy options, and cookies.
- Create or Edit Ignore File If you bind a project to Git outside of Flare (i.e., you do not use Flare's interface to do the binding), you should make sure that you have a .gitignore file. You can add the .gitignore file by selecting an option in the Source Control Explorer or Project Properties dialog. Once you have a project containing a .gitignore file, the button in the interface changes to "Edit Ignore File," so that you can open the file to make edits to it.
If Using Perforce Helix Core
- Bind If you want to add your project to source control so other users can access it, you need to connect the project to your source control tool. This process is called "binding" the project to source control.
- Unbind Provider If you no longer need your project connected to source control, you can remove the connection by "unbinding" the provider.
-
Disable Provider If you do not want to see the source control interface elements in Flare, you can disable the provider. This does not mean you cannot use source control. As long as the provider is still bound to the project, you can perform source control tasks in a third-party tool outside of Flare.
- Import Project from Source Control If you have a project in Helix Core, you can import it to Flare so you can edit it.
- View Pending Changes When you make changes to your project in Flare, you can see the files you have changed in the Pending Changes pane. You can also include or exclude changes if you do not want to submit all of your files at once.
- Submit When you are finished working on a file, you can return it to source control. This overwrites the existing copy in source control and creates a backup of the file in the source control tool.
If Using Apache Subversion
- Bind This means to connect your project to Apache Subversion. After doing this, you can then take advantage of all the automated source control tasks (such as commit, revert, update, and so on).
- Unbind Provider If you no longer need your project connected to source control, you can remove the connection by "unbinding" the provider.
-
Disable Provider If you do not want to see the source control interface elements in Flare, you can disable the provider. This does not mean you cannot use source control. As long as the provider is still bound to the project, you can perform source control tasks in a third-party tool outside of Flare.
- Import Project from Source Control If you have a project in Subversion, you can import it to Flare so you can edit it.
- View Pending Changes When you make changes to your project in Flare, you can see the files you have changed in the Pending Changes pane. You can also include or exclude changes if you do not want to commit all of your files at once.
- Commit When you are finished editing files, you can commit them to source control. Committing a file overwrites the old copy of the file in the source control database with the new one from your local machine. So even if others will not be working on that file, it is a good idea to periodically commit files so that you have a backup in source control.
- Lock If you want to prevent other users from committing your files, you can lock the file.
- Unlock If you are finished working on a file and want to allow other users to commit it, you can unlock the file.
- View and Modify Network Settings You can view and modify your current source control network settings without having to close Flare. You can make changes to several settings, including SSL, HTTP proxy, and caching options.
If Using Microsoft Team Foundation Server
- Bind If you want to add your project to source control so other users can access it, you need to connect the project to your source control tool. This process is called "binding" the project to source control.
- Unbind Provider If you no longer need your project connected to source control, you can remove the connection by "unbinding" the provider.
-
Disable Provider If you do not want to see the source control interface elements in Flare, you can disable the provider. This does not mean you cannot use source control. As long as the provider is still bound to the project, you can perform source control tasks in a third-party tool outside of Flare.
- Import Project from Source Control If you have a project in Team Foundation Server, you can import it to Flare so you can edit it.
- View Pending Changes When you make changes to your project in Flare, you can see the files you have changed in the Pending Changes pane. You can also include or exclude changes if you do not want to check in all of your files at once.
- Check In When you are finished working on a file, you can check it in it to source control. This overwrites the existing copy in source control and creates a backup of the file in the source control tool.
- Undo Check Out If you do not want to keep changes to a file, you can undo the check out. and restore the file to the state it was in the last time it was checked into source control.
Buttons and Sections
Following are explanations of the different buttons and sections in the Source Control Explorer.
Navigation
|
|
Open the last pane in a previously viewed sequence. |
|
|
Open the next pane in a previously viewed sequence. |
|
|
Refresh the Source Control Explorer. |
|
|
Return to the Home pane. |


Home Page View
|
Pending Changes |
Opens the Pending Changes pane. |
|
Branches |
Opens the Branches pane. This pane is only available if you are using Git. |
|
Settings |
Opens the Settings pane. |
|
Import Project |
Opens the Import Project from Source Control Wizard dialog. |
|
Network Settings |
Opens the Network settings dialog. This option is only available is you are using Git or Subversion. |
Branches View
Note The Branches view is only available if you are using Git
|
Published Branches |
Shows available published branches (i.e., branches that have been added to the remote repository). |
|
Unpublished Branches |
Shows available unpublished branches (i.e., branches that have not been added to the remote repository). |
|
Publish Branch |
Publish the selected branch (i.e., add it to the remote repository). |
|
Select Branch |
Switch to the selected branch. |
|
Delete Branch |
Delete the selected branch. Deleting the branch also deletes any commits on that branch. |
|
Create Branch |
Create a new local branch. |
|
Merge Branch |
Merge another branch with the active branch. |
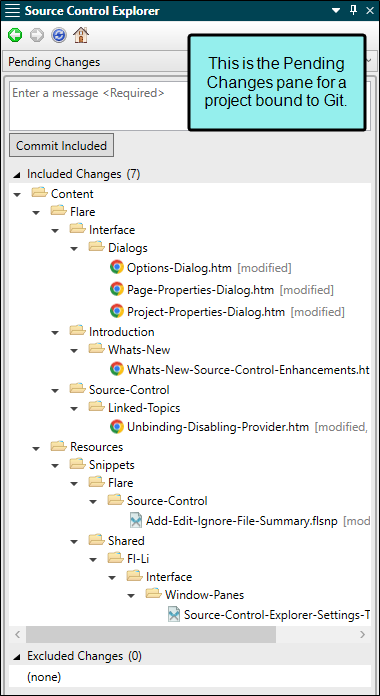
Pending Changes View
|
Comment |
Add a comment to the commit/submit/check in. You can view the comment in the file's history. |
|
Commit Included Submit Included Check In Included |
Send your local files to source control. The terminology on this button changes depending on the source control provider you are using. |
|
Included Changes |
The files in this section will be included in the next commit/submit/check in. You can right-click any file or folder to add it to the Excluded Changes section. |
|
Excluded Changes |
The files in this section will be excluded from the next commit/submit/check in. You can right-click any file or folder to add it to the Included Changes section. |
Settings View
|
Provider Name |
View the source control provider you are using for your project. |
|
Database |
View the source control database where your project is bound. |
|
Database Folder |
View the source control database folder where your project is bound. |
|
Remotes |
Displays the remote repository, and lets you add or remove one. |
|
Disable Provider |
If you do not want to see the source control interface elements in Flare, you can disable the provider. This does not mean you cannot use source control. As long as the provider is still bound to the project, you can perform source control tasks in a third-party tool outside of Flare. |
|
Unbind Provider |
If you no longer need your project connected to source control, you can remove the connection by "unbinding" the provider. |
|
Create or Edit Ignore File |
If you bind a project to Git outside of Flare (i.e., you do not use Flare's interface to do the binding), you should make sure that you have a .gitignore file. You can add the .gitignore file by selecting an option in the Source Control Explorer or Project Properties dialog. Once you have a project containing a .gitignore file, the button in the interface changes to "Edit Ignore File," so that you can open the file to make edits to it. |
What’s Noteworthy?
Note The labels that appear in the Source Control Explorer will vary depending on the source control provider you are using.

