for Windows Server 2008
Installing the Prerequisites for Windows Server 2008
Important Pulse is deprecated in Flare, which means that it is slated to be removed in a future version.
Information for Network Administrators
To prepare for a Pulse installation, you need to prepare the systems that will be hosting the Pulse server application and the Microsoft SQL Server instance for the Pulse database.
[Menu Proxy — Headings — Online — Depth3 ]
Before You Begin
In order to download and install the prerequisites, you need an internet connection.
You also need the ability to log on the server(s) as a user who has access permissions to install software and change configuration settings on the system. This requires you to have access credentials for one of these accounts:
-
The Built-in Administrator Account for Windows Server This account has full administrative privileges and is included with the operating system by default. See the person who installed the server's operating system for the user name and password.
OR
-
A Local User Account with Administrative Privileges If available in your environment, you can use a local administrator account. With a local administrator account, the server checks its own files to authenticate the user and determine if they have the appropriate administrative rights to install software on the system. This account is created on the server, typically by a Network Administrator.
Installing the Prerequisites
First, install Windows Server 2008 (SP2) on the system acting as the Pulse web server and Pulse database server. Whether you are setting up a new server or just using an existing Windows server, you should also ensure that the operating system is updated with all of the latest service packs, critical patches, and security updates from Microsoft.
If you are not familiar with how to install a server operating system, contact your Windows Administrator and/or Network Administrator for assistance. This will help to ensure that your server is in compliance with any security and network requirements specific to your environment.
Important You must upgrade the operating system to Service Pack 2 (SP2) or later.
Important If you are not familiar with how to install a server operating system, contact your Windows Administrator and/or Network Administrator for assistance. This will help to ensure that your server is in compliance with any security and network requirements specific to your environment. See Windows Server 2008 Requirements.
How to Install IIS
IIS provides the server hosting Pulse with web server capabilities and the ASP.NET framework, which is a feature of the .NET Framework. It supports the creation of web pages and web services. If you are setting up a new web server for Pulse, it is very important that you install IIS before installing the .NET Framework.
In the Web Server (IIS) page, review the information. Then click Next
Important Always make sure that you are installing IIS on the system designated as the Pulse server. If you are setting up a new server, IIS must always be installed before the .NET Framework.
Important Do not run IIS on a domain controller or a backup domain controller.
Note IIS is a built-in component of the Windows OS. For Windows Server 2008, the OS lets you install IIS 7.0. You can only upgrade the IIS version if you upgrade the OS version.
-
Log in to the system that you selected to be the Pulse web server using one of these accounts:
-
Built-in Administrator Account for Windows Server This account has full administrative privileges and is included with the operating system by default. See the person who installed the server's operating system for the user name and password.
OR
-
A Local User Account with Administrative Privileges If available in your environment, you can use a local administrator account for the server. With a local account, the server checks its own files to authenticate the log in and determine if the user has the appropriate administrative rights to install software on the system. This is different from a network domain account.
-
-
Determine if the appropriate version of IIS is installed on the operating system.
-
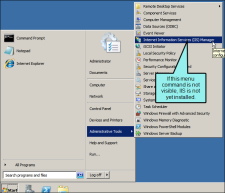
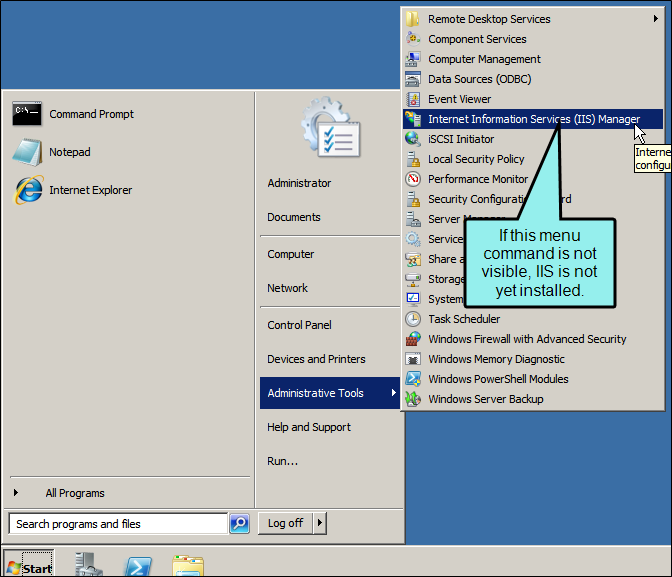
Click Start > Administrative Tools and look for the Internet Information Services (IIS) Manager menu command.
-
Depending on whether or not the menu command is visible, select the appropriate option:
-
If the Menu Command is Not Visible You need to install IIS.
OR
-
If the Menu Command is Visible Select the menu command to open the IIS Manager window. Then choose Help > About Internet Information Services to see the version number.
If IIS is already installed on the server, you can add a new web site in IIS to use with Pulse.
-
-
- If you need to install IIS on the server, add the Web Server (IIS) role service:
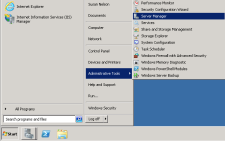
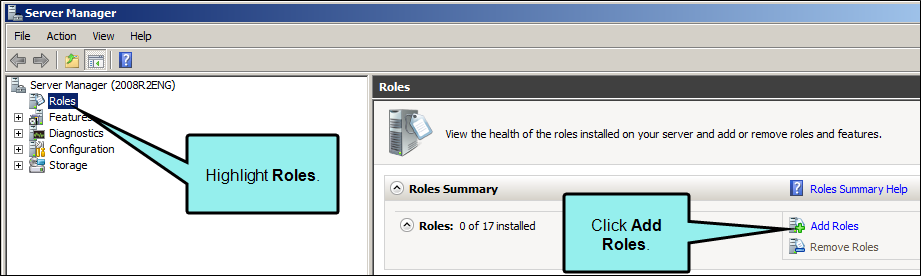
Click Start > Administrative Tools and select Server Manager from the context menu.
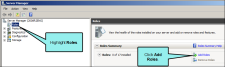
In the left-pane under Server Manager, highlight Roles. Then in the right-pane under Roles Summary, click Add Roles.
The Add Roles wizard opens.
- In the Before You Begin page, click Next
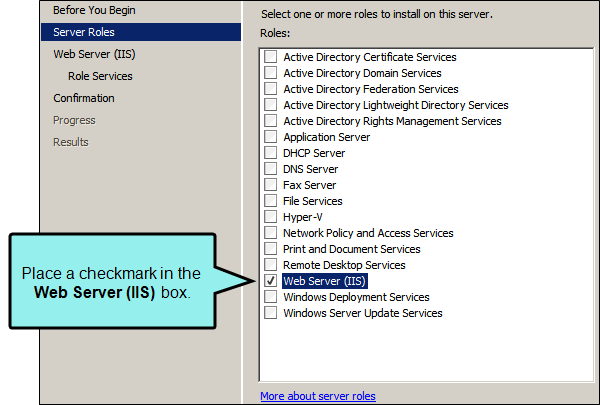
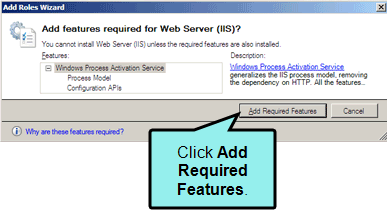
In the Select Server Roles page, place a check mark in the Web Server (IIS) box. Then click Next.

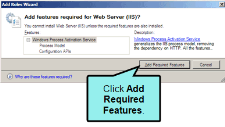
Example When you select Web Server (IIS), you will be prompted to install additional required features (this occurs only if the features are not already installed on the system). Click Add Required Features.
- In the Web Server (IIS) page, review the information. Then click Next
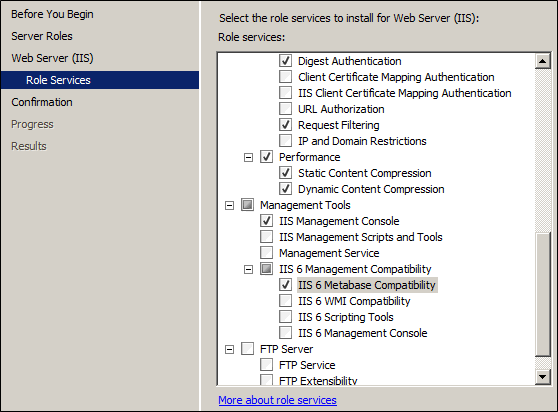
In the Select Role Services page, place a check mark next to all of the role services in the list below. When finished, click Next.
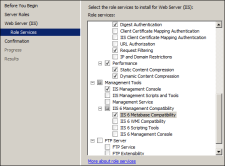
Select the desired services using the recommended role services listed below. Role services required by Pulse are marked with an asterisk (*).
Role Services Category
Select These Role Service Check Boxes
Common HTTP Features
*Static Content
Default Document
Directory Browsing
HTTP Errors
Application Development
*ASP.NET
.NET Extensibility
ISAPI Extensions
ISAPI Filters
Example When you select ASP.NET, you will be prompted to install additional required services (this occurs only if the services are not already installed on the system). Click Add Required Role Services.
Health and Diagnostics
HTTP Logging
Logging Tools
Request Monitor
Tracing
Security
*Basic Authentication
*Windows Authentication
Digest Authentication
Request Filtering
Performance
Static Content Compression
Dynamic Content Compression
Management Tools
IIS Management Console
IIS 6 Management Compatibility
*IIS 6 Metabase Compatibility
- In the Confirm Installation Selections page, click Install. A progress indicator shows you the status.
- After the "Installation Succeeded" message appears, click Close in the Installation Results page.
- Click Close to quit the Add Roles Wizard.

How to Install Windows Installer 4.5
If the server is running Windows Server 2008 and if you plan to install Microsoft SQL Server 2008 R2 (Express Edition with Advanced Services), you must download and install the Windows Installer 4.5 Redistributable. Other supported editions of SQL Server do not have this requirement.
Run the installation package that is appropriate for your platform.
-
Determine which version of Windows Installer is running on the server that will host your Pulse database:
-
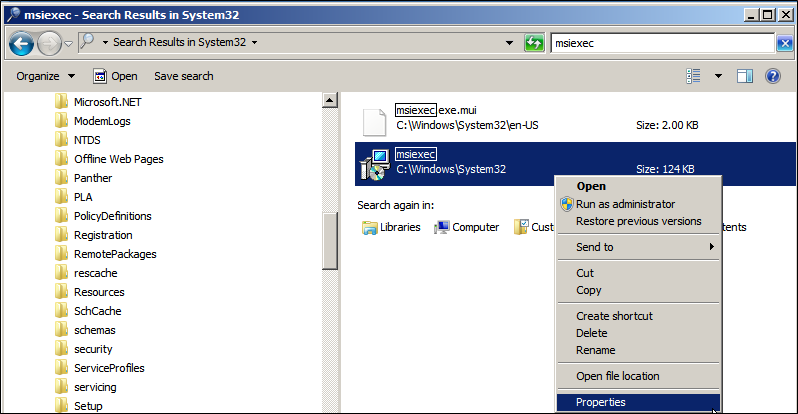
In Windows Explorer, navigate to the System32 folder. Typically, the path is: C:\Windows\System32.
- In the Windows Explorer search field, look for the file named "msiexec.exe."
-
Right-click the file and select Properties from the context menu.

- In the Properties dialog, click the Details tab.
-
In the field next to Product Version, ensure that your system is running Version 4.5 or higher.
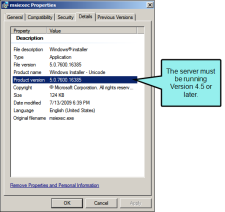
- Click OK to close the Properties dialog.
-
-
Visit the Microsoft Download Center to get a copy of the installation package.
-
Visit the Microsoft Download Center at:
http://www.microsoft.com/en-us/download/details.aspx?id=8483
- Scroll down the page and click Install Instructions. It is recommended that you read the instructions before proceeding.
- Click the Download button.
- In the Choose the Download You Want page, place a check mark next to the appropriate box:
- x86 Platform Windows6.0-KB942288-v2-x86.msu
- x64 Platform Windows6.0-KB942288-v2-x64.msu
- IS64 Platform Windows6.0-KB942288-v2-ioa64.msu
-
- Run the installation package that is appropriate for your platform.

Windows Powershell
Windows PowerShell 2.0 can be added via the operating system. You will use the Server Manager to add this feature.
- On systems running Windows Server 2008, log in to the server as an administrator.
- Click Start > Administrative Tools and select Server Manager from the context menu.
- Under Server Manager, highlight Features. The Add Features Wizard opens.
- In the Features Summary page, click Add Features.
-
In the Select Features page, place a check mark next to the Windows PowerShell box.
Note If the Windows PowerShell box is grayed out and unavailable, a message will indicate that PowerShell is already installed.
- In the Select Features box, click Next.
- In the Confirmation box, review any informational messages. When ready, click Install. A progress indicator shows you the status of the installation.
- In the Installation Results page, look for the Installation Succeeded message. Then click Close.