Important Pulse is deprecated in Flare, which means that it is slated to be removed in a future version.
Information for Network Administrators
You can install a Microsoft SQL Server instance to use as the Pulse database. This instance can reside on the Pulse web server (this is the server running IIS) or on a different system with access to the Pulse web server.
[Menu Proxy — Headings — Online — Depth3 ]
Before You Begin
To begin the installation, log in to the server where you will be installing the SQL database instance. You must use the appropriate access credentials:
-
Built-In Administrator Account for Windows Server This is the account that lets you run programs as an administrator, before a user account is created.
OR
- Windows User Account with Local Administrator Privileges This account must have local administrator privileges for the server.
Installing SQL Server
You must install a supported version of Microsoft SQL Server:
- Microsoft SQL Server 2012
- Microsoft SQL Server 2008R2
- Microsoft SQL Server 2008
You can use a full or express version of any of these, but the full version is recommended because it can store more data.
Regardless of your operating system (Windows Server 2012, 2008R2, or 2008), you should be able to use any of the versions of Microsoft SQL Server listed above. Following are general steps for all three. For the most part, the steps are identical for each, though there may be some minor variations.
It is recommended that you apply all available service packs and critical updates to your operating system prior to the installation.
Important If you are running Windows Server 2012 or are installing Microsoft SQL Server 2012, be sure you have the most current version of Pulse. Microsoft SQL Server 2012 and Windows Server 2012 are not compatible with earlier versions of Pulse.
How to Install Microsoft SQL Server
- Obtain the installation media.
- Log in to the server as an administrator.
- Run the setup program from a CD or the network.
If the Do You Want to Run This File dialog appears, click Run.
If prompted by Windows User Account Control message asking if you want to allow the program to make changes to this computer, click Yes.
Depending on your specific environment, you may also be prompted for access credentials to access the setup program on your network share.
-
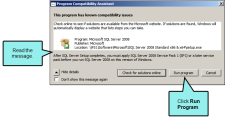
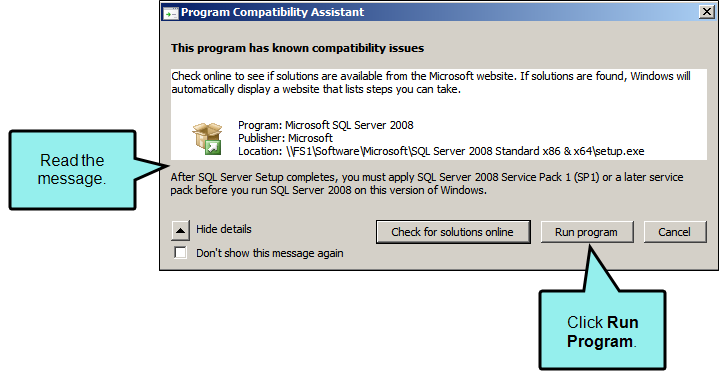
For SQL Server 2008: If you are performing the installation on a system Windows Server 2008 R2, the Program Compatibility Assistant appears. Read the message and then click Run Program.
-
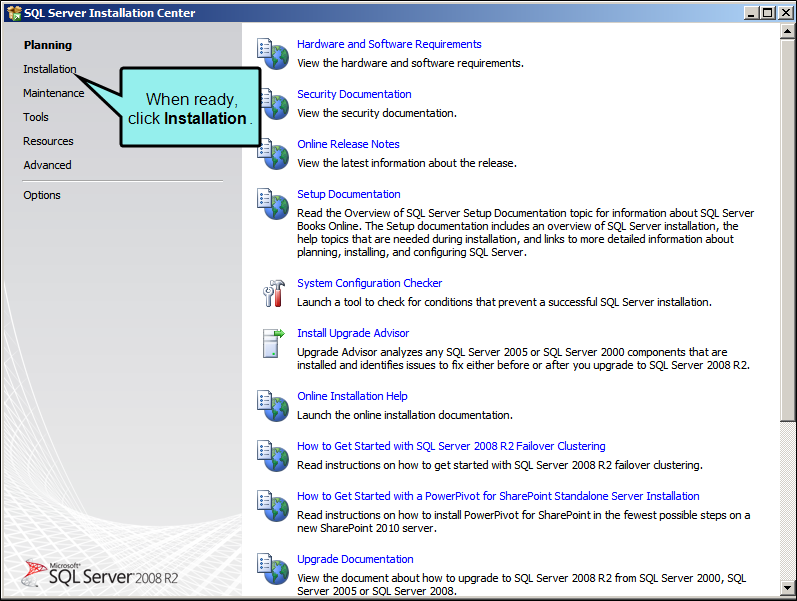
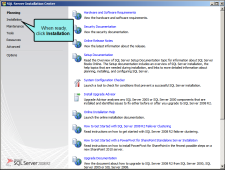
In the Planning page of the Installation Center, review the information. When ready to proceed, click Installation in the left pane.
-
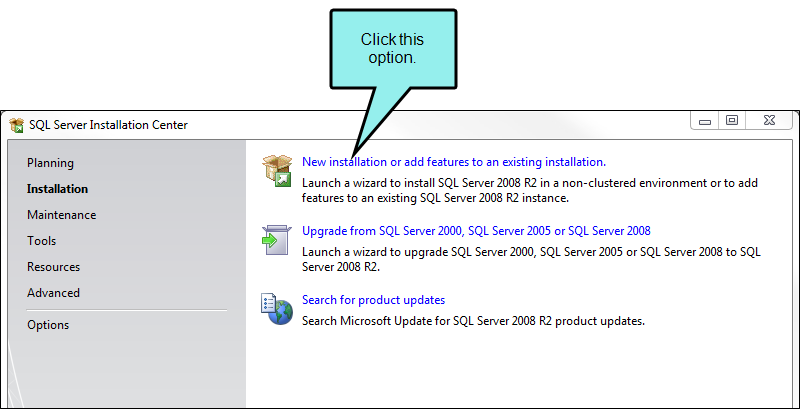
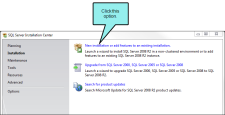
For SQL Server 2008 R2 In the Installation page, click the New installation or add features to an existing installation option.
For SQL Server 2008 and 2012 In the Installation page, click the New SQL Server stand-alone installation or add features to an existing installation option.
If a dialog opens with a security warning, click Run.
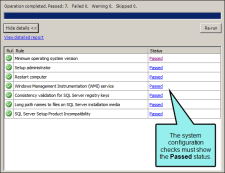
The wizard checks the system to detect potential issues.
-
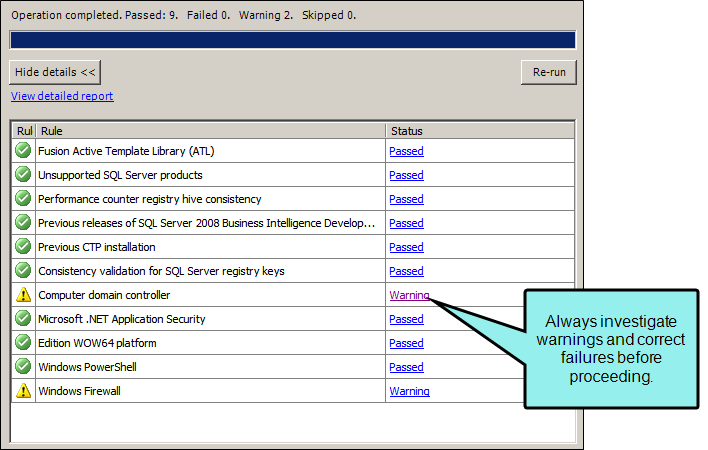
In the Setup Support Rules dialog, do one of the following:
-
If the wizard finds any failed, warning, or skipped rules, click Show Details and/or click View detailed report. Any failures must be resolved before proceeding. When resolved, click Re-run to perform another system check.
OR
-
If wizard determines that the system passes the system check, click OK.
The wizard ensures that you have a valid product key.
-
-
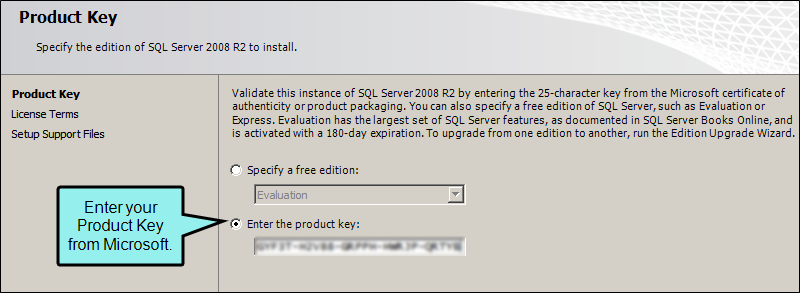
In the Product Key page, validate the SQL Server instance:
- In the Product Key page, select the Enter the product key option.
-
Type your Microsoft license key in the box.

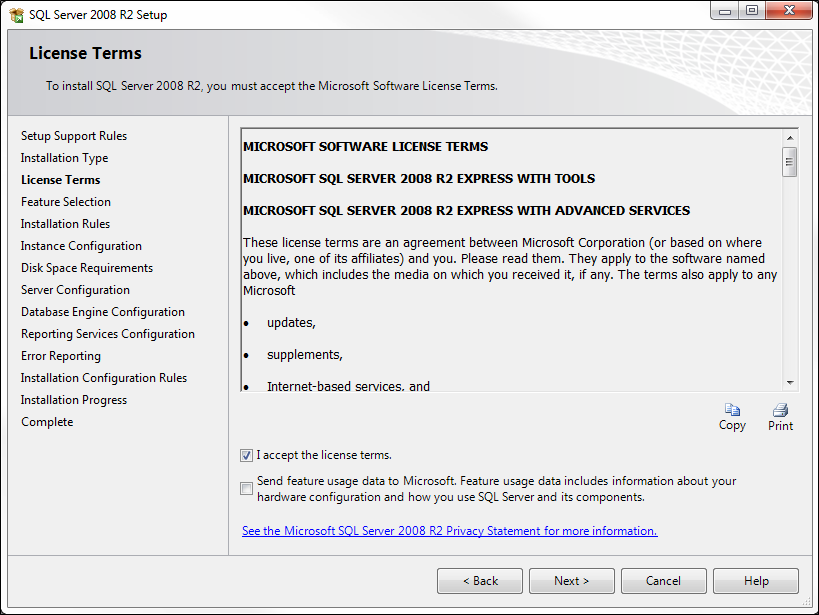
- Click Next to open the License Terms page.
- Place a check mark in the I accept the license terms box.
-
(Optional) If you wish to send feature usage data, select the check box at the bottom of the dialog.

- Click Next. (If your system requires updates, you may see a page at this point showing available updates. You can click the check box to include updates in the installation and click Next.)
- Depending on the version of SQL Server, you may need to click Install at this point. The setup program performs a system check to detect potential issues.
-
In the Setup Support Rules page, do one of the following:
-
If potential issues are found, click Show Details. You can also click View detailed report for more information. Issues must be resolved before proceeding. When resolved, click Re-run to perform another check.

OR
-
If the Setup Support Rules indicates the system has passed, click Next.
-
-
In the Setup Role page, choose the appropriate installation type. Then click Next to proceed.
If you are not familiar with SQL Server, it is recommend that you choose the following:
- Select SQL Server Feature Installation. This lets you choose the features to install.
- Click Next to open the Feature Selection page.
Note You will not see this step if you are installing SQL Server 2008.
-
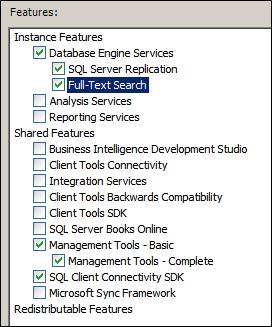
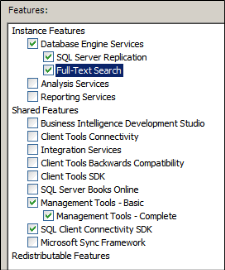
In the Feature Selection page, place check marks next to the desired features. Then click Next.
At a minimum, you should:
Use the default shared feature directory.
-
Select these check boxes:
-
Database Engine Services
- SQL Server Replication
- Full-Text Search or Full-Text Search and Semantic Extractions for Search
-
Management Tools - Basic
- Management Tools - Complete
-
SQL Client Connectivity SDK
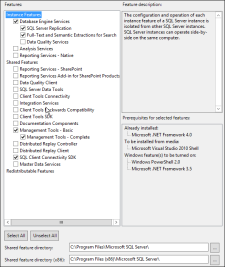
SQL Server 2008/2008R2 Example
SQL Server 2012 Example
-
- Use the default shared feature directory.
-
Click Next.
The setup program checks the system for potential issues.
-
-
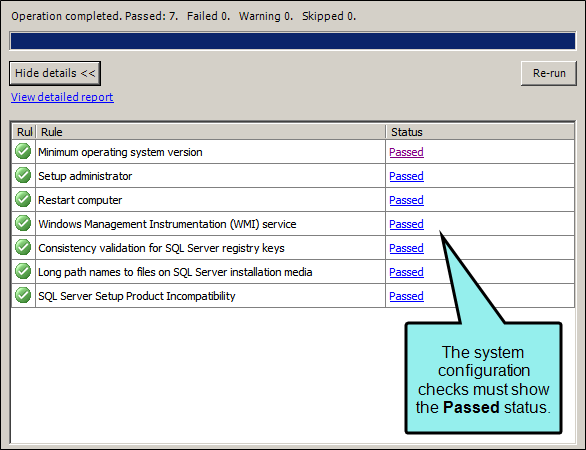
In the Installation Rules page, do one of the following:
-
If any issues are found, click Show Details. You can also click View detailed report for more information. Issues must be resolved before proceeding. When resolved, click Re-run to perform another check.
OR
- If all of the system configuration checks have passed, click Next.
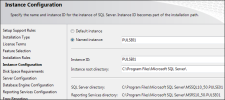
The Instance Configuration page opens.
Note You will not see this step if you are installing SQL Server 2008.
-
-
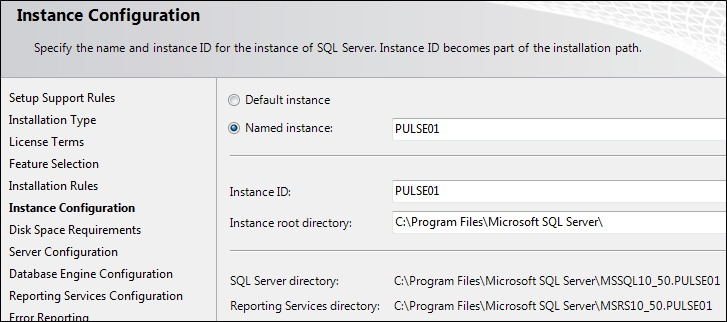
In the Instance Configuration page, select one of these buttons:
-
Default instance If this is the first time SQL Server instance is being installed on the system, use the default instance name. This is typically MSSQLSERVER.
OR
-
Named instance If you do not want to use the default instance, select this button and type a unique name in the Instance ID box. For example, type PULSE01.
-
-
Click Next to open the Disk Space Requirements page and then:
-
If your system does not meet the disk space requirements, review the Disk Usage Summary and address any issues before proceeding.
OR
- If your system meets the disk space requirements, click Next.
-
-
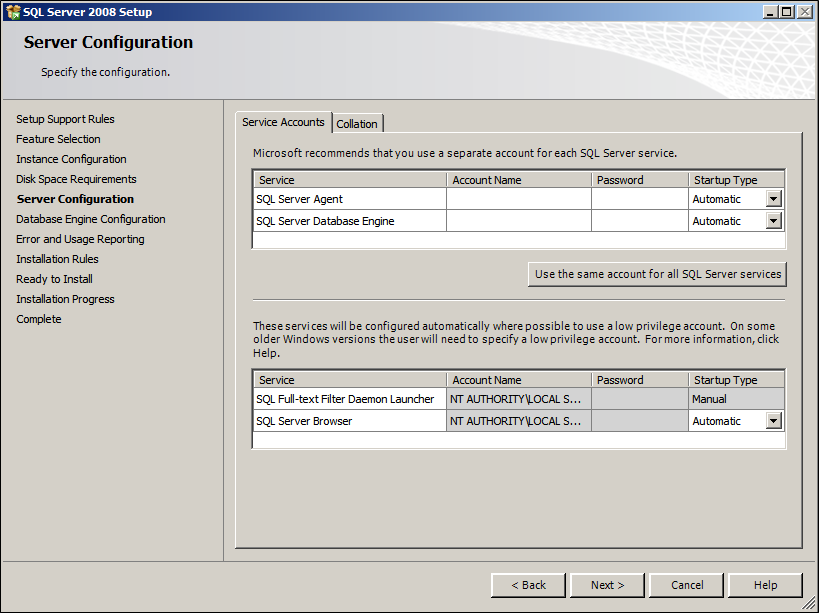
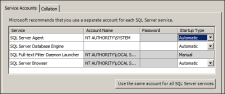
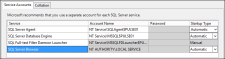
In the Server Configuration page, under the Service Accounts tab you must provision service accounts to each listed SQL service. When finished, click Next.
Important Always contact your SQL Server Administrator and/or Windows Administrator for the appropriate service accounts to use in your environment.
-
Provision the appropriate accounts to the list of SQL services.
-
Make sure the Startup Type for each service is set as follows, depending on the version of SQL Server:
Service
Account Name/Password
Startup Type
SQL Server Agent
SQL Server 2008/2008R2 There is no default account for this service. The account you use depends on your security requirements.
SQL Server 2012 This account defaults to NT Service\SQLAGENT$[Name of Instance].
There is no default account for this service. The account you use depends on your security requirements.
Automatic
SQL Server Database Engine
SQL Server 2008/2008R2 The account you use depends on your security requirements.
SQL Server 2012 This account defaults to NT Service\MSSQL$[Name of Instance].
The account you use depends on your security requirements.
Automatic
SQL Full-text Filter Daemon Launcher
SQL Server 2008/2008R2 This account defaults to NT AUTHORITY\LOCAL SERVICE.
The account you use depends on your security requirements. Microsoft recommends using a low privilege account.
SQL Server 2012 This account defaults to NT Service\MSSQLFDLauncher$[Name of Instance].
Manual
SQL Server Browser
The default logon account is NT AUTHORITY\LOCAL SERVICE.
You will typically keep this setting.
Automatic
SQL Server 2008 Example

SQL Server 2008R2 Example
SQL Server 2012 Example
-
-
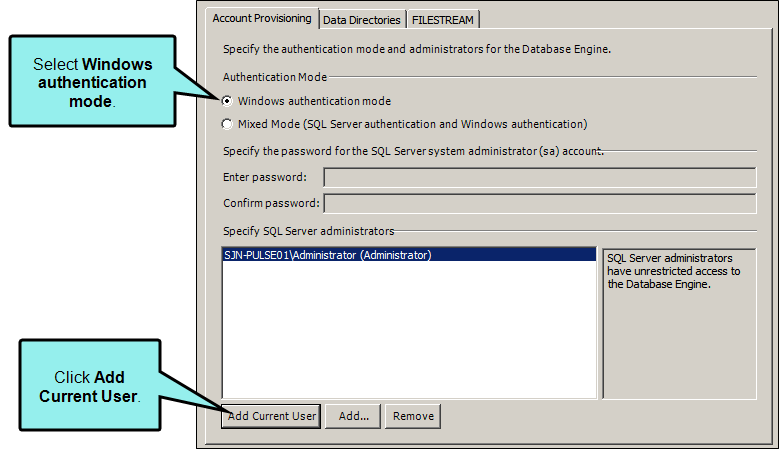
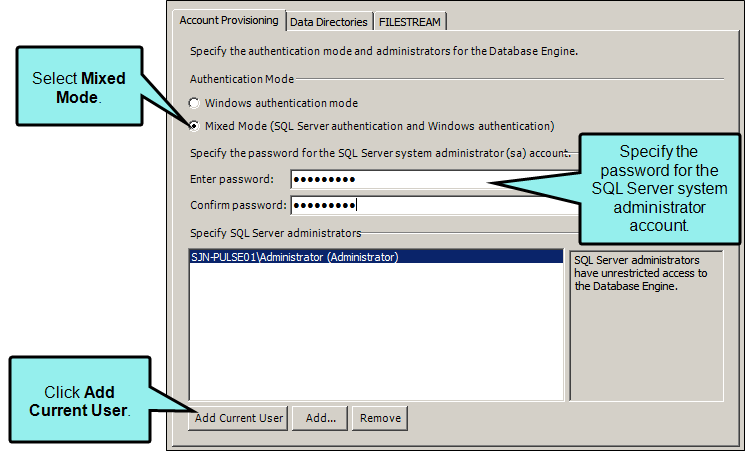
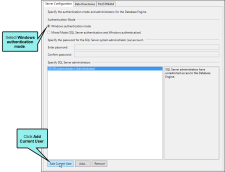
In the Database Engine Configuration page, under the Account Provisioning tab (SQL Server 2008/2008 R2) or the Server Configuration tab (SQL Server 2012), choose one of these options:
-
Windows authentication mode If you choose this option and are not logged in as an administrator, it is recommended that you add an account that has sufficient permissions to perform all of the needed SQL administrative tasks. If you are logged in as an administrator, it is recommended you also click Add Current User.
SQL Server 2008/2008R2 Example

SQL Server 2012 Example
-
Mixed Mode (SQL Server authentication and Windows authentication) If you choose this option, you must specify the password to use for the SQL Server system administrator account.
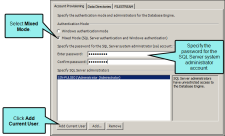
When finished, click Next.
-
- In the Error Reporting page, select whether or not you want to send error reports to Microsoft. This is your preference. Then click Next.
-
In the Installation Configuration Rules page, do the following:
-
If there are issues, you must address them before clicking Next.
OR
- If there are no issues, click Next.
-
- In the Ready to Install page, click Install. A progress indicator shows you the status of the process.
-
When the installation is complete, you will see the "Installation Succeeded" message. Click Close.
Note If a failure occurs, troubleshooting information may be available on the MadCap Software knowledge base at: http://kb.madcapsoftware.com/
Note You may also want to check with your SQL Server Administrator about any errors you experience during installation.