Google Search can be used in your HTML5 Top Navigation or Side Navigation output. It provides many configurable options.
- Verify the URL
- Add a sitemap
- Submit the site for indexing
- Exclude the TOC from indexing
- Customize how the results display
- Review indexing status
Important If you implement Google Search, your Flare output will be available publicly and listed in Google searches. To make your published output private, please refer to Google’s documentation.
How to Set Up a Google Search Engine
- Open an HTML5 target.
- Select the Search tab.
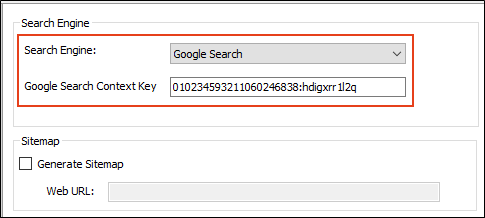
- From the Search Engine field, select Google Search.
-
There are several additional steps you can complete in your Google account to optimize your search.
Google Account—Create Search Engine
- Go to cse.google.com and log in with your Google (i.e., gmail) password.
- Click Add to create a custom search engine.
- In the Sites to search field, enter the URL for the site where your output will be published. A name for the search engine is automatically added toward the bottom of the page, based on your URL. You can edit the name to something more simple if you want.
- Click Create.
- On the next page, click Get code to retrieve your search engine ID.
-
Copy the search engine ID shown.
- Continue with the following Flare steps to enter the Google search key and generate a sitemap.
Flare Project—Enter Google Search Key and Generate Sitemap
- Return to the HTML5 target (Search tab) in the Flare project.
-
In the Google Search Context Key field, paste the ID that you copied from cse.google.com.
-
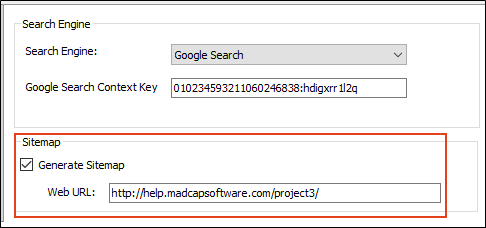
To assist with indexing, we also recommend that you create a sitemap. So Click Generate Sitemap and enter the same URL that you provided on your Google account page (make sure you include http:.// before the path; also, make sure you end the path with a closing /).
- Click
") to save your work.
to save your work. - Generate the target and upload the output files to your URL.
- Continue with the following steps to verify your URL.
Google Account—Verify URL
- In your browser, open a new tab and go to https://www.google.com/webmasters/tools/.
-
If you do not yet have a site, click the Add property drop-down, then select the Add property option.
If you already have a site, click the drop-down next to the site name, then select the Add property option.
-
Enter the URL for your site, and click Continue.
A page opens with steps for verifying your site.
- Complete the steps on the page.
- After you have successfully verified the site, continue with the following steps to add your sitemap.
Google Account—Add Sitemap
- After verifying the URL, click Go to Property.
- Click Sitemaps.
-
Enter Sitemap.xml.
- Click Submit.
- Continue with the following steps to submit the site for indexing.
Google Account—Submit Site for Indexing
- In the Google Search Console, click URL inspection.
-
In the text field, enter a page in your output that contains many links. For example, in the Top Navigation project template in Flare, the “Home.htm” topic is the landing page and contains links to multiple topics, so in that case you would enter Content/Home.htm in the field.
- Click Request indexing.
-
After the status finishes processing, close the message.
- Continue with the following steps to exclude your TOC from indexing.
Google Account—Exclude TOC from Indexing
By default, Google will index each word it finds on your pages, but there may be some words that you do not want to be indexed. This likely includes your TOC. After all, the words in the TOC will be repeated on most, if not all, of your pages. So it wouldn’t be useful for those words to be included in searches.
- Go back to the first browser tab for your Google account and click the Advanced tab.
- Click CSE context to expand that section.
- Click Download (XML). The cse.xml file is added to the Downloads folder on your computer.
-
Edit the downloaded context file cse.xml to add the following attribute: enable_nocontent_tag="true". (If you already see this attribute in the file, you do not need to add it.)
To add the attribute, you can open the file in a text editor such as Notepad++. Then near the top of the file, change:
<CustomSearchEngine id= "[id]" creator="[id]">
to
<CustomSearchEngine id= "[id]" creator= "[id]" enable_nocontent_tag="true">
There may be other attributes that are already in the tag as well. Save your changes when finished.
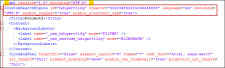
Example Here is an example of an edited cse.xml file:
- On your Google account page, go back to the CSE context section of the Advanced tab, and click Upload XML file.
- Choose the cse.xml file that you edited.
- In the popup, click OK to upload the file.
- Continue with the following steps to customize the appearance of search results.
Google Account—Customize Appearance of Search Results
By default, search results are overlayed on top of your output. You can change this look if you want.
- Click Look and feel.
-
On the Layout tab, select an option.
Note In your Flare output, the results layout that you select may not look precisely the way that Google presents them in the layout thumbnails. It is recommended that you try different layouts and test the output to see which one best meets your needs.
Tip To make the search results appear the way that they normally do in Top Navigation output, select Results Only.
- Click Save.
Google Account—Review Indexing Status
From your account, you can see the progress of your indexed pages.
- Go back to the browser tab showing your Google Search Console.
- Click Sitemaps.
It might be awhile before you see actual results, so return to this page periodically.
- Click to save your work.