Search Filter Set Example


Concepts and search filters might seem a little confusing to you at first. The following example is designed to help make these ideas clearer and guide you through the steps for creating your own search filter by using concepts.
[Menu Proxy — Headings — Online — Depth3 ]
Scenario
Let's say we have a Flare project called "Pets." In this project, we have dozens of topics about all kinds of animals (cats, dogs, parrots, hamsters, and so on). We have written five topics about dogs. These are:
- Choosing a Dog
- Feeding a Dog
- Training a Dog
- Grooming a Dog
- Walking a Dog
We want our users to be able to search for information about dogs. However, we want to limit their search to these five topics (so that they aren't bothered with seeing search results in other "non-dog" topics). We'll use a concept to tie our five "dog" topics together, and then we'll customize the search feature to include this concept.
Step 1—Create and Insert a Concept
First, we need to create a concept to tie these five topics together. We can create a concept with any name that we want, but it helps to name the keyword something that is obvious and all topics have in common. Therefore, we'll give our concept the name "dogs."
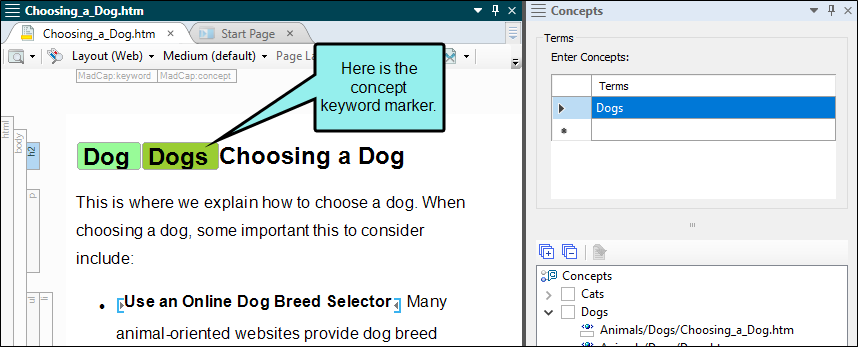
- Open any of the five topics. In this example, we'll open the topic "Choosing a Dog."
- Click in the location in the topic where you want to insert the concept. Typically, you'll insert the concept somewhere near the top of the topic. In our example, we will click right before our topic title "Choosing a Dog."
- Do one of the following, depending on the part of the user interface you are using:
Ribbon Select View > Concept Window.
- Keyboard Shortcut Press SHIFT+F9.
The Concept window pane opens.
-
The cursor should already be placed in the Terms cell. If not, click in that cell. Then type dogs and press ENTER. A concept marker labeled "dogs" is added before the topic title. If you cannot see the marker, you need to turn your markers on by clicking the down arrow next to the Show tags button
 in the XML Editor. Then select Show Markers.
Step 2—Copy and Paste the Concept Marker Into All Relevant Topics
Next, we need to place the same concept marker in our other four "dog" topics. We could repeat the same steps above for each topic, but we'll copy and paste our first concept marker instead.
- In the "Choosing a Dog" topic, click on the concept marker and choose Select.
- Press CTRL+C on your keyboard.
- Open another "dog" topic ("Feeding a Dog," "Training a Dog," etc.). Click in front of the topic title (or somewhere near the top of the topic), and press CTRL+V on your keyboard. Repeat this until you've pasted the concept marker into all five of the "dog" topics.
Step 3—Add a Search Filter Set and Create a Filter
Now that we have the concepts in place, we can create a search filter for the "dog" topics.
- Do one of the following, depending on the part of the user interface you are using:
Ribbon Select Project > New > Advanced > Search Filter Set.
- Right-Click In the Project Organizer, right-click on the Advanced folder and from the context menu select Add Search Filter Set.
The Add File dialog opens.
- Click Add. The search filter set is added to the Advanced folder in the Project Organizer. The Search Filter Set Editor opens to the right, with an initial search filter entry shown.
- Click in the cell under the Filter Name column until "My Subset" is highlighted. Type Dog Topics and press ENTER.
- Click in the cell under the Concepts column. The Select Concepts for Search Filter dialog opens.
- In the Selected Concepts section, double-click dogs. The concept is added to the "All Concepts" section on the left side of the dialog.
- Click OK.
- Click
") to save your work.
to save your work.
Step 4—Customize Search Filter Ordering
If you have created multiple search filters, you can rearrange them to best suit the needs of your audience (in web outputs). By default, they are alphabetical, but you want to move the "dog" filter to the top of the list.
- Open the Project Organizer.
- Double-click the Advanced folder. Any search filter sets that you have added are listed.
- Double-click the search filter set you want to customize. The Search Filter Set Editor opens to the right. The Order column represents the displayed order in the output.
- In the Filter Name column, select the "dog" filter.
- To customize the order of the filters, do one of the following:
- Click
 or
or  in the local toolbar.
 - Select Move Up or Move Down from the context menu.
- Click
- (Optional) To reset the search filters to alphabetical order, click
 .
. - Click to save your work.
Step 5—Associate the Search Filter Set With a Target
Finally, we need to make sure the search filter set that we created is associated with the target that we plan to build.
- Open the target that you plan to build.
- In the Target Editor, click the Advanced tab.
- Click the drop-down arrow in the Filter File field, and select the search filter set that you want to associate with the target.
- Click to save your work.
Now when people use the search feature in our output, they can select "Dog Topics" from the Filter field to limit their search to our five "dog" topics.
What’s Noteworthy?
Note Search filters are not supported in Elasticsearch.

