


Note This feature is supported in HTML5 Tripane skins, but not in HTML5 Side or Top Navigation skins.
You can set the size and position of the output window. The size refers to the height and width of the output window. The position refers to the distance that the output window is placed from the top, bottom, left, and right of the user's computer screen.
[Menu Proxy — Headings — Online — Depth3 ]
How to Specify the Size and Position of the Output Window
- Open a Standard or HTML5 Tripane skin.
- Click the Size tab.
- Do one of the following:
Click the Use Browser Default Size check box so there is a check mark in it. This sets the output window's dimensions to the default window size of whichever browser is used to open the output.
OR
Enter the size and position dimensions directly in each field (Top, Bottom, Left, Right, Width, Height). You can also use the up and down arrows to set a number. Use the down arrow to select a unit of measurement (point, pixel, centimeter, millimeter, inch, or pica).
OR
- Click the Preview Full Size button. Then click and drag the window to set its size and position. The fields on the tab change automatically as you resize and move the window.
-
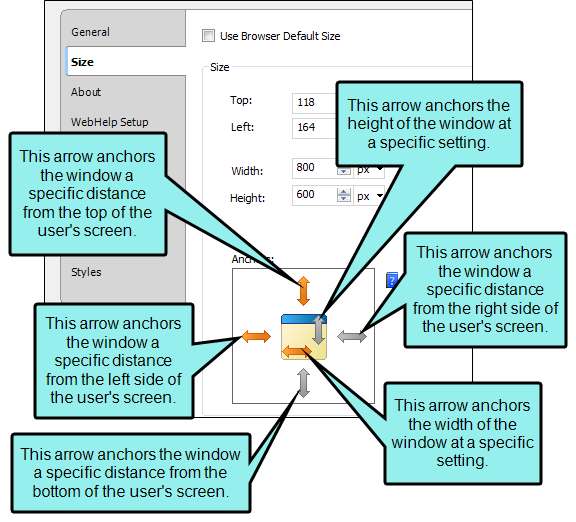
If you want to ensure the size and/or position of the output window, regardless of the size of your user's computer screen, click the appropriate anchors (the arrows shown on the Size tab).

Anchors "lock" the size or position of the window according to settings you provide – a nice feature if your users have different-sized computer screens. (However, users can always adjust the window size in the output to meet their needs.) The arrows on the outside of the box are used to anchor the Help window to the top, bottom, left, or right edge of the user’s screen. The arrows inside the box are used to anchor the height and width of the Help window. To set an anchor, click the appropriate arrow so that it is no longer gray.
Sometimes window settings conflict with each other (e.g., cannot have a window that is 700 pixels high and 300 pixels from the top of the screen). In such cases, Flare adjusts the settings as necessary. When there is a conflict and anchors exist, Flare follows the anchored settings and adjusts the non-anchored settings. If all settings are anchored, Flare follows the settings for the top, bottom, left, and right arrows (and changes the settings for the height and width as necessary).
If you want the output window to be a specific size, and your users have computer screens of various sizes, set the height and width dimensions. Then anchor the height and width of the window using the two arrows inside the box.
If you want the output window to be "dynamic" depending on the user's screen resolution, anchor it to the edges of the screen using the four arrows outside the box. Then set the top, bottom, left, and right dimensions. Regardless of the resolution of the screen, the output window will always be the same distance from the edges of the screen, and the size of the window will grow or shrink accordingly.
Note If you use anchors for WebHelp outputs, the size of the window is computed at runtime on the end-user’s machine. Therefore, if you use anchors to position the window, say, 157 pixels from the right side of the screen, the generated WebHelp output will move/resize the window on the end-user’s machine at runtime when the user views the output in a browser.
However, Microsoft HTML Help output works differently. The CHM viewer cannot move or resize itself. Therefore, the anchors are converted to absolute pixel coordinates based on your screen resolution during compile time. This means that the output on the end-user’s machine is hard coded, based on your screen resolution.
- Click
") to save your work.
to save your work.
Note The size settings in the skin will not work in Google Chrome or Mozilla Firefox browsers unless the output is invoked as a popup.
What’s Next?
Make sure that you associate the skin with the target. See Associating Skins With Targets.
