
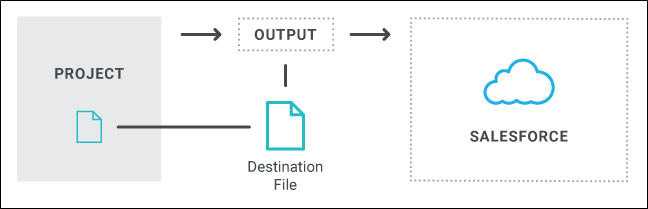
After you have completed the other tasks for publishing to Salesforce® (i.e., turning on Knowledge, creating an article type that includes a rich text field, and installing MadCap Connect for Salesforce), you can create a destination file.
[Menu Proxy — Headings — Online — Depth3 ]
How to Create a Destination File for Salesforce®
- Open the Project Organizer.
- Open an existing destination file or add a new one.
-
Click in the Type drop-down field in the Destination Editor, and select MadCap Connect for Salesforce®.
-
Activate your Salesforce® license.
- Click Activate. A wizard opens.
- Enter the license key, then click Next.
- Enter the name and email of the user associated with the license key. Then click Next.
- Select either Internet Activation or Manual Activation. Then click Next.
- If you choose Internet Activation, a confirmation displays to indicate that your license has been activated. Click Finish.
- If you choose Manual Activation, follow the instructions on-screen to copy and paste the information in an email to customerservice@madcapsoftware.com.
-
In the Destination Editor, click Login Credentials. Then enter the user name and password required for publishing to Salesforce®.
You also might see a window indicating that a verification code has been sent to your email address. You need to retrieve the code from your email and enter it into the field to proceed.
Note If you have created a sandbox environment in Salesforce®, select the Login to Sandbox option if you wish to login to it.
Note If you encounter a blank window when attempting to log in to Salesforce, it might be caused by your company using a proxy server.
If this is the case, you can open the Options dialog (File > Options), select the Proxy Server tab, and complete the fields. You might need to consult your network administrator to obtain the necessary credentials.
After completing the fields on this tab, close and restart Flare for the changes to take effect.
- In the next window, click Allow to give MadCap Connect access to your information and data.
-
Complete the
See the full topic for details.
-
Article Type Select the article type that you create in Salesforce®. Remember that the article type you select should contain a rich text field.
-
Rich Text Field Select a specific Salesforce® rich text field that is associated with the selected article type. That rich text field will then be used for the topics published from Flare to Salesforce®.
-
Record Type When Lightning knowledge is enabled, all article types must be consolidated into a single one. You can then create record types to separate and classify types of knowledge articles.
-
Shared Asset Library Publish logs are used to keep track of publishing updates, and these logs can be stored in a shared asset library in Salesforce®. This helps multiple authors on a shared Flare project to better manage publishing. If you do not have access to a shared asset library on Salesforce®, the publish log will be uploaded to your private library.
-
Category Mapping Salesforce® uses data categories to classify articles and make them easier to find (e.g., to classify articles by sales regions and products, create two category groups: Sales Regions and Products).
- Use default category for all articles If you select this option, you can then select one or more data categories in the Default Categories field below. All published articles will therefore become associated with those categories in Salesforce®.
-
Use TOC to map to matching category names This uses the table of contents (TOC) path selected for each topic and places the published article in the closest matching Salesforce® category name.
-
The TOC structure needs to strictly match the category structure in Salesforce®.
-
The top-level book in the TOC book must match the Salesforce® category group name.
-
There should only be one child category under the first-level book, because that is all that is allowed in Salesforce®.
-
If there is no matching Salesforce® category for the TOC path of the topic, the topic will be mapped to the default categories specified in the destination file. If there is no default category specified, the topic will not have a category applied.
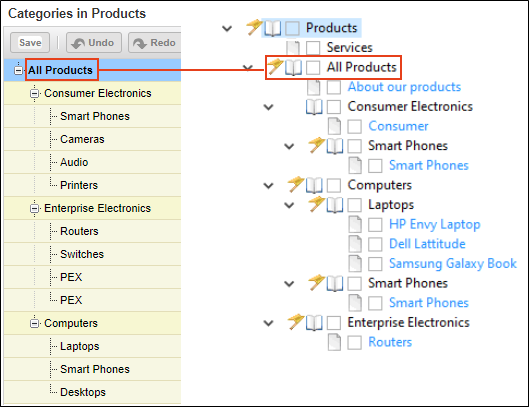
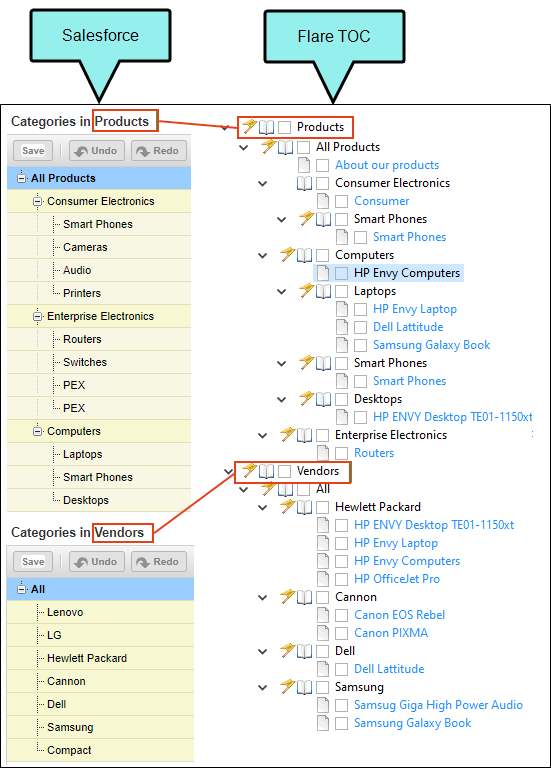
Example — Mapping to One Salesforce® Category Group
You have a Salesforce® category group named "Products." In your Flare TOC, the top-level book matches it.
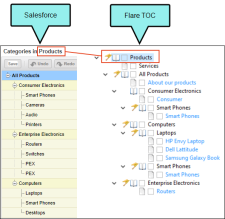
The second-level book in the TOC ("All Products") matches the top-level category node in Salesforce®.

Any topic linked in the next level of the TOC will map to the next Salesforce® category if the TOC path matches the Salesforce® category path.
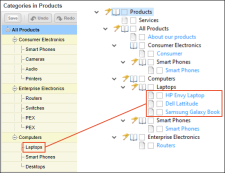
To map a single topic to multiple categories (e.g., Smart Phones in the image), include the topic under each TOC entry that represents the category in Salesforce®.
In this example:
-
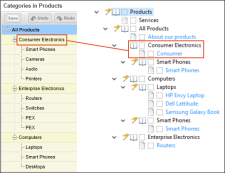
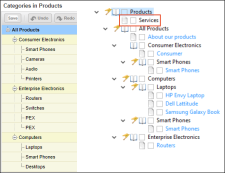
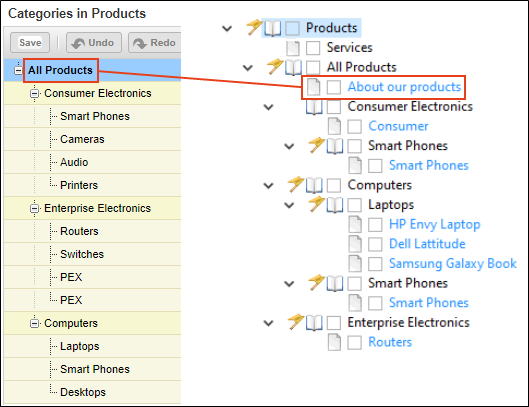
The topic "About our products" has a TOC path of Products > All Products > About our products. There is no exact Salesforce® category match but there is a partial match to a Salesforce® category. It will be mapped to Products > All Products in Salesforce® because this is the closest match.

-
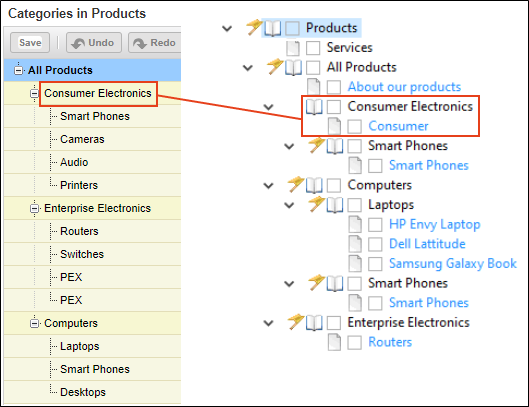
The topic linked to the TOC book "Consumer Electronics" and the "Consumer" topic will be mapped to Products > All Products > Consumer Electronics in Salesforce®.
-
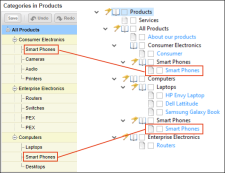
The topic "Smart Phones" will be mapped to two categories since it is included twice in the TOC. It will be mapped to Products > All Products > Consumer Electronics > Smart Phones, as well as Products > All Products > Computers > Smart Phones.
-
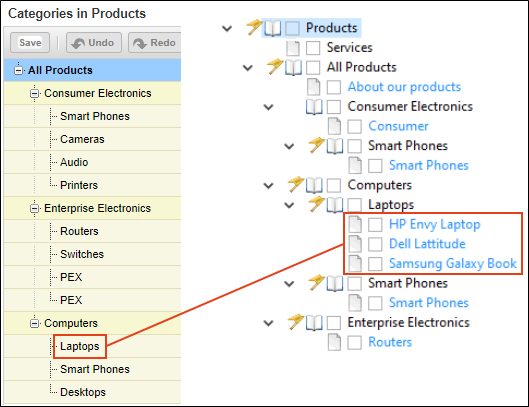
All topics under the TOC book "Laptops" will be mapped to Products > All Products > Computers > Laptops.
-
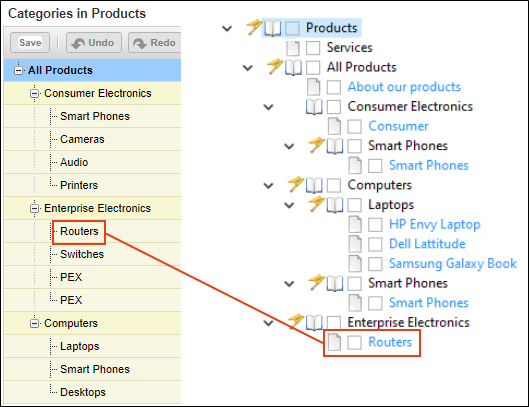
The topic "Routers" will be mapped to Products > All Products > Enterprise Electronics > Routers since it matches the TOC path exactly.

-
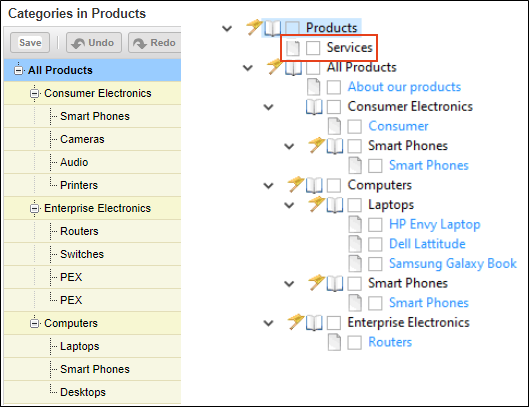
The topic "Services" will not be mapped because it does not have an exact or partial matching Salesforce® data category.
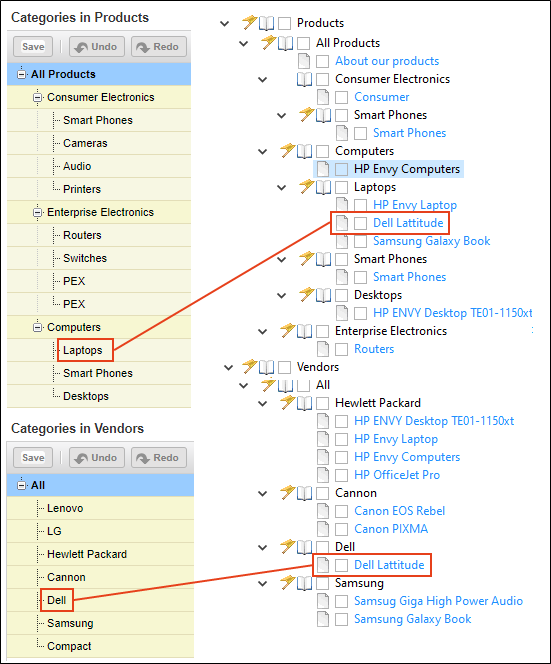
Example — Mapping to More Than One Salesforce® Category Group
You have a Salesforce® category group named "Products." In your Flare TOC, the first top-level book matches it. You have a second Salesforce® category group named "Vendors." In your Flare TOC, the second top-level book matches it.
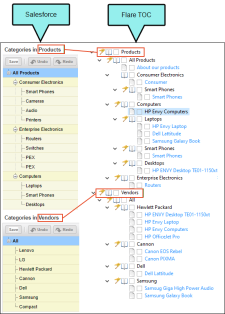
There are many articles arranged to be mapped to both category groups. For example, the "Dell Latitude" topic will be mapped to Products > All Products > Computers > Laptops, as well as Vendors > All > Dell.

-
-
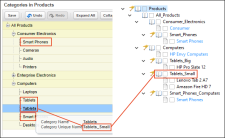
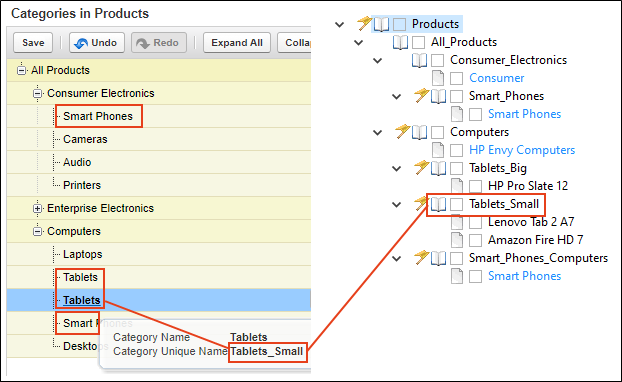
Use TOC to map to matching category unique names This is similar to the previous option, but uses the "unique names" instead of the "name" for Salesforce® categories. This option is most useful if there are multiple data categories in Salesforce® with the same category name but different category unique names. You can select the specific category using the unique name set in Salesforce®.
Example You have two "Smart Phones" categories and also two "Tablets" categories. They each have unique category unique names. The Flare TOC entries use labels that match the category unique name so that each topic can be mapped to the appropriate Salesforce® category.
-
Default Categories Select your default categories. If you do not want to map to any categories, just leave this field blank.
-
Channels This indicates what is displayed to an audience. Select one of the following:
- Partner
- Customer
- Public Knowledge Base
-
Exclusions If there are certain topics that you want to exclude from public view, you can enter them in this field. You can also use wildcards (asterisks) to exclude many topics sharing a similar name (e.g., *Interface.htm would exclude topics with names such as ModuleInterface.htm, SetupInterface.htm, and ReferenceInterface.htm).
-
Article Summary You can provide a short description to be used for all published topics. However, if you have entered a description for a specific topic in the Properties dialog, that text will be used as the summary instead
-
URL Naming Use this to customize the URL used for the articles published to Salesforce®.
Note Spaces and underscores in file names are replaced with hyphens in the URL when the files are published to Salesforce®.
- Generate a unique URL The URL is generated from the topic title followed by a unique hash number. This number is generated based on the destination name, project name, target name, and relative URL of the topic in the output folder. This is the same as the method used previously.
- Use CSH identifiers The URL is generated from the context-sensitive Help (CSH) identifiers found in the alias file associated with the target (on the Advanced tab of the Target Editor).
-
Topic title with suffix The URL generated will use the topic title followed by a hyphen and suffix set in the destination file.
Example Your topic title is Smart Phones, and you enter 5g as the suffix. The end result is:
Smart-Phones-5g
-
Topic title with prefix The URL generated will use the prefix set in the destination file followed by a hyphen and topic title.
Example Your custom prefix is 5g, and your topic title is Smart Phones. The end result is:
5g-Smart-Phones
-
Topic path with suffix The URL generated will use the topic path followed by a hyphen and suffix set in the destination file.
Example Your topic path is Content > Computers > Smart Phones.htm, and you enter 5g as the suffix. The end result is:
Content-Computers-Smart-Phones-5g
-
Topic path with prefix The URL generated will use the prefix set in the destination file followed by a hyphen and topic title.
Example Your custom prefix is 5g, and your topic path is Content > Computers > Smart Phones.htm. The end result is:
5g-Content-Computers-Smart-Phones
Note Suffix and prefix selections are optional. If this field is left blank, just the topic title or path will be used for the URL name.
-
Include images Select this option if you want any images in topics to be included in the published output.
Note To use this option, your images must not be over 1 MB each. Also, only PNG, GIF, and JPEG image formats are supported.
If you have images that do not meet these requirements, you will see an error message. However, if you also select the “Use compression and bulk upload” option, you will not see an error message; instead, the topics with the unsupported images will not be uploaded to Salesforce®.
-
Publish articles Select this option if you want your output to be viewable by the public. If unchecked, your files will be uploaded as drafts.
-
Create lightning style links This allows all links to open in Lightning mode. For example, clicking a hyperlink while viewing a topic in Classic mode will open the linked topic in Lightning mode.
-
Use compression and bulk upload Select this option if you prefer to compress the generated output files before uploading them to Salesforce®. This can speed up the process.
-
-
(Optional) The Destination ID section tracks the files published to the shared asset library or private library in Salesforce®. This is especially useful for a team of writers, because it ensures all the authors can update the same set of articles published from Flare.
Once you start setting up a Salesforce® destination, you get a generated destination ID right away. You probably won't need to click Generate GUID to create a new one. However, you can click it if the need arises. For example, if you copy a Salesforce® destination file to create a new one, you probably want to generate a new destination ID for that file.
- (Optional) In the View URL field, you can enter an address corresponding to your publish destination. This field is for your own internal purposes, and is simply a quick way for you to open the output associated with the destination by clicking the button to the right.
-
(Optional) Select the upload options when you publish to Salesforce®. The Upload Log File option is automatically selected for Salesforce®.
- Upload Only Changed Files Select this option if you want Flare to republish only the files that have changed. This can save significant time.
- Remove Outdated Published Files Select this option if you want Flare to identify files that were previously published to the destination but are no longer in the source files. Flare will then remove such files from the destination.
- Click
") to save your work.
to save your work.


Clean XHTML Target Options
Several options are available in the Target Editor for Clean XHTML targets. These options provide support for the some of the Salesforce® integration features. Therefore, you might need to complete some of these options, depending on how you set up the destination file.
-
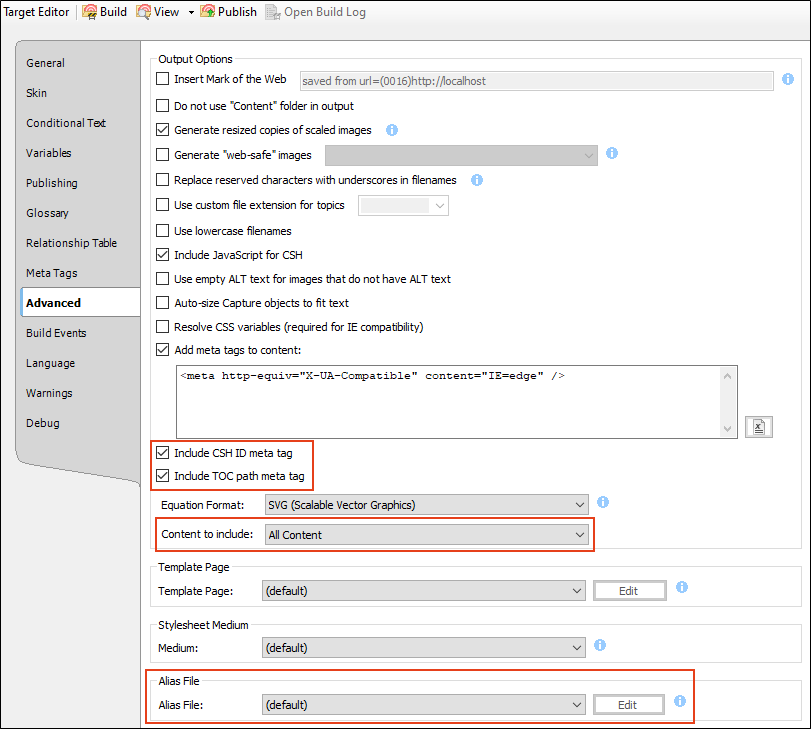
Include CSH ID meta tag When this option is enabled, the topics in the generated output will include the identifiers from the linked alias file as meta tag content. This option is required when Use CSH identifiers is selected in the URL Naming field of the Destination Editor.
-
Include TOC path meta tag When this option is enabled, the topics in the generated output will include the TOC path as meta tag content. This option is required when one of the TOC mapping options is selected in the Category Mapping field of the Destination Editor.
-
Content to include Select the kinds of content that you want to include in the published output. This field is also available for HTML5, Eclipse Help, and HTML Help targets.
-
All Content When you publish the destination, all content will be included and sent to Salesforce®.
-
Content linked directly or indirectly from the target Only content files that are directly or indirectly referenced from the target are included and sent to Salesforce®. This means that if the target is using particular files such as a TOC, template page, and so on, other files linked directly or indirectly from them will be part of the output.
-
Content linked directly from the TOC Only content files that are linked directly from the TOC are included and sent to Salesforce®.
-
-
Alias File If the Include CSH ID meta tag option is enabled, the identifiers from the linked alias file will be used for the CSH ID meta tag content.
What’s Noteworthy?
Note Salesforce® places a limit on the number of characters and links that you can have per article. So if you encounter such an issue when publishing to Salesforce®, you might need to adjust your topic(s) and then republish. Also, keep in mind that if you use the recommended option to convert stylesheet styles to inline, this will increase the character count in your published topics. For more information on these limitations, please refer to the Salesforce® documentation.
What’s Next?
(Recommended) Converting Stylesheet Styles to Inline
(Required) Publishing to Salesforce®

