Important Feedback is deprecated in Flare, which means that it is slated to be removed in a future version.
You need to install the Feedback Server Admin on the Microsoft Windows machine that will be used to host your Feedback data. Provide the individual who is responsible for the installation with these instructions.
[Menu Proxy — Headings — Online — Depth3 ]
Requirements
- Windows operating system (the following are supported):
- Microsoft .NET Framework (latest version)
- SQL Server (the following are supported):
- SQL Server 2005 Express (free download from msdn.microsoft.com)
- SQL Server 2005 Standard
- SQL Server 2008 Express (free download from msdn.microsoft.com)
- SQL Server 2008 Standard
- Microsoft Internet Information Services (IIS)
- ASP.NET (latest version)
- MadCap Feedback Server Admin
Keys
When you purchase MadCap Feedback Server, you are issued two types of keys.
- Feedback Server Key You will be issued one key. Use this key to activate MadCap Feedback Server Admin on the machine hosting the Feedback data.
- Feedback License Keys You will be issued a set number of keys. Authors use one of these keys for each of their Flare targets that they want to track.
Steps—Microsoft Windows Server 2003
Complete these steps on the Windows machine that will host
How to Install MadCap Feedback Server Admin and Other Components
- Make sure that the latest version of Microsoft .NET Framework is installed.Make sure that both required versions of the Microsoft .NET Framework are installed (Version .3.5.1 and 4.0).
-
Make sure that a supported version of SQL Server is installed.
Note If you do not have SQL Server installed, you can download SQL Server Express for free from msdn.microsoft.com.
- Ensure that Microsoft IIS
You can install IIS via the Server Manager dialog or via the Control Panel.
Note When you log on to the IIS machine, the user name must have "admin rights." In addition, you must have "sysadmin permission" on the SQL Server itself.
installing iis via the server manager dialog
- From the Start menu open the Server Manager dialog.
- Click Add or remove a role.
- Click Next.
- Select Application server (IIS, ASP.NET) and click Next.
- Click Enable ASP.NET and click Next.
- Click Next.
- After the installation is completed, click Finish.
installing iis via the control panel
- Open the Control Panel. On many computers, you can do this by clicking Start > Control Panel.
- Double-click Add or Remove Programs.
- Click Add/Remove Windows Components.
- In the list of components select Application Server and then click Details.
- Click the check box next to Internet Information Services (IIS) to add a check mark.
- In the Windows Component Wizard, "Application Server" should now be selected. Click Next.
- After the installation is completed, click Finish.
- Insert the CD (for boxed version purchases) or download the Feedback Server Admin application from the link you received (for online purchases). Install the application.Install the Pulse Server Admin application from the link you received.
After installation is complete, launch the application.
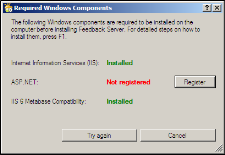
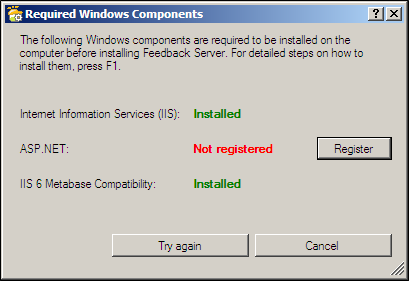
Note If you did not perform one of the above steps, a dialog shows what is not yet installed (by displaying it in red text). If necessary, you can install ASP.NET from the dialog by clicking the button to the right of the red text.
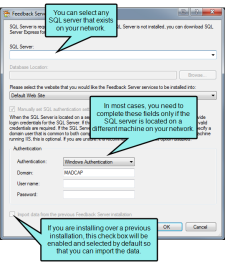
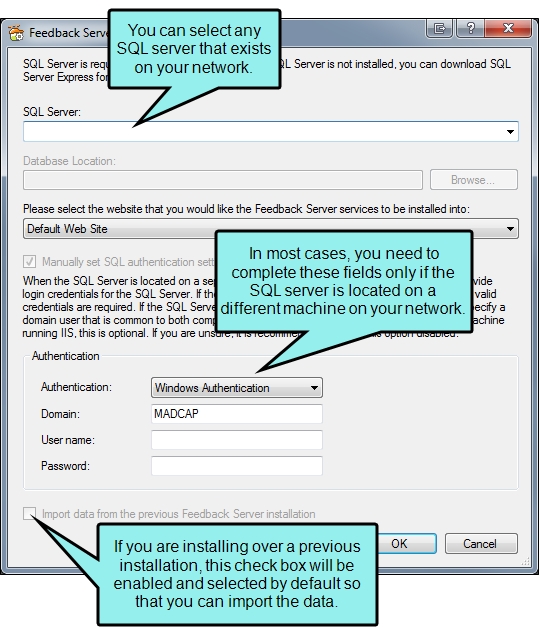
Click the down arrow in the SQL Server field and select your SQL Server. You can select any SQL Server on your network. If the SQL instance that you would like to use does not appear in the list, you can type the IP address or the name of the machine.
Note If you are connecting to an SQL Server on another machine, you must make sure that the machine running IIS and the machine running SQL Server are on the same domain. To verify this, you can right-click My Computer, then select Properties, then select the Computer Name tab.
Note If your SQL instance does not appear in the SQL Server field, you may need to turn on the SQL Server Browser or manually type in the computer name/SQL Server instance name. To turn on the SQL Server Browser, do this: (1) Open the SQL Configuration manager; (2) select SQL Server Services in the left pane; (3) right-click SQL server browser and select Properties; (4) on the Service tab, select start mode to Automatic and click OK; (5) right-click the SQL Server Browser again, and select Start.
Note If you experience connectivity issues, you can try entering the IP address for the SQL Server directly instead of selecting it from the drop-down list. When you do this, you need to replace only the computer name portion with the IP address (i.e., the part before the backslash).
(Optional) You can select a location for the database other than the default location provided. To do this, next to the Database Location field, click the Browse button. Then find and select the folder where you want the database to be stored.
Note The Database Location field is unavailable if you are using a remote SQL Server. The default data directory of the SQL Server will be used instead.
Select the IIS website where you want the
Note This is an administrative preference. Your server (IIS) might be serving several websites and you need one to store the
If the SQL Server is located on a machine different from the one where you are installing MadCap
What is meant by "common user"? When the SQL database is on the same machine as the internet Information Services (IIS) and
Note If the SQL Server is located on the same machine as the
If you complete these fields, it is recommended that you use a password that does not expire. However, if necessary, you can later change an expired password via the Control Panel. Following are steps for doing this.
- Open the Control Panel.
- Double-click Administrative Tools.
- Double-click Internet Information Services.
- In the Internet Information Services dialog, expand the Web Sites folder.
- Expand the website folder corresponding to the one specified in the Feedback Admin.
- Right-click on Service.FeedbackExplorer and select Properties.
- In the Properties dialog, select the Directory Security tab.
- Under Anonymous access and authentication control, click the Edit button.
- In the Authentication Methods dialog, change your password.
- (Optional) If you are using an earlier version of Feedback Server, the check box labeled Import data… at the bottom of the dialog is enabled and selected by default. This will import the data from your previous installation. You probably want to keep this check box selected.
Click OK.
The installation is complete and the
Note If the SQL Server is located on a different machine, this final step will (a) install two web services on the IIS machine and (b) install the Feedback Server Database on the SQL Server machine.
Note If the SQL Server and IIS are located on the same machine and you are using SQL Express, a Windows service will also be installed. The service handles the backing up of the database (configurable on the Maintenance tab of the Feedback Server Admin).
Note The machine used to host the
Steps—Microsoft Windows Server 2008
Complete these steps on the Windows machine that will host
How to Install MadCap Feedback Server Admin and Other Components
- Make sure that the latest version of Microsoft .NET Framework is installed.Make sure that both required versions of the Microsoft .NET Framework are installed (Version .3.5.1 and 4.0).
-
Make sure that a supported version of SQL Server is installed.
Note If you do not have SQL Server installed, you can download SQL Server Express for free from msdn.microsoft.com.
- Ensure that Microsoft IIS
- From the Start menu open the Server Manager dialog.
- Click Add roles.
- Click Next.
- Click the check box next to Web Server (IIS).
- In the dialog that opens click Add Required Features.
- In the Add Roles Wizard click Next.
- Click Next again.
- On the "Select Role Services" page of the wizard, expand Management Tools > IIS 6 Management Compatibility and click IIS 6 Metabase Compatibility.
- On the Confirm Installation Selections page of the wizard, click Install.
- After the installation is completed, click Finish.
- Insert the CD (for boxed version purchases) or download the Feedback Server Admin application from the link you received (for online purchases). Install the application.Install the Pulse Server Admin application from the link you received.
After installation is complete, launch the application.
Note If you did not perform one of the above steps, a dialog shows what is not yet installed (by displaying it in red text). If necessary, you can install ASP.NET from the dialog by clicking the button to the right of the red text.
Click the down arrow in the SQL Server field and select your SQL Server. You can select any SQL Server on your network. If the SQL instance that you would like to use does not appear in the list, you can type the IP address or the name of the machine.
Note If you are connecting to an SQL Server on another machine, you must make sure that the machine running IIS and the machine running SQL Server are on the same domain. To verify this, you can right-click My Computer, then select Properties, then select the Computer Name tab.
Note If your SQL instance does not appear in the SQL Server field, you may need to turn on the SQL Server Browser or manually type in the computer name/SQL Server instance name. To turn on the SQL Server Browser, do this: (1) Open the SQL Configuration manager; (2) select SQL Server Services in the left pane; (3) right-click SQL server browser and select Properties; (4) on the Service tab, select start mode to Automatic and click OK; (5) right-click the SQL Server Browser again, and select Start.
Note If you experience connectivity issues, you can try entering the IP address for the SQL Server directly instead of selecting it from the drop-down list. When you do this, you need to replace only the computer name portion with the IP address (i.e., the part before the backslash).
(Optional) You can select a location for the database other than the default location provided. To do this, next to the Database Location field, click the Browse button. Then find and select the folder where you want the database to be stored.
Note The Database Location field is unavailable if you are using a remote SQL Server. The default data directory of the SQL Server will be used instead.
Select the IIS website where you want the
Note This is an administrative preference. Your server (IIS) might be serving several websites and you need one to store the
If the SQL Server is located on a machine different from the one where you are installing MadCap
What is meant by "common user"? When the SQL database is on the same machine as the Internet Information Services (IIS) and
Note If the SQL Server is located on the same machine as the
If you complete these fields, it is recommended that you use a password that does not expire. However, if necessary, you can later change an expired password via the Control Panel. Following are steps for doing this.
- Open the Control Panel in an icon view, rather than Category view.
- Select Administrative Tools.
- Open the Internet Information Services (IIS) Manager.
- Expand the node with the computer name.
- Expand the Sites folder.
- Expand the website folder corresponding to the one specified in the Feedback Admin.
- Click Service.FeedbackExplorer.
- To the right, double-click Authentication.
- Right-click Anonymous Authentication and select Edit.
- In the Edit Anonymous Authentication Credentials dialog, click Set.
- In the Set Credentials dialog, change your password.
- (Optional) If you are using an earlier version of Feedback Server, the check box labeled Import data… at the bottom of the dialog is enabled and selected by default. This will import the data from your previous installation. You probably want to keep this check box selected.
Click OK.
The installation is complete and the
Note If the SQL Server is located on a different machine, this final step will (a) install two web services on the IIS machine and (b) install the Feedback Server Database on the SQL Server machine.
Note If the SQL Server and IIS are located on the same machine and you are using SQL Express, a Windows service will also be installed. The service handles the backing up of the database (configurable on the Maintenance tab of the Feedback Server Admin).
Note The machine used to host the
What’s Next?
After you install MadCap Feedback Server Admin and the other necessary services, you can open the admin at any time to configure and maintain the various settings. This includes the ability to test your settings, set up an SMTP server for various email notifications, specify redirection web pages for end users who register, and schedule automatic backups of the database and transaction log. See Configuring MadCap Feedback Server Admin.