
Use this merging method if you are developing Microsoft HTML Help (a CHM file) and you want to merge your output with another CHM file. This method is useful, for example, if another author is working on the external Microsoft HTML Help project to which you are linking and you only have access to the other CHM file (not the project files).
You can merge your output with another CHM file that you have already brought into your project (perhaps via the external resources feature
How to Merge Output From HTML Help Projects
-
Open the TOC in the Flare project that will serve as the parent project.
Note You can also merge projects by linking them from a browse sequence, as well as from a TOC. If you want to do this, simply follow these same steps after opening your browse sequence.
- Do one of the following:
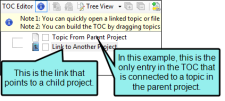
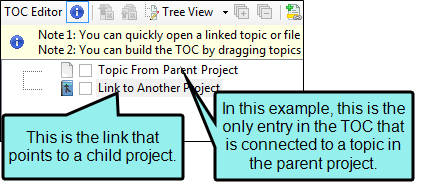
In the TOC Editor, select the TOC entry or book where you want to link the output from the child
OR
- If the CHM file already exists somewhere in your project, you can open the Content Explorer and drag the CHM file to the location in the parent TOC where you want to place it. If you use this method, the link will not point to any particular topic in the CHM file. Also, if you use this method, you do not need to complete the rest of the steps below.
- In the local toolbar of the TOC Editor, click
 . The Properties dialog opens.
 - On the General tab, click Select HTML Help. The Link to HTML Help dialog opens.
- Do one of the following:
If the child CHM file is already in your project Select Project Files and then use the area below to navigate to the file that you want to link to and select it. By using the buttons in the local toolbar, you can view all files in a list, view files in their folder structure, and use other options.
Option
Description

Shows or hides the folders that the files are stored in.

Shows or hides the files. If you click this button when the Show Folders button
 is selected, the area splits into two. The folder is shown on the left side, and the files and subfolders within it are shown on the right.
If the child CHM file is not yet in your project Select Import Existing. In the dialog that opens, find and double-click the child CHM file. Then from the drop-down—which displays "(root folder)" by default, you can select a specific content folder in your project to place the child CHM file.
-
(Optional) If you want to point to a specific topic in the child CHM file, in the Topic field click
 . In the dialog that opens, find and double-click the topic that you want to link to.
If you use this option, only the specified topic will be included in the TOC, as opposed to the entire TOC of the child CHM. However, even though just one topic will be included in the merged TOC, the other topics in it will still be included in the output and you can get to them through other means (e.g., clicking hyperlinks).
- Click OK in the Link to HTML Help dialog.
- If you imported a child CHM file, the Copy to Project dialog opens. You can select Keep file synchronized (create mapping). This creates a link (map) between the original file and the copy being added to your project
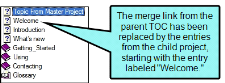
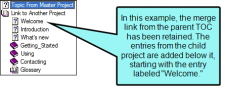
- (Optional) If you want the merged TOC to replace the entry that you selected, do the following.
- Select the Advanced tab.
- Click the check box labeled When merging, replace node with merged TOC.
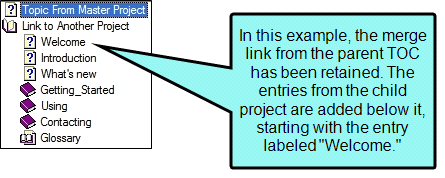
For example, you might have a TOC in your parent project that looks like this:
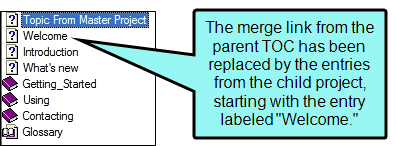
If you select the option in this step to replace the node, the merged TOC would look like this in the output:
And if you do not select this option, your merged TOC would look like this:
- In the Properties dialog, click OK.
Note There are occasions when projects cannot be merged because the file name is the same in two or more of the linked projects (e.g., multiple WebHelp projects all named "MyWebProject.mcwebhelp" or multiple Microsoft HTML Help projects all named "MyHtmlHelp.chm"). The way to solve this dilemma is to make sure each linked project has a different output file name. To do this: (1) open the target, (2) select the General tab in the Target Editor, and (3) enter a unique name in the Output File field.
Note If you are working with HTML Help and import a RoboHelp project that has been merged with other CHM files, the linked CHM files are placed in a special subfolder in the Content Explorer (Resources > CHMSupport).
Note You can also link to CHM files from the TOC in all web-based outputs (HTML5, WebHelp, WebHelp Plus). However, linking to a specific topic within the CHM is not supported in these outputs. See Linking to CHM Files.
Note If you want to create links from content in one project to content in another project, see Inserting Links to External Files—HTML, PDF, Microsoft Office.
Note You can merge HTML Help so that the navigation (table of contents, index, search) for each CHM file is displayed, regardless of which CHM file you open (parent or child). This can be done in a couple of ways, depending on whether you have access to all of the Flare projects or to the CHM files only. See Displaying Merged Navigation in HTML Help Child Outputs.
