Following are examples of how to create multilingual targets in two ways—by linking to Flare projects and by linking to Lingo projects.
[Menu Proxy — Headings — Online — Depth3 ]
Linking to Flare Projects
In the example below, a Flare target points to other Flare projects that have been translated. This example illustrates the process of adding a button (via a skin) so users can switch between languages in online output. It also shows how PDF output is generated from a multilingual project.
Example You want to create HTML5 and PDF outputs in US English, Spanish, and Japanese. You have already worked with a translator to translate your documents, so you have three different Flare projects: one for each language.
Before you can create your multilingual output in Flare, you make sure each Flare project has both an HTML5 and a PDF target available. This allows your parent project to build from the targets in the other two linked projects. You open the Project Organizer in each project, and then open the Targets folder. If you already have the targets you need, you do not need to create any new ones. If you do not have both targets in all three projects, you can create the missing targets from the Add File dialog.

Because you want to build multilingual HTML5 output where users can manually switch between languages, you need to make sure that each of your projects has the Select Language button in its HTML5 toolbar.
So you open the Project Organizer. In the Skins folder, you open the Topic Toolbar skin component. On the Setup tab, you select the Select Language button, click  to add it to your skin, and then save your work.
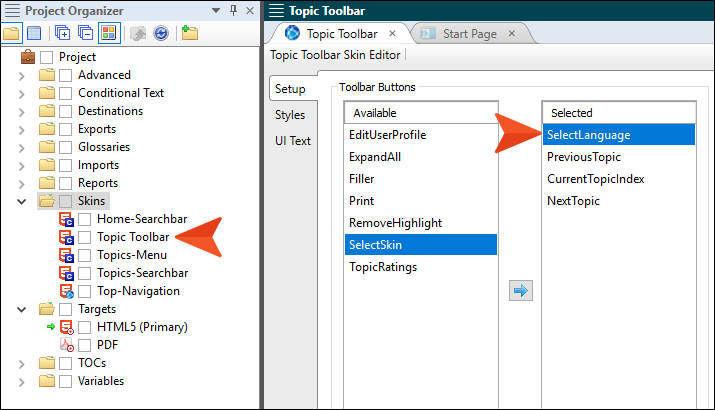
Next, you insert a Topic Toolbar proxy in the template page(s), and when doing so, you choose the Topic Toolbar skin component that you created.
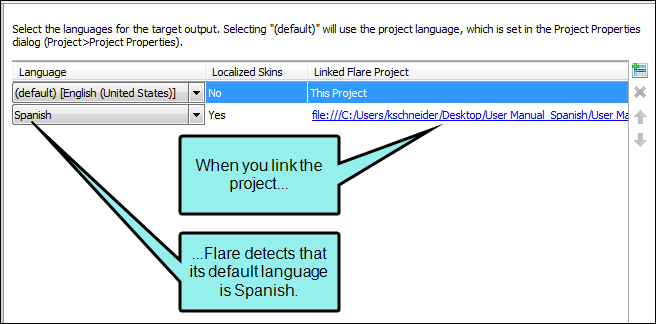
Now you can prepare your multilingual target. In the parent project (in this case, the US English project), you expand the Targets folder and open the HTML5 target. In the Target Editor, you select the Language tab. This is where you will link your other two projects. On the right side of the tab, you click  to add a new row.
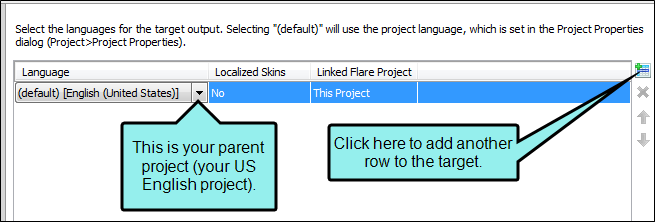
Then you click the link (ellipsis) in the Linked Flare Project column.
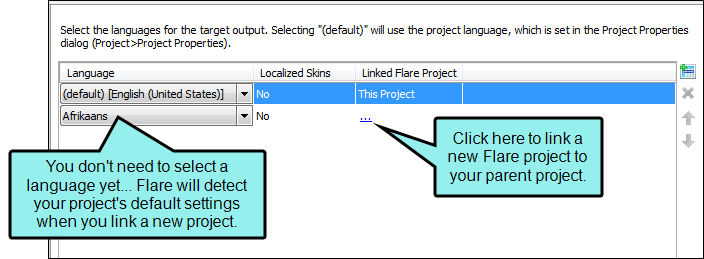
In the dialog that opens, you navigate to the Spanish project and click Open. This links the Spanish project to the US English project. The Language drop-down automatically updates when Flare detects the default Spanish language settings in your linked project.
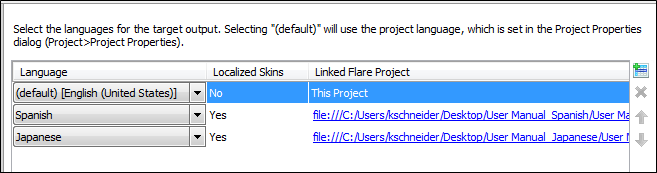
Then you link to the Japanese project in the same way.
You want the Japanese project to display second in the Help system (after US English), so you select the Japanese project and click  to rearrange the projects.

Now the Japanese project is listed before the Spanish project.
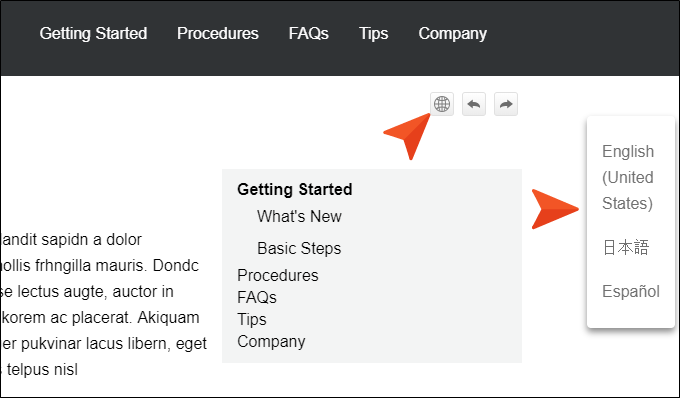
You are ready to build, so you save your work and build the target. When you open the HTML5 output, it defaults to the US English Help because that is your browser’s default setting.
But remember the Select Language button you added to your Topic Toolbar skin component? You can use that button to change the language setting using a drop-down menu.
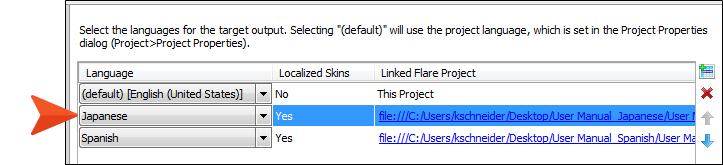
Next you open the PDF target in the Target Editor and adjust it in the same way you did the HTML5 output. Since you want the Japanese output to display immediately after the US English output, you add that project first, then you add the Spanish project.
You save the PDF target and build it. When you look in the Output folder, you only see one document. This is because Flare stitched all three documents together into a single PDF.
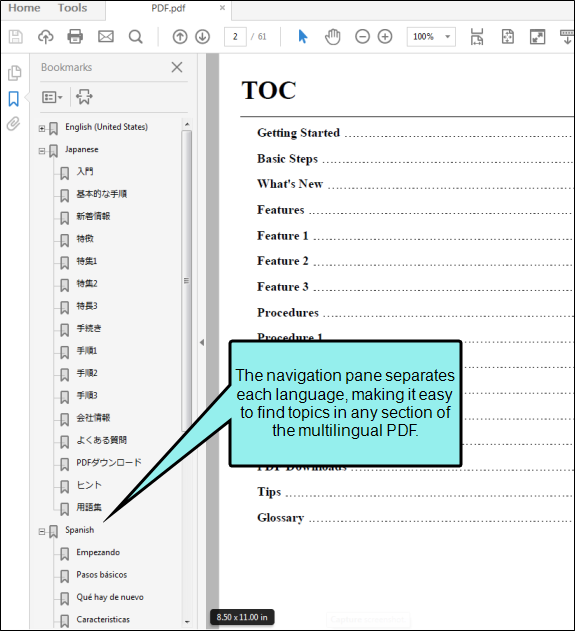
When you open the PDF, you see all three languages in the document’s table of contents. Each language has its own title page so you can find it quickly.
Linking to Lingo Projects
In the following example, a Flare target points directly to Lingo projects. This is a more direct approach because it doesn't require the creation of additional Flare projects.
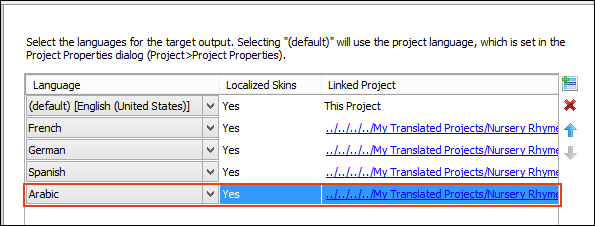
Example You want your US English Flare project to be translated into Arabic, French, German, and Spanish. You have one translator who knows French, German, and Spanish, and you have a second translator who knows Arabic.
Because the first translator knows three languages, there is no reason to have multiple Lingo projects for each language. Instead, the translator adds all three languages to a single Lingo project and translates the files.
Meanwhile, the second translator creates a Lingo project and uses it to translate the Flare project into Arabic.
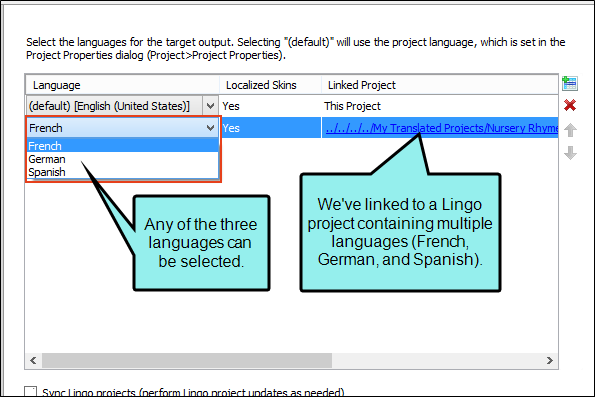
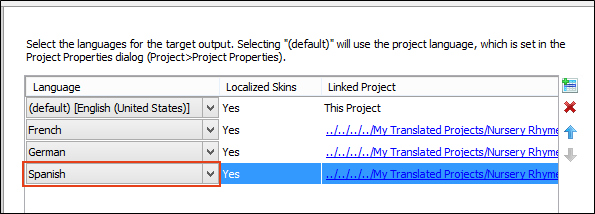
Both translators keep their Lingo projects on a server where you have access them. When the translation work is finished, you open the target in Flare, and on the Language tab, add a row for each language.
In the first row, you link to the Lingo project that was used for the French, German, and Spanish translations. After you add the first row, you notice that you can select any of the three languages.
For the first row, you select French, and then add a second row. This time, you can only select German or Spanish (because French has already been used).
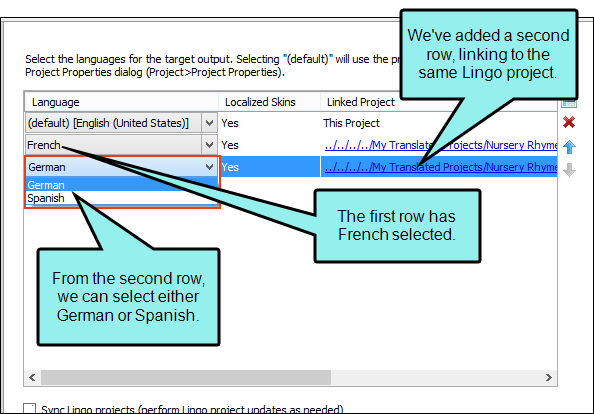
For the second row, you choose German, and then you add a third row. Spanish is automatically chosen for that row, because it is the only one left.
Finally, you create a fourth row and link it to the Lingo project used for the Arabic translation.