A passthrough marker is a special marker that you can insert into your FrameMaker source content when you have information or code that you plan to import to Flare and want left alone (or "passed through," leaving it exactly as you have authored it, rather than processing it). A passthrough marker can be just about anything, as long as supports it in the XHTML code.
You can specify how the marker content should be treated when the FrameMaker document is imported. The first option is that you can import the marker content as regular text (which is the default setting). The second option is that you can import the marker content as an XML fragment (e.g., the first part of a bold tag—<b>—but not the second part). The third option is that you can import the marker content as a complete XML tag.
You might use a passthrough marker for various reasons, such as for importing a marker as XHTML
Example You plan to import some FrameMaker documents to Flare and you have locations in those documents where you want to link to CHM files. The problem is that FrameMaker does not allow you to create links to CHM files in such a way that those links can then be imported into another software application.
Therefore, you create a passthrough marker in the FrameMaker document, providing the beginning "href" tag and path to the CHM file. Like this:
Then you create a second passthrough marker, providing the end tag for the link. Like this:

When you import the FrameMaker document(s), you can specify that the passthrough markers should be imported as XML fragments. In Flare, the link to the CHM file will look and work as it should.
How to Create a Passthrough Marker
Following are steps for creating these markers inAdobe FrameMaker. For more information, please refer to the documentation provided with Adobe FrameMaker.
The following steps may vary in different versions of FrameMaker.
- Open the FrameMaker document.
- In FrameMaker, create the passthrough marker type that is required for this feature. This is a one-time step in the document. Afterward, you can simply select the newly created marker type when applying it to content. To create the passthrough marker type, do the following.
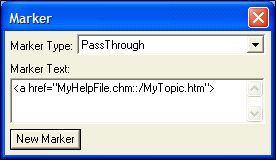
- In FrameMaker, select Special > Marker. The Marker dialog opens.
- From the Marker Type field, click the down arrow and select Edit. The Edit Custom Marker Type dialog opens.
- In the field, replace the existing text and type PassThrough.
- Click Add.
- Click Done.
- In the FrameMaker document, place your cursor at the location where you want to insert a passthrough marker.
- If it is not already displayed, open the Marker dialog (Special > Marker).
- If the passthrough marker type is not already displayed in the dialog, click the Marker Type down arrow and select PassThrough.
- In the Marker Text field, enter the text and/or code that you want to be included in the marker.
- Click New Marker.
- Save the FrameMaker document.
-
In Flare, go through the process for importing the FrameMaker document. When you arrive at the "Options" page in the Import FrameMaker Wizard or the "Options" tab in the Frame Import Editor, make sure Enable 'Passthrough' Markers is selected. Then from the Passthrough Marker Format field, select one of the options:
- text The marker content will be imported as regular text (default setting).
- fragment The marker content is imported as an XML fragment (e.g., the first part of a bold tag—<b>—but not the second part). If you select this option, you will probably need a second marker in the FrameMaker document to complete the XML tag.
- xml The marker content is imported as a complete XML tag.
Note Flare supports FrameMaker 7.0 and newer versions.

