If you have words and phrases in topics and snippets that are to be included in a glossary, you can turn them into links. A glossary term link lets users access definitions from that location in the output. Glossary term links can display definitions in popups, hyperlinks, or expanding text.
[Menu Proxy — Headings — Online — Depth3 ]
Default Behavior of Glossary Term Links
The default behavior for glossary term links in the output depends on whether (A) you have added a glossary definition as simple text or (B) you have pointed to a separate topic in the glossary file.
- If You Have Added a Definition as Simple Text In online output, the default behavior is that the definition displays as a popup when users hover over the glossary term link. In print-based output, the default behavior is that the definition is converted to a footnote.
- If You Have Pointed to a Separate Topic as the Definition In HTML5 Top Navigation output, the topic definition will open in the same window as the output from which it was launched. In HTML5 Tripane, skinless, and other online output, the topic definition opens in a popup window (like a topic popup). Print-based output does not support glossary term links where a separate topic is used as the definition.
How to Insert Glossary Term Links
- Open the content file.
-
Highlight the word or phrase that you want to add as a glossary term link. Then do one of the following depending on what part of the user interface you are using. (The text does not need to match an existing glossary term.)
- Ribbon Select Insert > Glossary Term Link.
- Keyboard Shortcut Press CTRL+SHIFT+T.
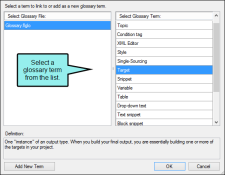
The Create Glossary Link dialog opens.
- In the Select Glossary File section on the left, select the glossary file (if you have more than one).
-
In the Select Glossary Term section on the right, select the glossary term. The definition text is shown at the bottom of the dialog.
-
(Optional) If you do not see a term that you want to link to, you can add one by doing the following:
- Click Add New Term. The Create Glossary Term dialog opens.
- Enter a new term and definition, which will be added to the glossary when you are finished.
- (Optional) You can also use the Insert Variable button
 , if you want to add a variable to the definition.
 -
(Optional) If you want to sort a glossary entry using a different term, in the Sort As field, enter the term you want to use for sorting. "Sort As" terms appear in the Sort As column of the glossary. See Sorting Glossaries.
Tip Use a "Sort As" term if you want to sort a glossary term as something else. This can be useful when a term begins with a symbol (e.g., place <html> in the "h" section, instead of at the top of the glossary), or if you are using character sets that need to be sorted phonetically.
- Click OK.
-
Click OK. The word or phrase is now shown as a linked glossary term with an icon
 beside it.
Note You can adjust the capitalization of the term in the topic or snippet if you like. It does not matter if the term is uppercase in the glossary but lowercase in the topic or snippet.
- Click
 to save your work.
What’s Noteworthy?
Note You can also configure a target to convert existing glossary terms to links automatically. For more information see Associating Glossaries With Targets.
Note If a glossary term link is pointing to a term that has been removed from the glossary file, the book icon in the content file will be red ![]() .
.
Note Another alternative for creating glossary term links is to use the Glossary Terms window pane (View > Glossary Terms). This window pane shows all of the glossary terms and definitions that you have added to the project.
You can double-click the terms in this window pane to insert them as links in the open topic or snippet. Make sure you double-click under the Term column. If you double-click anywhere else in the row (under the Definition or File column), the Glossary Editor opens instead.
What’s Next?
You can use styles to change the look of glossary term links. See Editing the Style of Glossary Term Links.


