You can insert images into
How to Insert a Screen Capture
- Open the content file.
- In the XML Editor, place your cursor where you want to insert the image.
- Select Insert > Screen Capture. The Screen Capture dialog opens.
- Complete the appropriate setup fields in the dialog.
- File name Enter a name for the image that you are capturing, or you can use the default name provided.
- Folder Select the folder where you want the captured image to be stored.
- Profile or Format Select the profile or file format that you would like to use when capturing the image. A profile (created in MadCap Capture) lets you capture the image with many additional settings applied to the image in advance.
- Launch MadCap Capture Editor Select this check box if you want MadCap Capture to be launched when you capture an image. The image will be displayed in MadCap Capture. This is a useful option if you want to edit the image (e.g., add callouts, lines, borders) after you capture it. When you edit and save the image in Capture, the changes will automatically be reflected in Flare.
- Select the capture option that you want to use, and complete the steps for each one as necessary.
- Capture UI element Captures a fixed area of a window (e.g., menu bar, toolbar, editor, individual button, entire window), depending on where you move your mouse and click. As you move the mouse in an application, a red border surrounds each separate region.
- Capture application Captures an open application. When you click this button, the Select window opens, displaying a list of all open applications. You can select the application that you want to capture.
Capture region Captures a rectangular region of your computer screen. When you click this button, a rectangle with a red border displays over your screen. You can move and resize this rectangle in several ways.
Drag Edge
You can resize the capture area manually by clicking any of the handles (small squares) around the edge of the rectangle and dragging them to resize the width and/or height.
Move Entire Capture Area
You can move the entire capture area by clicking the size-all icon in the center of the area
 and dragging the area to a new location on your screen.
Type Width or Height
You can click in the number fields in the task bar to manually change the width and/or height of the capture window in pixels.
Select Capture Size
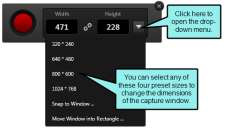
You can click the drop-down arrow and select a preset size for the capture window.
Select an Application
You can click the down arrow and select Snap to Window to choose an application to capture. This option will capture the application at its current size.
Note Capture will ignore applications that have been minimized. If you want these applications to appear as selections in the Select Window dialog, ensure they are open and have not been minimized.
Select Move Window Into Rectangle
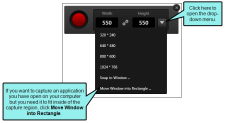
You can click the down arrow and select Move Window into Rectangle to choose an application to capture. This option will minimize the application window to fit into the capture area you drew.
Note Capture will ignore applications that have been minimized. If you want these applications to appear as selections in the Select Window dialog, ensure they are open and have not been minimized.
To capture the region, click the red capture button on the task bar.
- Click
 to save your work.
Note You can also insert an image file that already exists it into a topic. See Inserting Images.
Note When you insert a screen capture into a topic, the image file is added to your project. The image file is stored in the Resources\Images folder of the Content Explorer. If the screen capture image has a .props file (used for storing layer information for the image), that file is included in the project as well, although it is hidden.
Note For more information about screen captures and editing images, see Capture's online Help.


