After adding a relationship table file, you can create the actual content for it, adding relationships between the topic links in a row.
[Menu Proxy — Headings — Online — Depth3 ]
How to Create a Relationship Table
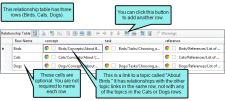
- Open the relationship table that you want to work on. The Relationship Table Editor opens to the right. If you do not yet have a relationship table, see Adding Relationship Table Files.
- Use the editor to perform any of the following tasks. Keep the following in mind as you work:
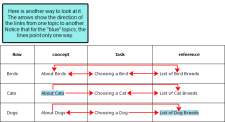
- Relationships are expressed within individual rows only. Relationships do not exist between rows in a table.
- Not every cell in a row needs to have a topic link.
- Multiple topic links can be added to a single cell.
- You can add the same topic link in many different rows.
- Highlight a row.
- In the local toolbar click
 .
. - In the Row Type field, enter a name.
- Click OK.
- Highlight any cell in the column you want to rename.
- In the local toolbar click
 to run the Column Properties dialog.
 - In the Column Type field, enter a name.
- Click OK.
- Click a cell where you want to insert a topic reference.
- In the local toolbar click
 .
. - In the Open dialog, locate and double-click the topic. The topic file name is added to that cell. The square next to the file name is used to show any condition tags applied to the link.
- Links on Items Each topic item in a relationship table can use a different kind of link.
- Links on Cells If you apply a link type to a cell, all of the topic items in that cell will use that same setting (unless you later override the setting on individual items).
- Links on Columns If you apply a link type to a column, all of the topic items in all cells will use that same setting (unless you later override the setting on individual items or cells).
- Do one of the following:
For Columns Click in a column. In the local toolbar click
 .
.OR
For Cells Click in a cell. In the local toolbar click
 .
.OR
- For Topic Link Items Click a topic link item in a cell. In the local toolbar click
 .
.
- Click in the Linking field and select one of the following.
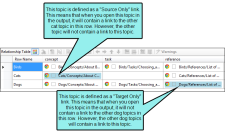
- Source Only This is a link where the topic in question will have a link to other topics, but other topics will not have a link back to it.
- Target Only This is a link where the topic in question will not have a link to other topics, but other topics will have a link back to it.
- Normal (default) This is a two-way link. In other words, a link will be displayed in each topic involved, and that link will open the other topic.
- None This option indicates that the topic reference does not have a link.
- Use CONREF Target This uses the conref attribute to pull content. The conref attribute references an ID on content that can be reused. For Flare outputs other than DITA, this option is not supported. For more detailed information about DITA and the conref attribute, please refer to www.oasis-open.org/committees/dita/.
Unless you leave the default link setting, relationship links are identified by a blue background when you set them. To identify the exact kind of relationship link applied to an item, you can select the item and then click the appropriate Properties button in the local toolbar.
- Click OK.
- In a cell containing multiple items (topic references), hold your CTRL key and click the items that you want to group.
-
In the local toolbar click
 . The word "Group" is added to the cell.
 - Do one of the following:
- For Columns Click in a column. In the local toolbar click
 .
. - For Topic Link Items Click a topic link item in a cell. In the local toolbar click
 .
.
- For Columns Click in a column. In the local toolbar click
- Click in the Collection Type field and select one of the following:
- Unordered (default) This displays the grouped links in the output, but the order in which they are displayed is not important.
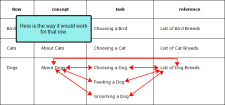
Family This lets you display links not only to adjacent topics in the row, but to other topics grouped within the same cell as well.
Example You have a row that is populated like this:
Topic A is in the "concept" cell.
Topics, B, C, and D are contained in a group in the "task" cell.
Topic E is in the "reference" cell.
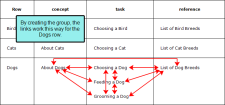
Suppose you DO NOT use the Family collection type. In that case, when a user opens Topic A, he will see links to Topics B, C, D, and E. However, when the user opens Topic C, he will see links to Topic A and Topic E, but not to Topics B and D.
Now suppose you DO use the Family collection type. In that case, when a user opens Topic C, he will see links not only to Topics A and E, but to Topics B and D as well.
- Sequence This displays links with significance given to how the links are ordered in the output. For Flare outputs other than DITA, this option is not supported.
- Choice This lets you specify which link should be "selected" or "highlighted" from the group of links. For Flare outputs other than DITA, this option is not supported.
- Use CONREF Target This uses the conref attribute to pull content. The conref attribute references an ID on content that can be reused. For Flare outputs other than DITA, this option is not supported.
Note For more detailed information about DITA and these options, please refer to www.oasis-open.org/committees/dita/.
- Click OK.
- Click on a topic link in a cell that you want to move.
- In the local toolbar, click
 to move it to the left, or click
  to move it to the right.
 - Click the topic item that you want to move.
- In the local toolbar click
 to move the item up or
  to move the item down.
 - Click in the row you want to delete.
- In the local toolbar click
 .
. - Click in the column you want to delete.
- In the local toolbar click
 .
. - Click
 to save your work.
To Give a Row a Name
This simply helps you distinguish one row from another.
To Insert a Row
To Rename a Column
To Insert a Column
In addition to the Row Name, a relationship table has three additional columns, each named after three basic topic types—Concept, Task, and Reference. You can add more columns if you want.
To Add a Topic Item to a Cell
To Select the Link Type for a Topic Item, Cell, or Column
When you insert topic items into a row in a relationship table, those topics will link to the other topics in the row in some way. If you do not want to use the default type of link, you can select another kind. You can do this for individual topic items, entire cells, or entire columns.
Following are the steps for selecting link types.
To Group Selected Items
You can group topics in the same cell so that they function as a unit or are related to one another. When you group items together, you can choose a collection type to specify how the items within the group behave.
To Select the Collection Type for a Column or Topic Link Item
When you put items into a group, you can specify how that group will function as a collection (e.g., in the images above the group is using the "Family" collection type, which means that those topic items will reference each other in the output). You can do this for entire columns or for individual topic items in a cell that have been grouped. If you set a particular collection type on a column, all groups in that column will use that collection type.
To Nest Items
After you add items to a cell, you can nest them by using the left and right arrows. If an item is above and to the left of other items, it becomes the parent; the child items are below and to the right of the parent. When this occurs, the child items inherit the settings from the parent item (e.g., link type).
To Move Items Up or Down
If you have multiple topic items in a cell, they are displayed in the output in the order they are shown. You can use the up and down buttons to change the order.
To Delete a Row
To Delete a Column
To Show or Hide Conditional Indicators
In a relationship table, condition tags are shown in the small squares next to topic file names. This feature can be used to show or hide those squares.
Note If there are any broken links in a relationship table, they will be identified by this icon: ![]() . You can then open the properties for that item and fix the link.
. You can then open the properties for that item and fix the link.
Note The three relationship link style classes in your stylesheet are designed to work in sync with the column headings in the Relationship Table Editor. Therefore, if you rename a column or create a custom column, make sure that you create a corresponding style class in the stylesheet to control that column
What's Next?
After creating a relationship table, you can insert a Relationships proxy in the locations where you want links to appear in the output. See Inserting Relationship Links.


 .
.
 .
.


 .
.
