After you create or add a new snippet to your project, you can insert it into any of your topics. Later, if you decide that a different snippet is a better fit for the topic, you can select a new snippet to replace it. When you replace a snippet, it only affects the instance that you selected.
How to Replace a Snippet
- Right-click on the snippet where it is inserted and select Select New Snippet. The Insert Snippet Link dialog opens.
-
Navigate to the snippet that you want to insert and select it. By using the buttons in the local toolbar, you can view all snippet files in a list, view files in their folder structure, and use other options. If you want to add one of your 20 most recently used snippets to the project, you can select a snippet from the Recently Used Snippets group. If you want to add one of your pinned—or favorite—snippets to the project, you can select a snippet from the Pinned Snippets group. You also can click
 to find and select a snippet file outside of the project.
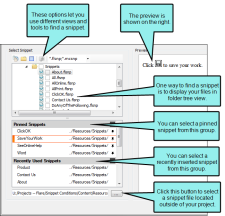
Option
Description

Shows all of the files

Shows or hides the folders that the files are stored in.

Shows or hides the files. If you click this button when the Show Folders button
 is selected, the area splits into two. The folder is shown on the left side, and the files and subfolders within it are shown on the right.
If the Show Files button
 is the only one selected, you can click this button to move up one folder level.
Lets you filter the kinds of files shown below. Depending on the task you are performing, this field may already be populated with the most appropriate file type(s).
Note If you select a snippet file outside the project, that file is then copied and placed inside the project. The image file is stored in the Resources\Snippets folder of the Content Explorer.
- Click OK. The original snippet is replaced by the new snippet.
- Click
") to save your work.
to save your work.


