


After you insert a text box, you can adjust the way that the text within it is hyphenated. This can be done through styles or by using local formatting. Using styles is usually recommended because the setting is automatically applied to any content using that style
[Menu Proxy — Headings — Online — Depth3 ]
How to Use a Style to Set Hyphenation in a Text Box
- From the Content Explorer, open the stylesheet that you want to modify.
-
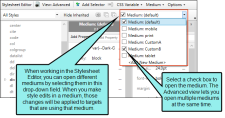
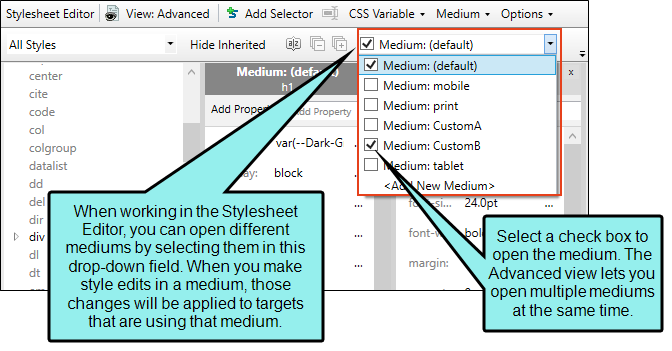
From the Medium drop-down in the Stylesheet Editor, make sure the proper medium is selected before you begin. In the Advanced view, you can open multiple mediums at once; you just need to look at the title at the top of the medium pane and make sure you are working in the correct one. If you are not using stylesheet mediums for your different outputs or if you want all mediums to have the same settings, just leave the medium set to default and continue.
Mediums can be used if you want to use one group of settings for online output types and another group of settings for print-based output types. For example, you might use the default medium for your online outputs and the print medium for your print outputs.
Please note that Flare remembers the last medium that you used when working in the stylesheet, so it may or may not be the one that you want to use the next time around.
- In the local toolbar, make sure the first button displays
 (which means that the Simplified view is currently shown in the editor). If the button displays
  instead, then click it.
 - In the upper-left corner of the Stylesheet Editor, click in the drop-down field and select
 .
. - Select the appropriate div style. If you use the default style when inserting the text boxes, then select div. Otherwise, if you have used a class of that style that you created previously, then select it instead.
- In the local toolbar of the editor, click
 . The Properties dialog opens.
 - Select the Hyphenation tab.
- Complete the options as necessary.
- Enable Hyphenation Select whether you always or never want words to be hyphenated at the end of lines.
- Length of shortest word… Enter the minimum number of characters that a word must have in order to be hyphenated.
- The minimum number of characters remaining… Enter the minimum number of characters that must remain on the initial line when a word is hyphenated. For example, if you enter 4 in this field, a word that normally could be hyphenated after two characters would not be broken at that point. Instead, it would not be broken until at least four letters make an appearance on the first line.
- The minimum number of characters carried over… Enter the minimum number of characters that must be carried over to the second line when a word is hyphenated. For example, if you enter 3 in this field, a hyphenated word must have at least three characters on the second line after it has been broken.
- The maximum number of adjacent lines… Enter the maximum number of lines next to each other that are allowed to end with a hyphenated word. For example, if you do not mind seeing three consecutive lines ending in a hyphenated word, but you want to avoid seeing a fourth adjacent line with a hyphenated word, you can enter 3 in this field.
- In the Properties dialog, click OK.
- Click
") to save your work.
to save your work.
How to Use Local Formatting to Set Hyphenation in a Text Box
-
- Right-click inside the text box and from the menu, select Text Box. The Text Box Properties dialog opens.
- Select the Hyphenation tab.
- Complete the options as necessary.
- Enable Hyphenation Select whether you always or never want words to be hyphenated at the end of lines.
- Length of shortest word… Enter the minimum number of characters that a word must have in order to be hyphenated.
- The minimum number of characters remaining… Enter the minimum number of characters that must remain on the initial line when a word is hyphenated. For example, if you enter 4 in this field, a word that normally could be hyphenated after two characters would not be broken at that point. Instead, it would not be broken until at least four letters make an appearance on the first line.
- The minimum number of characters carried over… Enter the minimum number of characters that must be carried over to the second line when a word is hyphenated. For example, if you enter 3 in this field, a hyphenated word must have at least three characters on the second line after it has been broken.
- The maximum number of adjacent lines… Enter the maximum number of lines next to each other that are allowed to end with a hyphenated word. For example, if you do not mind seeing three consecutive lines ending in a hyphenated word, but you want to avoid seeing a fourth adjacent line with a hyphenated word, you can enter 3 in this field.
- Click OK.
- Click to save your work.


