


You can create date and time variables based on Microsoft's "Custom Date and Time Format Strings." You can add date/time variables in a topic or a template page. See Inserting Custom Date/Time Variables Into Template Pages.
[Menu Proxy — Headings — Online — Depth3 ]
How to Create Custom Date/Time Variables
- In the Project Organizer, expand the Variables folder and double-click a variable set. The Variable Set Editor opens.
-
In the local toolbar click
 . A new row is added for the Date/Time variable.
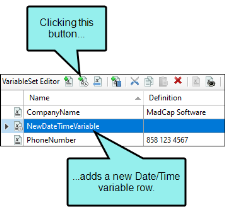
- To enter a new name or comment, do one of the following:
Double-click in the appropriate cell and type the name or comment.
OR
Click once in the appropriate cell and press F2 on your keyboard. Then type the name or comment.
Note When naming or editing a variable, you must enter a unique name.
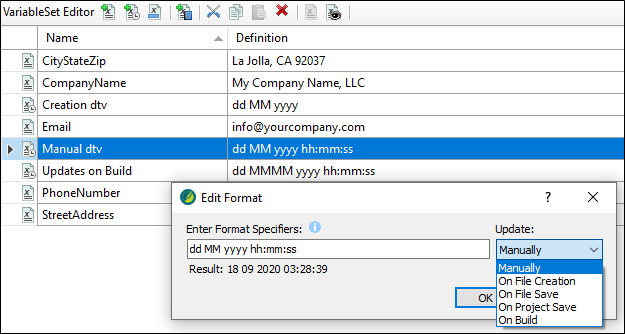
- Click in the Definition cell. The Edit Format dialog opens.
-
In the field, enter a combination of format specifiers. As you do this, the current date and time are displayed below the field in that format.
Specifiers are based on Microsoft's custom date and time format strings. For details of the specifiers available, see:
Copyhttp://msdn.microsoft.com/en-us/library/8kb3ddd4.aspxHere are some of the more common specifier combinations:
Specifier Combination
Result
MMMM dd, yyyy hh:mm:ss tt
July 09, 2013 03:55:53 PM
hh:mm:ss tt dd MMMM, yyyy
03:55:53 PM 09 July, 2013
dddd MMMM dd, yyyy
Tuesday July 09, 2013
ddd MM/dd/yy
Tue 07/09/13
Note You can make a word part of the definition. For example, you might want the word Date with a colon and a space before a date string (e.g., Date: October 25, 2014). The issue is that certain characters are translated automatically as specifiers. So just typing the word Date wouldn't work. The easiest solution is to put the non-specifier characters within quotation marks. Therefore, you might enter "Date:" MMMM dd, yyyy.
-
In the Update field, select how you want the variable to display the date and time. You can choose any of the following:
- Manually The variable displays the date and time when the variable was created. You can update the variable manually, and it will display the date and time when it was most recently updated.
- On File Creation The variable displays the date and time that you created the file.
- On File Save The variable displays the date and time that you last saved the file.
- On Project Save The variable displays the date and time that you last saved all the files in the project.
- On Build The variable displays the date and time of the most recent project build. This is the default date/time variable type.

- Manually The variable displays the date and time when the variable was created. You can update the variable manually, and it will display the date and time when it was most recently updated.
-
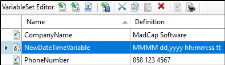
Click OK. It might look something like this:
- Click
") to save your work.
to save your work.


Note System variables use the language set in a tag, in the target, or at the project level. For example, you might have an English operating system, but in a Flare target you have French set as the language. If you insert a date/time variable, the day and month will display in French when you generate that target. Flare will also adjust the format of the variable if necessary (e.g., date first vs. month first).
Note Like standard variables, you can override custom date/time variables in a target.
Note If you want to edit a date/time variable, click on the Definition cell in the Variable Set Editor and make changes in the Edit Format dialog. You can also add multiple alternate definitions to a variable, using them as a way to override variables on a target.
Note You can add custom date/time variables to your template pages to show when each topic in your output was created. These variables will update as if they are part of the topic, so you do not need to add a variable to each individual topic in your output. See Inserting Custom Date/Time Variables Into Template Pages.
What’s Next?
After you create a variable, you can insert it into any topic in your project. See Inserting Variables.


