In addition to any type of regular content (e.g., text, images) and page numbers, you can insert Heading variables or Running Head variables into template pages.
How to Insert a Heading Variable Into a Template Page
- From the Content Explorer, open the template page.
-
Place your cursor inside a particular page header or page footer proxy.
-
Do one of the following, depending on the part of the user interface you are using:
-
Ribbon Select Insert > Variable.
- Local Toolbar Click
 .
. - Keyboard Shortcut On your keyboard press CTRL+SHIFT+V.
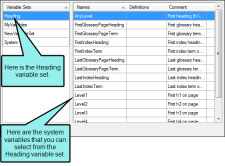
The Variables dialog opens, with the variable set(s) on the left and the variables associated with the selected set on the right.
-
- Select the Heading variable set.
-
Select the variable you want to add:
- AnyLevel Automatically displays the text in the first heading on a page that uses any of the h1 through h6 styles.
-
Level1 Automatically displays the first text on a page that uses the mc-heading-level style property set at 1. By default, the h1 style has the mc-heading-level set to 1 (that's why it's called a first-level heading), but you can change it, and you can set the mc-heading-level to 1 for other styles if you want.
Example You are using the keep the mc-heading-level set to 1 for the h1 style. Furthermore, you use the h1 style only for your chapter titles at the beginning of each chapter. If you insert the Heading.Level1 variable into the heading frames in the page layout that you are using for chapters, the appropriate chapter title will display automatically at the top of each chapter in the output.
- Level2 Automatically displays the first text on a page that uses the mc-heading-level style property set at 2. By default, the h2 style has the mc-heading-level set to 2 (that's why it's called a second-level heading), but you can change it, and you can set the mc-heading-level to 2 other styles if you want.
- Level3 Automatically displays the first text on a page that uses the mc-heading-level style property set at 3. By default, the h3 style has the mc-heading-level set to 3 (that's why it's called a third-level heading), but you can change it, and you can set the mc-heading-level to 3 for other styles if you want.
- Level4 Automatically displays the first text on a page that uses the mc-heading-level style property set at 4. By default, the h4 style has the mc-heading-level set to 4 (that's why it's called a fourth-level heading), but you can change it, and you can set the mc-heading-level to 4 for other styles if you want.
- Level5 Automatically displays the first text on a page that uses the mc-heading-level style property set at 5. By default, the h5 style has the mc-heading-level set to 5 (that's why it's called a fifth-level heading), but you can change it, and you can set the mc-heading-level to 5 for other styles if you want.
- Level6 Automatically displays the first text on a page that uses the mc-heading-level style property set at 6. By default, the h6 style has the mc-heading-level set to 6 (that's why it's called a sixth-level heading), but you can change it, and you can set the mc-heading-level to 6 for other styles if you want.
Note The glossary and index variable options are available only in Adobe PDF output.
- Click OK. The variable is added to the template page.
- Click
 to save your work.


