

You can set page, column, and frame breaks on tables using a couple of different options.
In regular stylesheets, you can set breaks on the standard HTML table tags. The most common approach for page breaks is to set them on table rows through the tr style. Another option is that you can set breaks on rows (and on entire tables) through a table stylesheet. And because you can create patterns in table stylesheets, each pattern item might have different settings for breaks.
You might use standard HTML table tags in a regular stylesheet if you want all tables to follow the same behavior when it comes to breaks. On the other hand, you might use table style settings if you have complex tables and patterns requiring some table elements to break in a certain way and other elements to behave differently.
[Menu Proxy — Headings — Online — Depth3 ]
How to Set Breaks for Tables in a Regular Stylesheet
- From the Content Explorer, open the stylesheet that you want to modify.
-
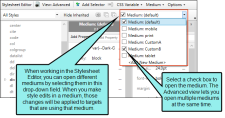
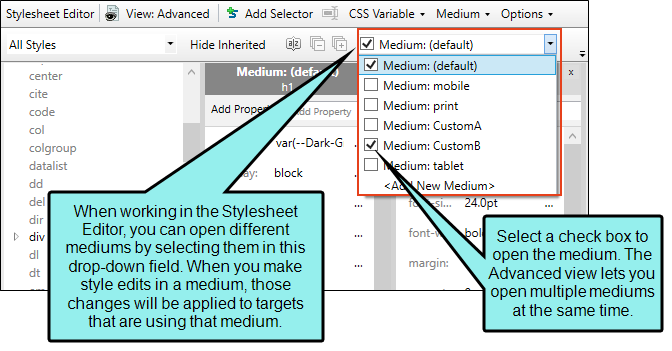
From the Medium drop-down in the Stylesheet Editor, make sure the proper medium is selected before you begin. In the Advanced view, you can open multiple mediums at once; you just need to look at the title at the top of the medium pane and make sure you are working in the correct one. If you are not using stylesheet mediums for your different outputs or if you want all mediums to have the same settings, just leave the medium set to default and continue.
Mediums can be used if you want to use one group of settings for online output types and another group of settings for print-based output types. For example, you might use the default medium for your online outputs and the print medium for your print outputs.
Please note that Flare remembers the last medium that you used when working in the stylesheet, so it may or may not be the one that you want to use the next time around.
- In the local toolbar, make sure the first button displays
 . If the button displays
  instead, then click it.
 - In the upper-left corner of the editor, click in the drop-down field and select
 .
. - From the list below, select the appropriate style. Usually you want to put a break on table (which sets the break on the entire table) or tr (which sets the break on rows, allowing you to easily end a page with one row due to the amount of content, and begin the next page with the following row).
- From the Show drop-down list on the upper-right side of the editor, select
 .
. - (Optional) You can use the toggle button in the local toolbar to show properties below in a group view
 or an alphabetical view
  .
. - If you are using the grouped view, expand the PrintSupport group.
-
Select the appropriate property and set a value for it. For example, you can click
 to the right of page-break-inside, and select avoid. If you do this for the tr style, Flare will automatically create a break between rows so that row content does not continue from one page to another.
Column-Break-Before
To the right of the property, click
and set a column break before the element.- always A break will always occur before the element.
- auto A break will neither be forced nor prevented before the element.
- avoid A break will not occur before the element.
- inherit The break setting of the parent tag is used.
Column-Break-After
To the right of the property, click
and set a column break after the element.- always A break will always occur after the element.
- auto A break will neither be forced nor prevented after the element.
- avoid A break will not occur after the element.
- inherit The break setting of the parent tag is used.
Column-Break-Inside
To the right of the property, click
and set a column break inside the "rendering box" of the element.- auto A break will neither be forced nor prevented inside the rendering box of the element.
- avoid A break will not occur inside the rendering box of the element.
- inherit The break setting of the parent tag is used.
Frame-Break-Before
To the right of the property, click
and set a frame break before the element.- always A break will always occur before the element.
- auto A break will neither be forced nor prevented before the element.
- avoid A break will not occur before the element.
- inherit The break setting of the parent tag is used.
Frame-Break-After
To the right of the property, click
and set a frame break after the element.- always A break will always occur after the element.
- auto A break will neither be forced nor prevented after the element.
- avoid A break will not occur after the element.
- inherit The break setting of the parent tag is used.
Frame-Break-Inside
To the right of the property, click
and set a frame break inside the "rendering box" of the element.- automatic A break will neither be forced nor prevented inside the rendering box of the element.
- avoid A break will not occur inside the rendering box of the element.
- inherit The break setting of the parent tag is used.
Page-Break-Before
To the right of the property, click
and set a page break before the element.- always A break will always occur before the element.
- auto A break will neither be forced nor prevented before the element.
- avoid A break will not occur before the element.
- inherit The break setting of the parent tag is used.
- left One or two breaks will occur before the element so that the next page is formatted as a left page.
- right One or two page breaks will occur before the element so that the next page is formatted as a right page.
Page-Break-After
To the right of the property, click
and set a page break after the element.- always A break will always occur after the element.
- auto A break will neither be forced nor prevented after the element.
- avoid A break will not occur after the element.
- inherit The break setting of the parent tag is used.
- left One or two breaks will occur after the element so that the next page is formatted as a left page.
- right One or two breaks will occur after the element so that the next page is formatted as a right page.
Page-Break-Inside
To the right of the property, click
and set a page break inside the "rendering box" of the element.- auto A break will neither be forced nor prevented inside the rendering box of the element.
- avoid A break will not occur inside the rendering box of the element.
- inherit The break setting of the parent tag is used.
- Click
") to save your work.
to save your work.
How to Set Breaks in a Table Stylesheet
- From the Content Explorer, open the stylesheet that you want to modify.
- In the Table Style Editor, select the appropriate tab, depending on the table element that you want to create the break for.
- General tab This tab lets you set breaks for the entire table.
- Rows tab This tab lets you set breaks for regular rows in the table.
- If the tab has multiple pattern items, select the one that you want to set the break for (e.g., in the Row Styles section).
- Toward the bottom of the tab click the Print Options button. (You may need to use the scroll bar to view this button.) The Breaks dialog opens.
-
Use the Page Break, Column Break, and Frame Break sections in the dialog to specify the settings for a page, column, or frame break, respectively.
Before
You can select one of the options for setting a page or column break before the element.
- Automatic A break will neither be forced nor prevented before the element.
- Always A break will always occur before the element.
- Avoid A break will not occur before the element.
- Force to 'left page' One or two breaks will occur before the element so that the next page is formatted as a left page.
- Force to 'right page' One or two page breaks will occur before the element so that the next page is formatted as a right page.
After
You can select one of the options for setting a page or column break after the element.
- Automatic A break will neither be forced nor prevented after the element.
- Always A break will always occur after the element.
- Avoid A break will not occur after the element.
- Force to 'left page' One or two breaks will occur after the element so that the next page is formatted as a left page.
- Force to 'right page' One or two breaks will occur after the element so that the next page is formatted as a right page.
Inside
You can select one of the options for setting a break inside the "rendering box" of the element.
- Automatic A break will neither be forced nor prevented inside the rendering box of the element.
- Avoid A break will not occur inside the rendering box of the element.
-
(Optional) If you have selected the General tab, you can also set widow and orphan properties for the table. By default, table widows and orphans are set at 1, which means that it is possible for there to be a single row from a table left at the top or bottom of a page or column (if you use multi-column page layouts). But you can change the setting in order to ensure that multiple rows are always shown at the top or bottom of a page or column.
- In the Widows section, click the down arrow in the upper-right corner and select Number. Then enter a number in the field. This determines the number of leftover rows allowed at the top of a page or column.
- In the Orphans section, click the down arrow in the upper-right corner and select Number. Then enter a number in the field. This determines the number of leftover rows allowed at the bottom of a page or column.
-
Click OK.
- Click to save your work.
Examples
Example — Page Break in Regular Stylesheet
You have a long table. In the output, the first part of the table might be shown on page 14, and the second part of it is shown on page 15. Suppose the final table row on page 14 has so much content that it wraps around to page 15, in essence splitting that row. If you would rather not split rows such as this, but rather keep them entirely on one page or another, you can set a page break on the tr style in a regular stylesheet. In this situation, you would set the "page-break-inside" property to "avoid." Therefore, all tables in your output would simply break automatically at the end of pages when necessary.
Example — Page Break in Table Stylesheet
You have many tables where you have not only main headings with a gray background at the top of each table, but subheadings with a blue background every so many rows. And whenever a new subheading is needed, you want a page break to occur before it so that the subheading row begins a new page.
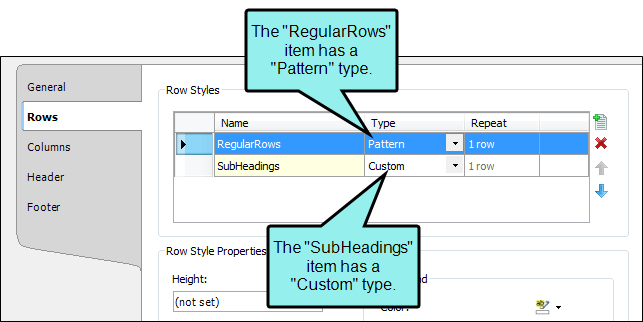
After designing your main header row in the Header tab of the Table Style Editor, you open the Rows tab. In the Rows tab you create two pattern items—one for the main table rows and another for rows used as subheadings.
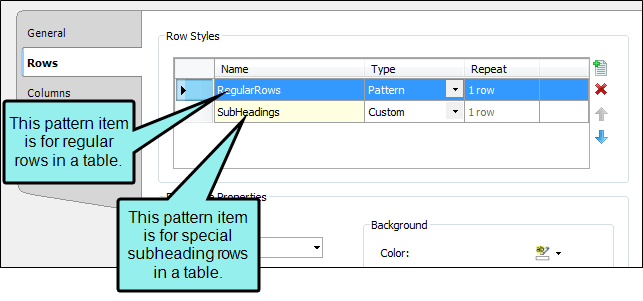
You leave the "RegularRows" item set as a "Pattern" type, which means that this style will be applied to rows in the table automatically. On the other hand, you change the type of the "SubHeadings" item to "Custom." This means that the style will not automatically be applied to rows to be used as subheadings; instead, you must apply the style to those rows manually. Why? Because you can't predict when you're going to need a subheading in a table. So you simply apply that look whenever it's needed.
As mentioned, subheading rows should have a blue background, so that's what you set in the Background area.
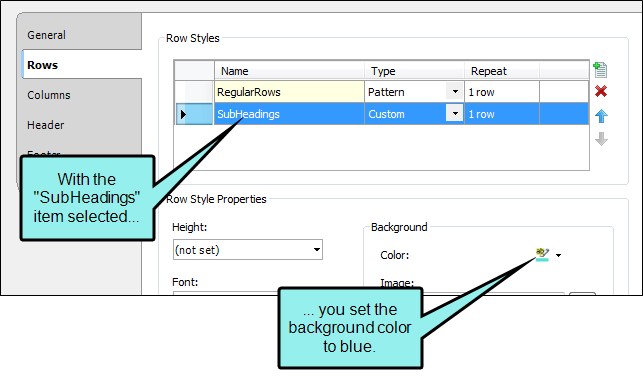
With the "SubHeadings" item still selected, you can click the Print Options button at the bottom of the tab.
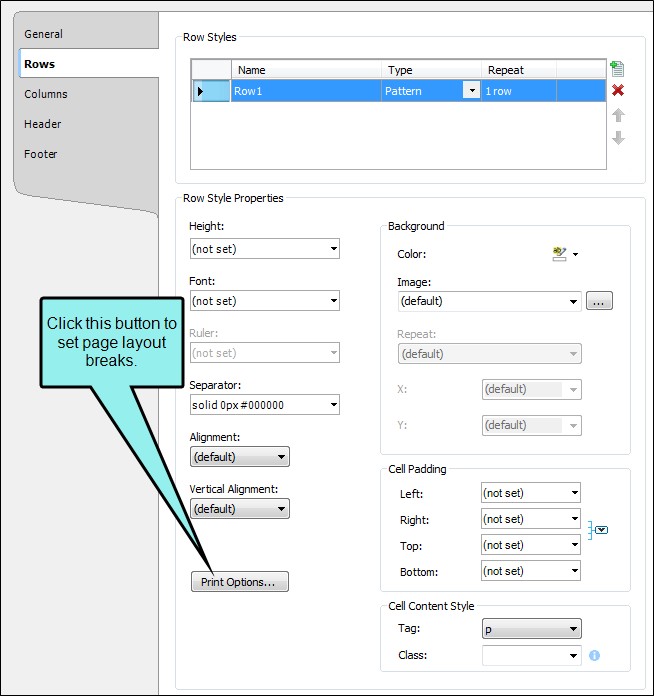
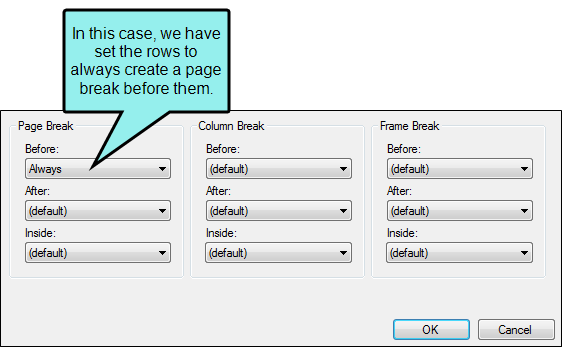
In the Breaks dialog you select Always in the Before field in the Page Break section.
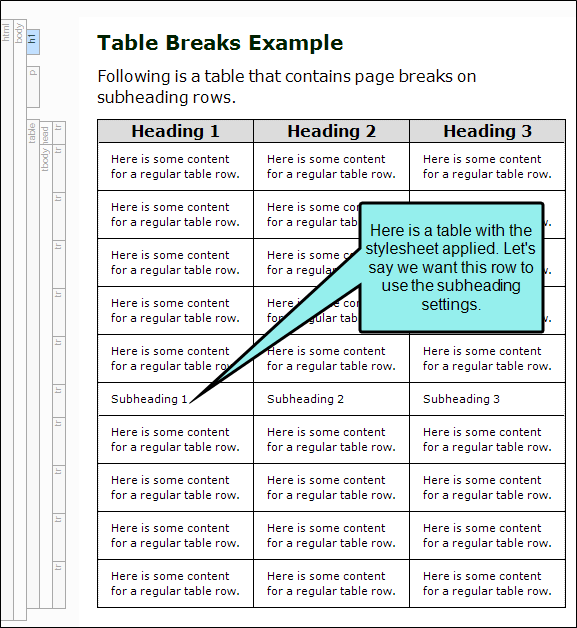
After you are finished designing your table stylesheet, you insert a table into a topic and apply the table stylesheet to it. But because the "SubHeading" pattern item was set to "Custom," none of the rows initially have the blue background or the page break setting.
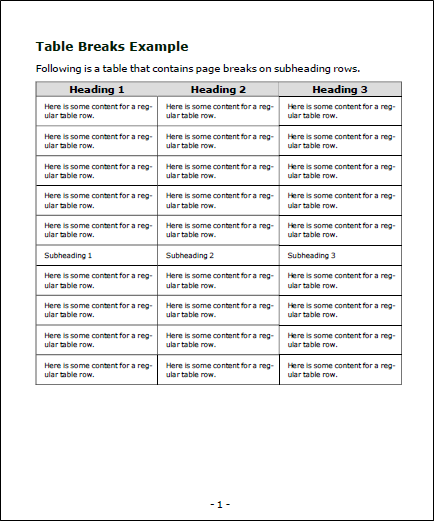
In PDF output the table might look like this:
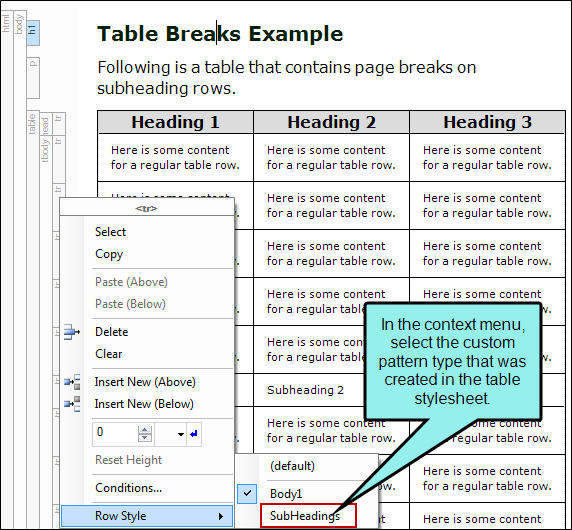
In order for a row to be treated as a subheading row with a page break, you need to right-click on the tr tag bar and select the custom "SubHeadings" style.
In the XML Editor, the table might now look like this (in this example, the topic is being viewed with the Default medium, which is why we don't see the page break in action):

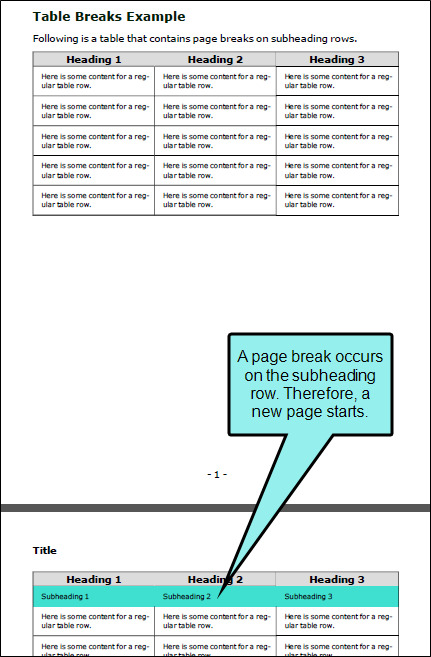
And in the PDF output, it would look like this:
What’s Noteworthy?
Note Because you can often control the look of a table in multiple ways—(1) local formatting tools, (2) local table properties, (3) a table stylesheet, (4) a regular stylesheet, or (5) branding stylesheet—it's possible that you might encounter conflicting settings from time to time. When this happens, the settings closest to the content typically has precedence. So precedence works like this: Local Formatting > Table Stylesheet > Regular Stylesheet > Branding Stylesheet.
You open a regular stylesheet and specify that the outer borders of the table should be green. Then you open the table stylesheet and specify that the outer borders should be red. And then you open the Table Properties dialog and specify that the outer borders should be blue. You've told Flare to do three different things to the same table. So in this case, the table would display blue borders, because the local properties rule over the other settings. But if you remove that setting from the Table Properties dialog and use the default setting, the table would then display red borders, because the table stylesheet has precedence over the regular stylesheet. And finally, if you remove the settings from both the Table Properties dialog and table stylesheet, using the default setting in both, the table would take its command from the regular stylesheet and display green borders.
Note If you are using a multi-column page layout and set an "Inside" break to "Avoid," you must specify this in both the "Page Break" and "Column Break" fields.
Note Frame breaks are supported only in PDF output.


