
Following are some steps you should complete and information you should know before you publish from Flare to Salesforce®.
Note Keep in mind that information provided below about the Salesforce® interface follows the Classic view of that application, rather than the Lightning view. In addition, it is possible the Salesforce® interface can change periodically, so the labels and directions below might not always match the most current Salesforce® interface. For full steps on Salesforce® tasks, please refer to the Salesforce® documentation.
[Menu Proxy — Headings — Online — Depth3 ]
Salesforce® Side
Following are settings and considerations on the Salesforce® side of this process.
Knowledge Module
You must have the Knowledge module enabled in Salesforce®. This needs to be done for the user, as well as for the site.
When enabling Knowledge for a user (Manage Users > Users), you should set the following permissions:
-
Knowledge User
-
Salesforce CRM Content User
This permission lets you work with a Shared Asset Library.
You can enable Knowledge for the site from Customize > Knowledge > Knowledge Settings.
Profile Permissions
To publish output from Flare, there are a variety of permission settings that you need to have on Salesforce® for the profile in question. This can be done from Manage Users > Profiles.
Enable the following permissions (some items are only available on multilingual Lightning accounts):
Administrative Permissions
-
Customize Application
-
Manage Salesforce CRM Content
-
Manage Salesforce Knowledge
-
View All Data
General User Permissions
-
Allow View Knowledge
-
Archive Articles
-
Article Translation - Edit (if working with multilingual output)
-
Article Translation - Publish (if working with multilingual output)
-
Article Translation - Submit for Translation (if working with multilingual output)
-
Manage Articles
-
Publish Articles
-
View Archived Articles
-
View Draft Articles
Knowledge Base Permissions
-
Read
-
Create
-
Edit
-
Delete
-
View All
-
Modify All (useful for deleting articles from the archives)
Article Types
When creating and editing your destination file in Flare, you need to point to an article type. Classic Knowledge in Salesforce® lets you create multiple article types. Lightning Knowledge lets you create only one article type (but you can also create record types to help classify articles).
Regardless of your kind of account, it is important that you create a rich text field for your article type. Also, when adding this type of field, make sure the permission is set so that the field is visible to the appropriate profile.
Categories
When publishing from Flare, you have the option of mapping your TOC nodes to one or more categories in Salesforce®.
-
You can simply map all of your topics to default categories, in which case they will all become articles under those categories in Salesforce®.
-
You can create multiple categories in Salesforce® and map them from the structure of your TOC. The advantage of doing this is that users can then filter by categories in Salesforce® that match your Flare TOC structure to more easily find articles.
-
You can choose not to map to any categories at all. In this case, you would select the option in the destination file to use default categories, but not select any actual categories in the accompanying field.
When using TOC mapping, make sure that the names of the nodes in your TOC structure match exactly with the categories in Salesforce®. Nodes on the first level of your TOC should correspond with the names of your category groups. There should only be one child category immediately under each first-level TOC node, just as you see only one category directly under a category group in Salesforce®.
Another important detail is to ensure any categories being used for your publishing process are set as active in Salesforce®.
Unique Names
If there are multiple categories with the same category name in Salesforce®, but different unique names, you can create corresponding books in your Flare TOC that have the same unique names. This might help more easily identify the article according to its location in the structure.
Shared Asset Library
When you publish output from Flare to in Salesforce®, a log file is included in the process and is necessary to place the published content in the correct locations. If you are working with other authors who are also publishing from Flare to Salesforce®, you might want to create a separate Shared Asset Library in Salesforce®. This library will then be used specifically for storing Flare publish logs, instead of each author's private library. This will help keep everything recorded accurately and maintain a good multi-author workflow.
You can create a Shared Asset Library using the Libraries page in Salesforce®. Keep in mind that certain permissions (covered above) are required to access this kind of library.
Profile permissions needed:
-
Manage Salesforce CRM Content
-
Customize Application
User permission needed:
-
Salesforce CRM Content User
In addition, each author must be a member of the library selected in the destination file, and they should each have Library Administrator permission.
Salesforce® Limitations
Keep in mind the following limitations when publishing to Salesforce®:
-
Salesforce® supports up to 131,072 characters for each rich text area field, including the HTML tags. When there are inline styles included in the topic (see Converting to Inline Styles), that will add to the number of characters for the article. Also, tables tend to significantly affect the character limit due to the number of tags required to display them.
-
Articles can only have up to 100 links to different Salesforce® knowledge articles in one rich text field.
Flare Side
Following are some settings and considerations on the Flare side of this process.
Clean XHTML
Salesforce® does not support JavaScript or external stylesheets. Therefore, only the Clean XHTML format is fully supported when publishing from Flare to Salesforce®.
Targets, TOCs, and Destination Files
If you want to publish multiple groups of content to Salesforce®, it is best not to do so from the same target (e.g., switching the TOC in the target file each time you want to publish different content). Otherwise, the most recently published content will replace the content published earlier. Instead, it is best to use a different target, destination file, and table of contents (TOC) for each distinct group of content.
TOC Structure
If you created multiple categories in Salesforce® and want to map them to the linked topics in your TOC, make sure your TOC structure in Flare matches exactly the names and structure of those categories on Salesforce®.
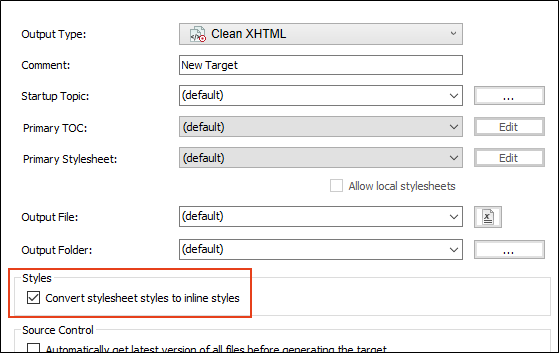
Converting to Inline Styles
In Flare, it is recommended that you enable the option Convert stylesheet styles to inline styles, which can be found on the General tab of the Target Editor. This will ensure that your styling is maintained when you publish the Clean XHTML output to Salesforce®. This is necessary because Salesforce® does not support external stylesheets.
Body Style
Normally, we recommended that you set certain global properties (e.g., font size and type) on the body style in your stylesheet. That way, the settings trickle down to all of your other styles. However, the <body> tag will not be retained when you publish to Salesforce®. Therefore, anything that you have originally set on your body style will need to instead be set on lower styles in the hierarchy (e.g., p, ul, div).
Images in Stylesheet
Images that are referenced in a stylesheet are not supported when publishing to Salesforce®. This includes list images, background images, etc.
Flare to Salesforce® Only
Flare supports sending output to Salesforce®, but not importing content from it. Therefore, after publishing topics from Flare, you should not edit the resulting articles in Salesforce® if you plan to republish from Flare in the future. Otherwise, any changes you make in Salesforce® will be overwritten by the newly published topics.
Limiting Content Published
You have different options when it comes to limiting the content that is published to Salesforce®:
- There is an Exclusions field in the Destination Editor where you can enter specific files to be held back from the publishing process. This is particularly useful to exclude files such as Default.htm.
- You can use conditions on topic files in Flare, then include or exclude them appropriately in the Target Editor.
- In the Target Editor, you can select the Advanced tab and choose an option in the Content to include drop-down. You can include files linked directly or indirectly from the target, or you can include only files linked directly from the TOC.
Multilingual Output
Multilingual targets in Flare can be published to Salesforce®. Users in Salesforce® can then switch between languages in the interface to see the categories, sections, and articles in a particular language.
Server Limitations
You should avoid publishing multiple targets to Salesforce® from a batch at the same time in order to avoid any server limitations during the upload process. You can still publish targets in a batch, but you probably want to open the Options dialog (File > Options), select the Build tab, and set the Maximum Concurrent Builds to 1.
Practice Publishing
Since you have many options for publishing content to Salesforce®, you might find it helpful to practice publishing output to a sandbox environment using different settings in Flare. Once you identify results that you like in Salesforce®, you can than publish output to your production environment.

