Task Management
How do you keep track of all the work that you need to accomplish, both inside and outside of a Flare project? The good news is that you have lots of options. The bad news is that it’s not always easy to decide which option is right for you.
Following are some of the common ways that authors use to management their workload.
[Menu Proxy — Headings — Online — Depth3 ]
Management Software Tools
Several tools designed to manage issues and tasks are available. This includes applications such as Jira, Trello, and many others.
|
Pros |
|---|
|
Some of these tools are quite powerful and have some features that are quite useful. We are not going to attempt to compare any of these tools here. Just like any other software, these tools excel in some areas more than others. |
|
If your company already uses a particular management tool, it’s already available to you, and there might be training that’s accessible. |
|
Some of these applications can be inexpensive, or even free. |
|
Cons |
|---|
|
Some of these software applications can be expensive. |
|
Depending on the tool, it can be difficult to learn to use. |
|
There is no built-in integration with MadCap Flare Desktop. Therefore, the input is largely manual. |
Microsoft Excel
If you are familiar with Excel, you might decide to create spreadsheets to track topic development and other kinds of work.
|
Pros |
|---|
|
For many, Excel is readily available and familiar. |
|
You can provide formulas to calculate information such as completion percentages for particular cells. |
|
Cons |
|---|
|
There can be somewhat of a learning curve for new users. |
|
There is no built-in integration with MadCap Flare Desktop. Therefore, the input is largely manual. |
Microsoft Word
You can create Word documents with tables to track information in a similar way that you might use Excel documents.
|
Pros |
|---|
|
For many, Word is readily available and familiar. |
|
Cons |
|---|
|
You must create your own tables for tracking purposes, which can take some time. |
|
There is no built-in integration with MadCap Flare Desktop. Therefore, the input is largely manual. |
Old-Fashioned Methods
It’s not high-tech at all, but some people choose to organize simply by writing on sticky notes, in notebooks, etc.
|
Pros |
|---|
|
These methods are typically quick, easy, and inexpensive. |
|
Cons |
|---|
|
Everything is manual. There is no automation in any way. |
|
You can easily lose the information. |
|
There is no backup, so if you lose the information, it’s gone for good. |
|
Seriously? Sticky notes? Really? |
MadCap Flare Online
If you bind your projects to Flare Online, you can take advantage of the following features for managing work. For more about each of these, see the documentation for Flare Online:
documentation.madcapsoftware.com
- Tasks These are high-level cards providing information about a particular task.
- Checklists These are just what they sound like—detailed checklists with rows and columns, where you can keep track of the progress for the minutiae of your work.
|
Pros |
|---|
|
Within a task card, you can provide a name, description, priority level, associated project, relevant dates, assigned writers, and attachments. |
|
Tasks can be managed in a Kanban format, as well as in a calendar view. |
|
You can backlog tasks that need to be addressed in the future. |
|
You archive tasks to remove them from the current workflow, but keep them for future reference if necessary. |
|
Everything is in the cloud, so you don’t need to worry about losing it. |
|
You can create generic checklists and include any kind of information you want to track. Alternatively, you can create project file checklists, which automatically load Flare project files that you choose. |
|
You can set multiple statuses (To Do, In Progress, Completed, N/A) in individual cells of a checklist. |
|
Statistics for each checklist are automatically provided as you make changes. |
|
You can create templates, which make it quicker to create new checklists that use the same format. |
|
You can create widgets (graphical information objects) that provide snapshots of information about tasks and checklists. |
|
Cons |
|---|
|
You must be subscribed to Flare Online to use these features. |
What the MadCap Documentation Team Does
At one time, we used Excel spreadsheets and Word documents to keep track of all our work. However, we found that these methods were too manual and cumbersome for us. After tasks and checklists became available in Flare Online, we began to use these features.
Tasks
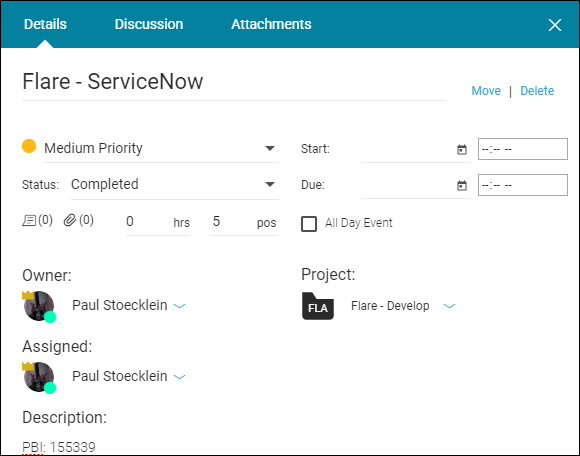
For the most part, we create high-level tasks based on each new feature that is being developed by our programmers. Schedules can be somewhat unpredictable, so we don’t focus much on entering start and due dates. But we do associate each task with a project and assign a writer.
Also, in the description for each task, we enter the following information:
- Feature (PBI) number
- Basic explanation of the feature
- Developer lead
- QA lead
- URL to the associated checklist
If it is determined that a particular feature will not be part of the upcoming release, but rather a later one, we move the associated task into the backlog.
Checklists
For each new product release cycle, there are three main types of checklists that we create:
-
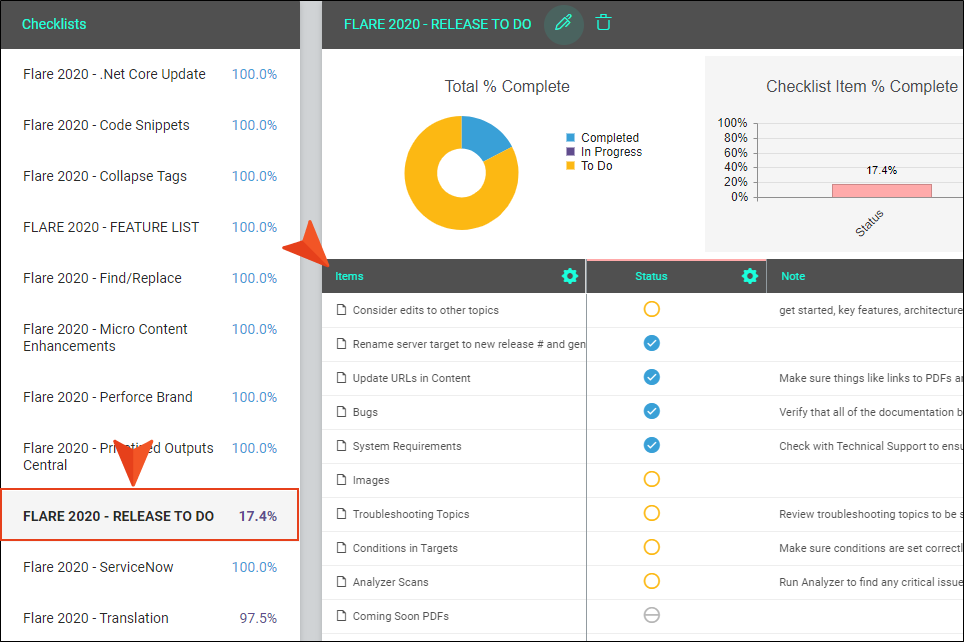
Release To Do This is a generic checklist with about 25 rows listing certain things that we do, usually in order, throughout each release cycle. The name of the checklist starts with the product name and version number, and it is in ALL CAPS to help it stand out from the many topic checklists that are also listed. We also have detailed notes for each row, which are especially helpful for a new writer. The columns are the names of the writers, who mark each item as complete (if applicable) throughout the course of the release.
-
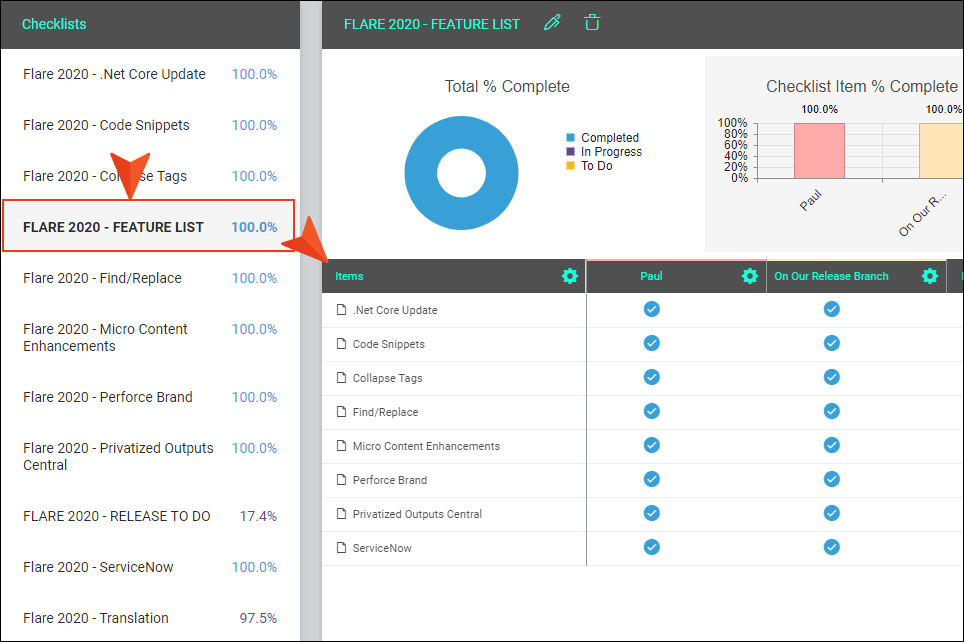
Feature List This is a generic checklist, where each row lists a feature that is part of the upcoming release. The name of the checklist starts with the product name and version number, and it is in ALL CAPS to help it stand out from the many topic checklists that are also listed. A note is included with each feature that provides the URL to the relevant topic checklist. The column are the names of the writers, who mark each item as complete (if applicable) as the feature is finished. There is another column called “Release” that we mark as complete when programmers have made enough progress on the feature to merge the code into their “release” branch (see Source Control). This tells us that we may safely merge the documentation for that feature into our “release” branch as well.
Essentially, this checklist is a consolidation of the tasks that were created for the upcoming release. We’ve found that is nice to have this “birds-eye” view of all the features intended for the next release. And if it turns out that a particular feature does not make it into the specified release, we edit the checklist, removing that row.
-
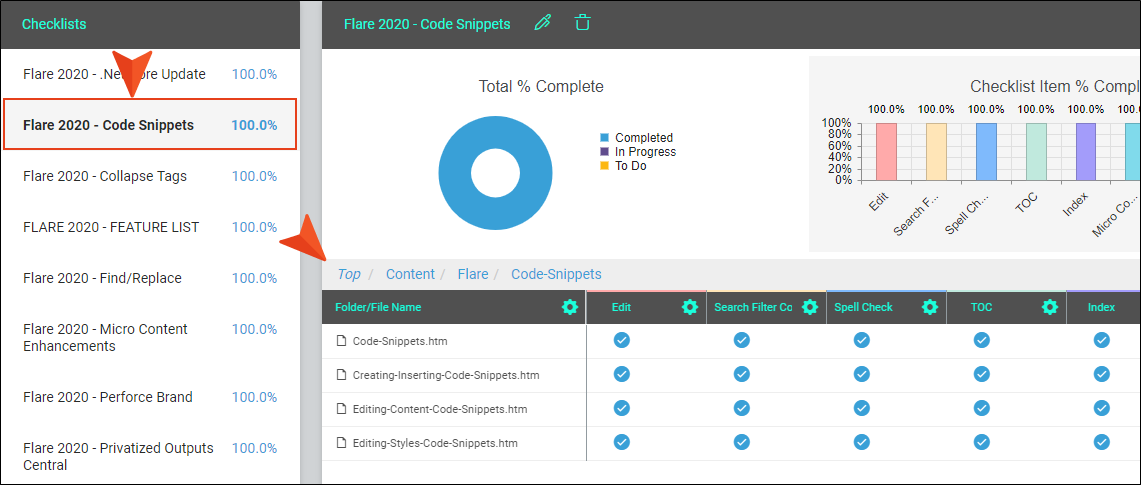
Topics This is a project files checklist. It is the most detailed, and perhaps the most important, of our checklist types. For each feature, we create one of these topic checklists. The checklist name includes the product name and version number (or release date). Within the checklist, we choose the Flare topics that are new or affected by that feature. Columns indicate (in order, for the most part), the various things we want to ensure are completed for each topic (e.g., Edit, TOCs, Index, CSH ID, Reviewed). As needed, we enter notes for a particular topic to remind us of specific things that might need to be done (e.g., “Replace video link”).
Because each of these types of checklists is used repeatedly over time, we have created checklist templates so that we don’t need to manually re-enter all of the columns, rows, and notes each time we create a new checklist.


