After you insert cross-references into topics, you can change the file to which the cross-reference is pointing.
How to Edit a Cross-Reference Destination
- Open the content file.
- In the XML Editor, right-click on the cross-reference and select Edit Cross-Reference. The Insert Cross-Reference dialog opens.
-
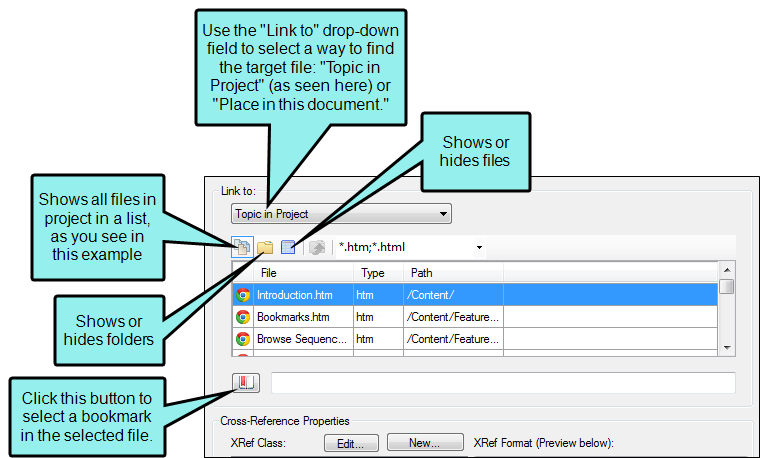
From the Link to drop-down field, select a way to identify the topic or bookmark to which you want to link. Based on the option you choose, the section below gives you a list of selections or additional fields to complete.
Topic in Project
This option lets you search for a topic within your project. After you select this option, use the area below to navigate to the file that you want to link to and select it. By using the buttons in the local toolbar, you can view all files in a list, view files in their folder structure, and use other options.
Option
Description

Shows all of the files in the project in a list below. Click the button again to switch to a folder tree view. You can click the File, Type, or Path column headers to sort the list alphabetically by that column data.

Shows or hides the folders that the files are stored in.

Shows or hides the files. If you click this button when the Show Folders button
 is selected, the area splits into two. The folder is shown on the left side, and the files and subfolders within it are shown on the right.
If the Show Files button
 is the only one selected, you can click this button to move up one folder level.
Lets you filter the kinds of files shown below. Depending on the task you are performing, this field may already be populated with the most appropriate file type(s).
You can also click
 to display and select any bookmark or a location using a particular style (including classes and IDs). If necessary, a bookmark will be created at that location if one does not exist. If you want to clear a bookmark in the link, select it and click the button at the bottom of the dialog.
Place in This Document
This option displays any bookmarks, headings, and other elements in the current file. Expand the appropriate section and select the element to which you want to link. If you select anything other than an existing bookmark, Flare Desktop will insert a new bookmark at that destination in the file.
-
(Optional) In the Target Frame field of the Insert Cross-Reference dialog, click the drop-down arrow to select the way the linked destination will open. This option can be used to open the destination topic or file in a popup.
- Page Default The destination file opens in the same window as the output window.
- Parent Frame The destination file opens in the parent frame of the current topic while hiding that topic.
- New Window The destination file opens in a new browser window.
- Same Frame The destination file opens in the same frame as the current topic.
- Top Frame The destination file opens in the same output window, removing all other framesets. You might use this option, for example, if the destination topic has its own frameset.
- Popup Window The destination file opens in a popup box on top of the current topic.
-
(Optional) In the Screen Tip field, you can type a phrase that will appear when the end user hovers over the cross-reference in the output.
When you enter a screen tip, it is added as a <title> tag in the markup.
For more information see Accessibility.
- (Optional) In the Alternate Text field, type a phrase that describes what the element is about. This option should be used to increase accessibility for users who are unable to view an element.
- Click OK.
- Click
") to save your work.
to save your work.

