If changes were made to source files after you have started working in—or even completed—a Lingo project, you need to update the project so that the modified files can be translated.
[Menu Proxy — Headings — Online — Depth3 ]
How to Update a Project
- Select File > Update Project.
- Navigate to and select the project or file that has been changed. A processing dialog temporarily displays as the changed files are integrated into the Lingo project. This dialog closes automatically when it is finished.
-
(Optional) If you want to update the localized images in your Lingo project with the images from the source, select Replace localized images for this project, and click OK.
Note You may want to replace the localized images if the images in the source project have changed considerably. Localized images will only be replaced if the source image is newer (i.e., more recently updated) than the localized image; localized images that have not changed in the source project will not be replaced.
Note You will only be prompted to replace images if there are images in your Lingo project.
If the animation below is cut off, you can see the complete animation by clicking the link under it to open the full topic.
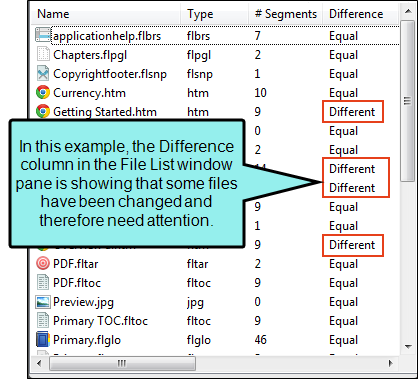
Note If the changed source file has segments that exactly match those in TM, the segments automatically receive those translations. If there are changes where matches do not occur in TM, those changes are reflected in the Lingo project in a couple of ways. First, the Difference column in the File List window pane indicates whether a file has changed. Also, if you switch to Preview mode in the Translation Editor (for files such as Word documents, PowerPoint files, and Flare topics, which can be displayed in that mode), icons are displayed next to segments that have been changed.
Note When you use this feature, Lingo only scans files that have been changed, instead of all files in the project. This results in quicker updates.
Note Update Project is disabled if you created a project in either of the following ways:
- From individual folders and individual files
- From individual folders, and later you added additional files using the Add Project Files Wizard
Note If you make changes to a project's filtering or flattening settings in the Project Properties dialog, you do not need to update the project to apply these settings. Instead, the changes are applied dynamically.
Note If you translate a segment in Lingo and then update the source for that segment, the source content may no longer match the translation provided by the TM or machine translation. If this happens, the TM Source column displays "Xliff Alternate," to indicate that a previous translation is stored in the XLIFF file.
What’s Next?
After updating a project, you can open a list of files that require translation (see Viewing Files Requiring Translation). If the Difference column indicates a change was made to a particular file, you can open that file to translate the new text (you may need to drag the divider in the File List window pane to see the Difference column).