There are times where you may have to merge branches into a common branch.
How to Merge Branches in Git
-
Do one of the following, depending on the part of the user interface you are using:
- Ribbon Select Source Control > Merge.
- Right-Click If you have the File List window pane open, right-click any file and select Source Control > Project > Merge.
- Source Control Explorer From the drop-down, select Branches. Then select any branch except the active one, and click the Merge Branch button.
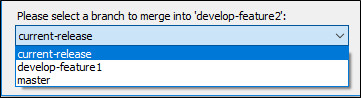
The Select branch to merge dialog opens.

-
From the drop-down list, select the Git branch you wish to merge into the active branch.

-
Click OK. A dialog will display the status of the merge in progress.

- When the merge operation is completed, a dialog will display indicating the merge was a success. Click OK to close the dialog.


Example
You have two feature branches that are bound in Git source control.
In the first feature branch (develop-feature1), you make changes to a file called “Getting-Started” and commit those changes. These changes are specific to the first feature being developed.
In the second feature branch (e.g., develop-feature2), you make changes to the same "Getting-Started" file and commit those changes. These changes are specific to the second feature being developed, and are being made in a separate part of the topic from the develop-feature1 changes.
After you complete and commit your changes on the second feature branch, you decide you want to merge your changes from the first feature branch to the second feature branch.
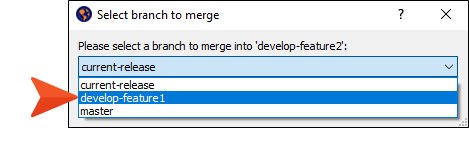
In the Source Control Explorer, you select the develop-feature2 branch. Then, you click the Merge Branch button. From the drop-down, you select develop-feature1.
You click OK to merge. Since the changes took place in different sections of the "Getting-Started" file, the merging of the first feature branch into the second feature branch is successful.
