—Subversion
There may be times when you need to merge changes from different authors when committing a file. The merge occurs automatically if there are no conflicting changes (i.e., changes do not occur in the same location in the file). If there are conflicting changes, a dialog opens, allowing you to determine how changes are merged.
How to Merge Source Control Files
- Go through the process of updating files from source control or committing files. SeeUpdating Source Control Files—Subversion and Committing Source Control Files—Subversion. If your local copy of the file is different from the server copy (e.g., another author has already committed the same file), the Resolve Conflicts dialog opens.
-
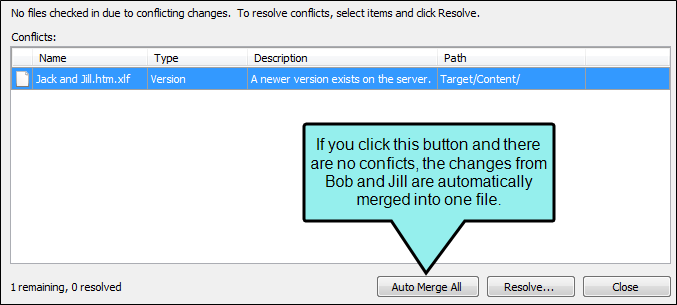
Click Auto Merge All. If changes from the other author do not conflict with your changes, this will merge all changes. A message lets you know that a backup of your local copy has been made. This lets you restore that file if you do not want to keep the merged version. You do not need to complete the rest of the steps below.
However, if your changes conflict with those from another author, a message displays to tell you. In this case, continue with the next step.
- Click OK on the conflict message.
- In the Resolve Conflicts dialog click Resolve. The Resolve Version Conflict dialog opens. From this dialog, you can choose from the following options.
- Merge changes for me Automatically merges changes within the same file that are not part of the same element. If changes have been made to the same element
- Merge changes in merge tool Opens a merging interface, which lets you see exactly what changes were made and choose which to keep.
- Undo my local changes Automatically removes your changes and keeps changes from other
- Discard external changes Automatically removes changes from other
- Merge changes for me Automatically merges changes within the same file that are not part of the same element. If changes have been made to the same element
- If you selected the option to use the merge tool, the Merge Changes dialog opens. Use this dialog to view and select changes. You can take actions in the following ways.
Click a change You can click a change on either the remote or local side. This lets you select a particular change. Use the key at the top of the merge changes dialog, as well as the color coding on the local and server sides, to determine if a change has been added (new), deleted, changed, or moved.When you select a change, the change you selected will display with a solid colored background, and the conflicting change will display with a striped background. If you select the other change, the background shading will switch.
- Type content If you want to use your changes as well as those from another
- Previous/next conflict When you are finished resolving the first conflict, you can use the "Previous Conflict" and "Next Conflict" buttons at the bottom of the dialog to work on other conflicts in the file.
Note If you selected "Merge as Text" in the local toolbar and are working in the code, you can click on text with a hatched background to keep the change in it. After you click on text with a hatched background, the hatched lines are removed, leaving a solid color.
- After all conflicts have been resolved, a message lets you know that a backup of your local copy has been made. This lets you restore that file if you do not want to keep the merged version. Click OK.
Example — Auto Merging
Let's say two
Bob checks out the glossary and starts making changes to it.
Jill also checks out the glossary and makes some changes to it. Jill's changes are in a different segment in the glossary than Bob's changes; there are no conflicts. She finishes before Bob and submits the file to source control.
Bob finishes his changes and tries to submit the file. Before the file can be submitted, Bob is prompted with a dialog, indicating that changes from another
Bob selects Auto Merge All. The changes from Bob and Jill are now both shown in the merged topic.