You can use the command line to create, export, update, and synchronize Lingo projects. With the command line, you do not have to open Lingo at all.
[Menu Proxy — Headings — Online — Depth3 ]
How to Use the Command Line for Lingo Projects
-
Open Notepad (to create and save a batch file) or open your command prompt (to run a command immediately).
Tip The best way to use the command line feature is to create a batch file with the necessary commands in it. Then you can use a scheduling tool (such as the Task Scheduler utility in Windows) to run the batch file automatically whenever you want.
-
Type the path to the
cd\Program Files\MadCap Software\MadCap Lingo 12\Lingo.app
Note Alternatively, you can use cd c:\Program Files\[rest of the path] instead of cd\Program Files\[rest of the path].
-
Type any of the available commands (see Library of Command Line Options), entering the appropriate value in place of the section in brackets.
Tip Some operating systems allow you to drag a folder or file from the Windows location to the Command Prompt window. This will add the path of the folder or file within quotation marks for you.
Note If there are spaces anywhere in the path/name of your project file, source file, export path, or target language, you need to use quotation marks around it.
Note The commands used by the compiler are case-sensitive.
To Create a Lingo Project
Here is the command:
lingoproject.exe -sourceFile [source file] -projectDirectory [folder for new Lingo project] -projectName [name for new Lingo project] -sourceLanguage [source file language] -targetLanguages [new Lingo project language(s)] -function Create
Example
You have a Flare project called "Cool Project" that is located in your C:\FlareProjects folder. You want to use the files in that project to create a new Lingo project named "Cool Project Translated." The source language in the Flare project is English (United States), and the target languages for the Lingo project will be Spanish and French. You want to store this new Lingo project in your C:\LingoProjects folder. You would type this:
lingoproject.exe -sourceFile "C:\FlareProjects\Cool Project.flprj" -projectDirectory C:\LingoProjects -projectName "Cool Project Translated" -sourceLanguage en-us -targetLanguages es;fr -function Create
To Export a Lingo Project
Here is the command:
lingoproject.exe -project [project file] -sourceFile [source file] -exportTo [export path] -function Export -sync true
Example
You have a Lingo project called "Nursery Rhymes” that is stored in your Documents\My Translated Projects folder, and you want to export it to a folder on your Desktop. The source is a Flare project located in a folder called "SourceFiles" on your C drive. You would type this:
lingoproject.exe -project "C:\Users\[username]\Documents\My Translated Projects\Nursery Rhymes.liprjf\Nursery Rhymes.liprj" -sourceFile "C:\SourceFiles\Nursery Rhymes.flprj" -exportTo "C:\Users\[username]\Desktop\Exports" -function Export -sync true
To Export a Lingo Project in a Specific Language
Here is the command:
lingoproject.exe -project [project file] -sourceFile [source file] -exportTo [export path] -language [target language or code] -function Export -sync true
Example
You have a Lingo project called "Nursery Rhymes" that has been translated into Spanish and French. It is stored in your Documents\My Translated Projects folder, and you want to export the Spanish version to a folder on your Desktop. The source is a Word document located in a folder called "SourceFiles" on your C drive. You would type this:
lingoproject.exe -project "C:\Users\[username]\Documents\My Translated Projects\Nursery Rhymes.liprjf\Nursery Rhymes.liprj" -sourceFile "C:\SourceFiles\Nursery Rhymes.docx" -exportTo C:\Users\[username]\Desktop\Exports -language Spanish -function Export -sync true
To Export a Lingo Project in All Languages
If you wish to export all of the languages in your Lingo project using the command line, this is the syntax you would use:
lingoproject.exe -project [project file] -sourcefile [source file] -exportTo [export path] -function Export -appendLanguage [true/false] -sync true
Note Since the -language argument is omitted from this command, Lingo will export all languages in the project. The -appendLanguage argument of this command indicates that a language code will be used for the parent folder name for each of the exported languages of non-project files.
Example
Say that you have a Lingo project called "San-Diego" that has been translated into Danish and Dutch. This project is stored in your Translated-Projects folder on your local C drive. The source Flare project file is also located on your C drive in the Source-Files folder. You want to export your project to a network location that is mapped to your S drive. You would first type the path to the Lingo.app folder where you installed Lingo. If you installed Lingo to the default location, you would type this and press ENTER on your keyboard:
cd\Program Files\MadCap Software\MadCap Lingo 12\Lingo.app
Next, type this and press ENTER on your keyboard:
lingoproject.exe -project C:\Translated-Projects\San-Diego.liprjf\San-Diego.liprj -sourcefile C:\Source-Files\San-Diego.flprj -exportTo S:\Exported-Projects -function Export -sync true
To Update a Lingo Project
Here is the command:
lingoproject.exe -project [project file] -sourceFile [source file] -function Update
Example
You have a Lingo project called "Nursery Rhymes." It is stored in your Documents\My Translated Projects folder. Your source file has changed, so you want to update the Lingo project. The source is a Flare project located in a folder called "SourceFiles" on your C drive. You would type this:
lingoproject.exe -project "C:\Users\[username]\Documents\My Translated Projects\Nursery Rhymes.liprjf\Nursery Rhymes.liprj" -sourceFile "C:\SourceFiles\Nursery Rhymes.flprj" -function Update
Now What?
If you are using the command prompt window for any of the commands just described, the project is exported or updated immediately.
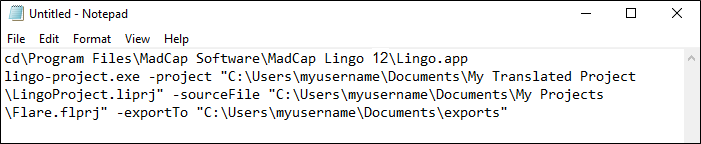
If you are creating a batch file in Notepad, it might look something like this:
Library of Command Line Options
Following is a collection of the various command line options that you can use for Lingo.
|
Global |
|
|
-config |
The location of a config file containing arguments for the console application. Any arguments passed directly on the command line will override the config values. The config file should be in JSON format with the name of the argument as the key with a string value. Example You might have a JSON file named "config.json" that you've stored in your C:\LingoCMD folder. The JSON file contains the following: Copy
In the command line, you could type this: lingoproject.exe -config "C:\LingoCMD\config.json" |
|
-function |
The operation you want Lingo to perform. It precedes each of the following: Bundle, Create, Export, MergeBundle, MT, Sync, TM, Update. Examples -function Bundle -function Create -function Export -function MergeBundle -function MT -function Sync -function TM -function Update |
|
-log |
Flag to create log file. |
|
-logFile |
The location of the log file to create. |
|
-sourceFile |
The source project or file(s). Semicolon-delimited list. Example -sourceFile "C:\SourceFiles\Nursery Rhymes.flprj;C:\Local\text.txt" |
|
Create Lingo Project |
|
|
Main Commands |
|
|
-projectDirectory |
Path where you want to store the new Lingo project. Example -projectDirectory C:\Folder |
|
-projectName |
Name of the new Lingo project. Example -projectName LingoProject |
|
-sourceLanguage |
Source language code of the project. Example -sourceLanguage en-us |
|
-targetLanguages |
Target language code(s) of the project. Example -targetLanguages es;fr |
|
Other Commands |
|
|
-client |
The client for whom the project is being created. |
|
-domain |
The source domain or subject. |
|
-fileFilters |
File filter URLs to use. Semicolon-delimited list. |
|
-maintainFiles |
Maintain non-translatable files in an imported folder in the exported folder. |
|
-mtProviders |
Machine translation (MT) providers to connect to. Pipe-delimited connection strings. |
|
-termbaseConnections |
Termbases to connect to. Pipe-delimited connection strings. |
|
-tmConnections |
Translation memories (TMs) to connect to. Pipe-delimited connection strings. |
|
-useMT |
Flag to pre-translate the project using MT. |
|
-useTranslationMemory |
Flag to pre-translate the project using the connected TMs. |
|
Other Commands for DITA Files |
|
|
-flattenConrefs |
Flag to convert inline conrefs to plain text. |
|
-selectedAudience |
Filter to include the selected audience attribute. |
|
-selectedOtherProps |
Filter to include the selected other props attribute. |
|
-selectedPlatform |
Filter to include the selected platform attribute. |
|
-selectedProps |
Filter to include the designated property attribute. |
|
Other Commands for Flare Files |
|
|
-createLanguageSkin |
Flag to create language skin for target languages. |
|
-flattenedSnippets |
Flag to convert inline snippets to plain text. |
|
-flattenedVariables |
Variables to convert to plain text. Semicolon-delimited variable names. Example -flattenedVariables General.Variable;Flare.Variable |
|
-selectedConditions |
Conditional text to exclude from translation. Semicolon-delimited list. Example -selectedConditions Default.PrintOnly;Default.ScreenOnly |
|
-selectedTargets |
Filter content by selected target(s). Semicolon-delimited list. Example -selectedTargets Project/Targets/HTML5.fltar;Project/Targets/PDF.fltar |
|
Other Commands for Source Control |
|
|
-bind |
Flag to bind the project to source control. Example -bind true |
|
-database |
The source control database URL. Example -database http://blah3l7tfs12:8080/tfs/NewCollection |
|
-databaseRoot |
The source control path to the project. Example -databaseRoot $/Flare/Lingo.liprjf/ |
|
-providerType |
The source control provider to bind the project to. Example -providerType "Microsoft Team Foundation Server" |
|
-sourceControlProjectFile |
The URL(s) for the file(s) to import from the source control client. Example -sourceControlProjectFile https://gitstage.madcapcentral.com/abc/project.git/project.flprj |
|
-sourceDistributedEmail |
The git user email for the client used to import source files. Example -sourceDistributedEmail ldobler@fictionsoft.com |
|
-sourceDistributedName |
The git user name for the client used to import source files. Example -sourceDistributedName "Lloyd Dobler" |
|
-sourceDistributedSavePer |
The save per setting for the git client for the client used to import source files. |
|
-sourcePerforceServer |
The Perforce server URL for the client used to import source files. |
|
-sourcePerforceUser |
The Perforce user for the client used to import source files. |
|
-sourceProviderType |
The source control provider to bind the project to. Example -sourceProviderType Git |
|
-sourceSubversionServer |
The Subversion server URL for the client used to import source files. |
|
-sourceTeamFoundationServer |
The TFS server URL for the client used to import source files. |
|
-sourceUser |
The source control user for the client used to import source files. Example -sourceUser apiuser1 |
|
-sourceUserPass |
The source control password for the client used to import source files. Example -sourceUserPass mypassword121! |
|
-user |
The source control user. Example -user ldobler@fictionsoft |
|
-userSecret |
The source control password, or Personal Access Token (PAT) when binding to Git. Example -userSecret mypassword875! |
|
Bundle / Merge Lingo Project |
|
|
Main Commands |
|
|
-bundleFiles |
The filenames (relative paths inside project e.g. Content/Topic.htm) that will be included in the bundle. If omitted, all files with segments and images will be included. |
|
-bundleType |
Lingo or XLIFF bundle type. Default is Lingo bundle. |
|
-merge |
Flag to merge bundle. |
|
-mergeFile |
Bundle URL. |
|
-project |
Path and name of the Lingo project to bundle from or merge to. Example -sourceFile "C:\SourceFiles\Nursery Rhymes.flprj" |
|
Export Lingo Project |
|
|
Main Commands |
|
|
-appendLanguage |
Used to apply a language code (e.g., "es" for Spanish) to exported non-project files, instead of applying code to folder. Example -appendLanguage true |
|
-exportTo |
Path where you want to store translated project or file after exporting from Lingo. Example -exportTo C:\Users\[username]\Desktop\Exports |
|
-language |
Language code of the target language to export. Example -language es;fr |
|
-project |
Path and name of the Lingo project to export. Example -project "C:\SourceFiles\Nursery Rhymes.flprj" |
|
-sync |
Perform a project update. If an export path is omitted and a source file specified, an update will be performed. Example -sync true |
Batch Files and Task Scheduler
If you are creating a batch file, save the Notepad file to any location you like on your computer. When you do this, type .bat as the extension at the end of the file name (e.g., MyBatchFile.bat). At any time you like, you can generate the output simply by double-clicking the batch file. You can also use a tool to schedule the batch file to run.
For example, complete the following steps if using the Windows 10 Task Scheduler utility.
- In the Windows search field, type Task Scheduler and press ENTER.
- Click Action > Create Basic Task.
- In the Create Basic Task Wizard, give the task a name and click Next.
- Using the next couple of pages of the wizard, choose when you wan the batch to run (e.g., daily, starting at 2 a.m.). Click Next until you get to the Action page.
- Click Start a program, and click Next.
- Click Browse. Then find and double-click the batch file you created.
- Click Next.
- Click Finish.
What’s Next?
After exporting a project, you can inform the author, who can then open the translated project or file and create output for it.
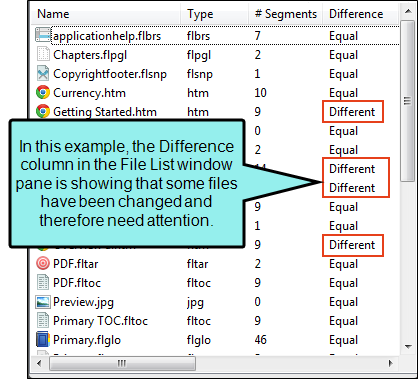
After updating a project, you can open a list of files that require translation (see Viewing Files Requiring Translation). If the Difference column indicates a change was made to a particular file, you can open that file to translate the new text (you may need to drag the divider in the File List window pane to see the Difference column).