When you add an object, it is placed on its own layer. And each time you add a new object, it is placed on the top layer with the previous objects on layers beneath it. If necessary, you can "float" objects that are on lower layers to bring them forward, and you can "sink" objects to send them backward.
[Menu Proxy — Headings — Online — Depth3 ]
Example
Example
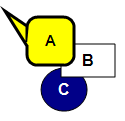
Here is an example with three objects (A, B, and C). Currently, "A" is on the top layer, "B" is on the middle layer, and "C" is on the bottom layer.
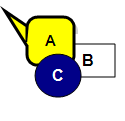
In this example, we've moved "C" to the top layer. "A" is now on the middle layer, and "B" is on the bottom layer.
How to Float Objects in the Editor
- Open a frame to which you have added objects.
- Click on the object that you want to float (bring forward).
-
Do one of the following, depending on the part of the user interface you are using:
-
Ribbon Select Home>
 (face of the button). This brings the object forward one layer or click the down arrow next to the float button and from the drop-down menu do one of the following.
-
Click
 to bring the object forward one layer.
 - Click
 to bring the object forward all the way to the top.
-
- Right-Click Right-click the object and from the context menu select Order > Float or Order > Float To Top.
-
- Click
") to save your work.
to save your work.
How to Sink Objects in the Editor
- Open a frame to which you have added objects.
- Click on the object that you want to sink (send backward).
-
Do one of the following, depending on the part of the user interface you are using:
- Ribbon Select Home>
 (face of the button). This sends the object back one layer or click the down arrow next to the sink button and from the drop-down menu do one of the following.
- Click
 to send the object back one layer.
 - Click
 to send the object all the way to the bottom.
- Click
- Right-Click Right-click the object and from the context menu select Order > Sink or Order > Sink To Bottom.
- Ribbon Select Home>
- Click to save your work.
What’s Next?
If necessary, you can continue enhancing the movie. Otherwise, you can finalize the movie by building and distributing it. See Editing a Movie and Building Movie Output Using the Interface.
