After applying condition tags to the appropriate elements, you can tell Mimic to include or exclude those conditions in the output. This can be done in three places—at the movie level (if it is a standalone movie), at the collection level, or on individual targets. In most cases, you will probably associate condition tags with targets, which is recommended.
Note The following instructions are for the Basic method of associating condition tags, which uses Include and Exclude check boxes. If you prefer to use the Advanced method—which uses manual AND, OR, and NOT statements—see Instructions for the Advanced Method.
[Menu Proxy — Headings — Online — Depth3 ]
How to Associate Conditions With Targets
Targets are very useful because they allow you to generate multiple outputs simultaneously. In addition, you can create targets for either collections or standalone movies.
- If you have not done so already, create the target(s) to be used with your collection or standalone movie.
- Open the Mimic collection or standalone movie.
- Do one of the following, depending on whether you are working in a collection or standalone movie.
Collection In the Collection Editor, click the Targets tab.
- Standalone Movie Select Movie > Properties. The Movie Properties dialog opens. Click the Targets tab.
- Select the target for which you want to set conditions and click the Edit button. An editing window for that target opens.
-
Click the Conditional Text tab. All of the available condition tags—those that you have created, as well as those from a linked Flare project—are shown on the right. An Include and Exclude check box appears next to each condition tag.
-
If you want to exclude a condition tag from the output for this target, click the Exclude check box next to it. If you want to make sure a condition tag is included in the output for this target, click the Include check box next to it. The primary reason for having Include check boxes is to account for possible conflicts.
Example
Suppose you have two condition tags—one called "Beginner" and another called "Advanced." Let's say that you have
Let's say that you want to create output for your advanced users. You obviously want to include all objects associated with the Advanced tag, but you want to exclude objects associated with the Beginner tag. By default, Mimic will include objects associated with both tags, unless you tell it not to. So you tell Mimic to exclude the objects associated with the Beginner tag. The problem is the middle object. It is associated with both tags. You have told Mimic to exclude objects associated with the Beginner tag, and it will do so, overriding the default. But you want to make sure that object is included in the advanced output. That is why you need to make sure you select the Include check box next to the Advanced tag.
Warning The condition feature is an inclusive system. If you do not select any options at all, all of the tags will automatically be included, as indicated by the gray text in the Action cell. If you include only some tags and exclude others, any remaining tags without options specifically set will automatically be included. However, if you select Include for any of the tags (even just one) and do not select Exclude for any tags, all of the other tags that do not have the Include option set explicitly will automatically be excluded. If you have not explicitly set an option for a condition tag, make sure you look at the gray text in the Action cell to know what will happen for that tag in the output.
- Click OK.
- If you want to associate conditions for another target, repeat steps 4-7.
- If you are working in a standalone movie, click OK again.
- Click
") to save your work.
to save your work.
How to Associate Conditions With Standalone Movies
- Open the standalone movie.
- Select the Movie ribbon.
-
In the Properties section, click Properties.
The Movie Properties dialog opens.
- Click the Conditional Text tab. All of the available condition tags—those that you have created, as well as those from a linked Flare project—are shown on the right. An Include and Exclude check box appears next to each condition tag.
-
If you want to exclude a condition tag from the output for this movie, click the Exclude check box next to it. If you want to make sure a condition tag is included in the output for this movie, click the Include check box next to it. The primary reason for having Include check boxes is to account for possible conflicts.
Example
Suppose you have two condition tags—one called "Beginner" and another called "Advanced." Let's say that you have
Let's say that you want to create output for your advanced users. You obviously want to include all objects associated with the Advanced tag, but you want to exclude objects associated with the Beginner tag. By default, Mimic will include objects associated with both tags, unless you tell it not to. So you tell Mimic to exclude the objects associated with the Beginner tag. The problem is the middle object. It is associated with both tags. You have told Mimic to exclude objects associated with the Beginner tag, and it will do so, overriding the default. But you want to make sure that object is included in the advanced output. That is why you need to make sure you select the Include check box next to the Advanced tag.
Warning The condition feature is an inclusive system. If you do not select any options at all, all of the tags will automatically be included, as indicated by the gray text in the Action cell. If you include only some tags and exclude others, any remaining tags without options specifically set will automatically be included. However, if you select Include for any of the tags (even just one) and do not select Exclude for any tags, all of the other tags that do not have the Include option set explicitly will automatically be excluded. If you have not explicitly set an option for a condition tag, make sure you look at the gray text in the Action cell to know what will happen for that tag in the output.
- Click OK.
- Click to save your work.
How to Associate Conditions With Collections
- Open the Mimic collection.
- In the Collection Editor, click the Conditions tab. All of the available condition tags—those that you have created, as well as those from a linked Flare project—are shown on the right. An Include and Exclude check box appears next to each condition tag.
-
If you want to exclude a condition tag from the output for this collection, click the Exclude check box next to it. If you want to make sure a condition tag is included in the output for this collection, click the Include check box next to it. The primary reason for having Include check boxes is to account for possible conflicts.
Example
Suppose you have two condition tags—one called "Beginner" and another called "Advanced." Let's say that you have
Let's say that you want to create output for your advanced users. You obviously want to include all objects associated with the Advanced tag, but you want to exclude objects associated with the Beginner tag. By default, Mimic will include objects associated with both tags, unless you tell it not to. So you tell Mimic to exclude the objects associated with the Beginner tag. The problem is the middle object. It is associated with both tags. You have told Mimic to exclude objects associated with the Beginner tag, and it will do so, overriding the default. But you want to make sure that object is included in the advanced output. That is why you need to make sure you select the Include check box next to the Advanced tag.
Warning The condition feature is an inclusive system. If you do not select any options at all, all of the tags will automatically be included, as indicated by the gray text in the Action cell. If you include only some tags and exclude others, any remaining tags without options specifically set will automatically be included. However, if you select Include for any of the tags (even just one) and do not select Exclude for any tags, all of the other tags that do not have the Include option set explicitly will automatically be excluded. If you have not explicitly set an option for a condition tag, make sure you look at the gray text in the Action cell to know what will happen for that tag in the output.
- Click to save your work.
Instructions for the Advanced Method
If you are a more experienced user, you may decide to use the Advanced section to write expressions manually, rather than clicking check boxes. You can type the names of the condition tags as well as any of the following tokens: OR, AND, NOT, (). This lets you produce more complex, robust expressions to control your output (i.e., "and" statements, as well as "or" statements).
You can use the Advanced method to associate conditions with targets, standalone movies, or collections.
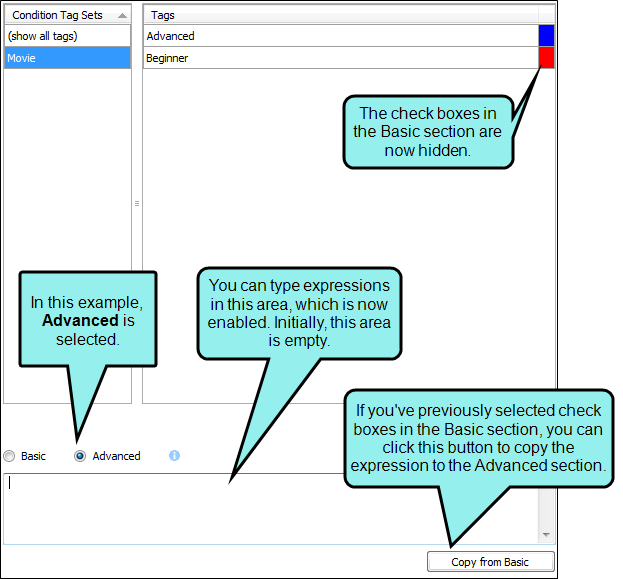
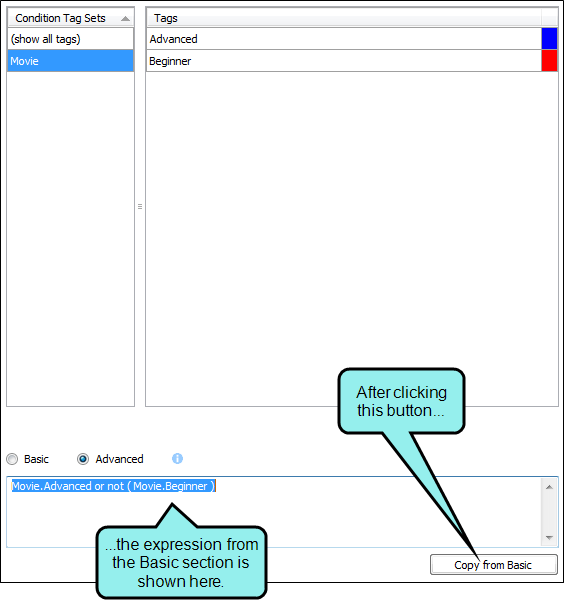
Copy From Basic
When you select Advanced for the first time, the Basic section becomes disabled (i.e., the options are disabled), and the Advanced section is enabled but empty (even if you've previously selected conditions in the Basic section). However, you can copy the expression from the Basic section to the Advanced section. This is a quick and easy way to create an initial expression and then adjust it with "and" statements.
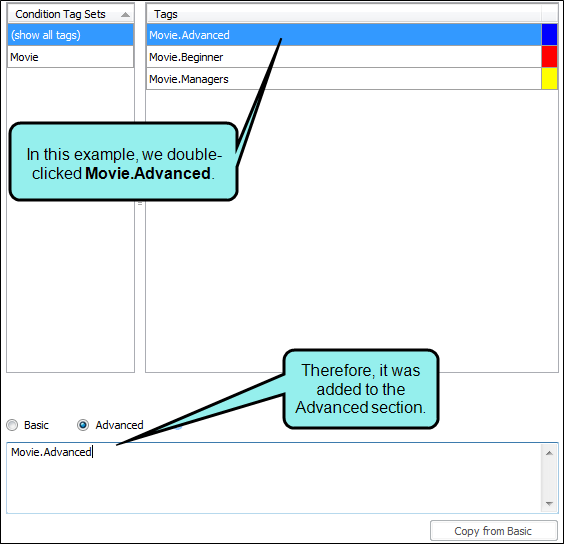
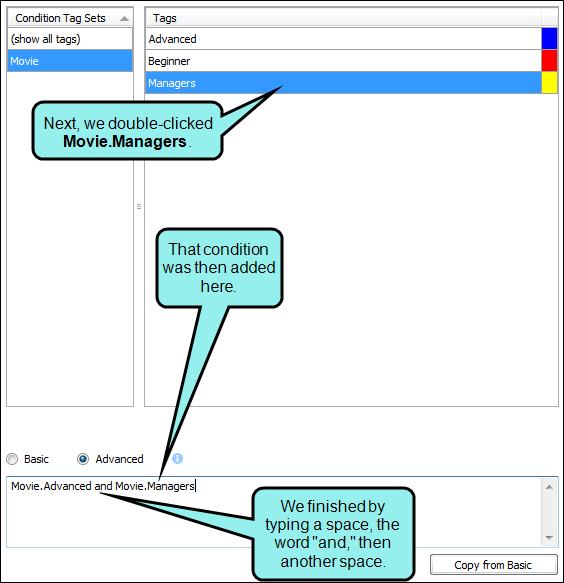
Double-Click Tags
Another trick you can use while working in the Advanced section is to double-click any tag from the Basic section. This adds the condition to the Advanced section so you do not have to type it. Just make sure your cursor has been placed in the Advanced section before double-clicking a condition tag. If you don't click in the Advanced section first, the newly added condition tag will overwrite all of the text you've entered previously in the Advanced section.
Warning Icon
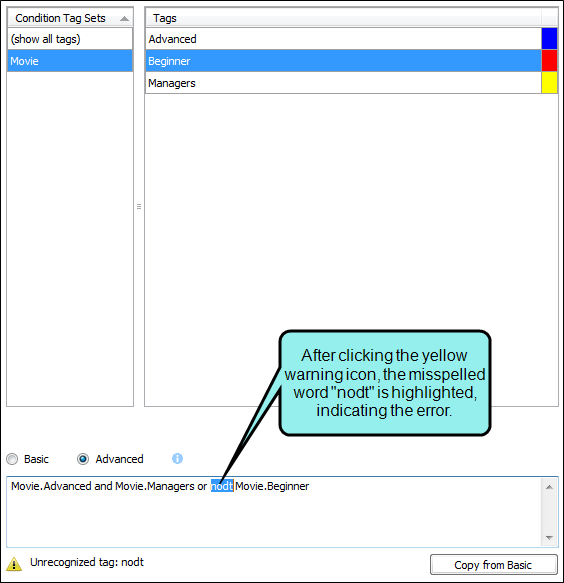
When you type in the Advanced section, a yellow warning icon displays with relevant text if you have typed an error.
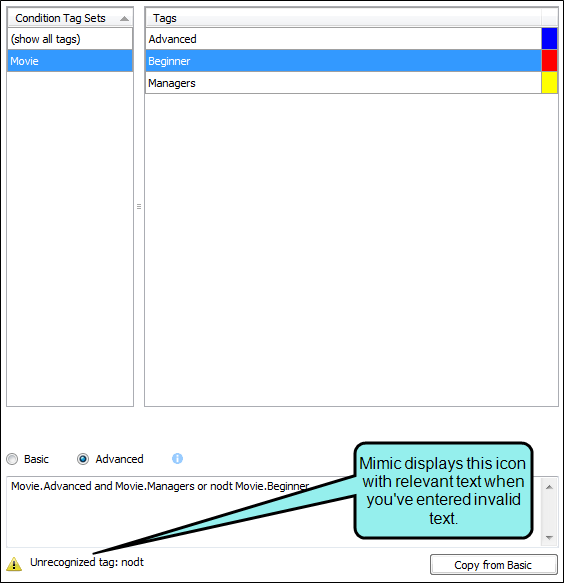
You can expect to see this icon quickly appear and then disappear as you type. However, if the icon remains after you finish, you can click it. The error will then be highlighted in the text below.
What's Next?
Now that you have associated your condition tags, you can build the output to see the results. See Building Movie Output Using the Interface.
