After you record an audio file, you can make adjustments to the volume of the file.
How to Adjust the Volume of an Audio File
- Open the movie.
-
Do one of the following, depending on the element for which you have recorded audio:
- Movie For an entire movie, select Movie > Properties, then in the Movie Properties dialog, select the Audio tab. The recorded audio file should be displayed in the Audio field.
- Frame For a single frame, double-click the frame, then in the Frame Properties window pane, expand the Frame Sound section. The recorded audio file should be displayed in the Sound File field.
- Object For an object, double-click the object, then in the Object Properties window pane, expand the Audio section. The recorded audio file should be displayed in the Sound File field.
- Click Edit. The Sound Editor opens.
- Click
 . The Adjust Volume dialog opens.
 - Modify the options in the dialog as necessary:
- Volume Slide the bar up or down to increase or decrease the volume.
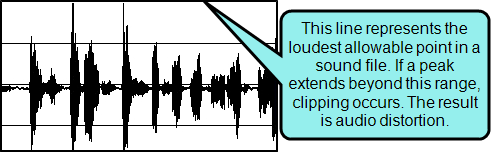
Normalize Click this button to maximize the volume of the audio file without causing clipping. In other words, if audio peaks in the file extend beyond the loudest allowable point, distortion of the sound can result. When you normalize an audio file, the highest peak is extended to the loudest point (but not beyond it). The rest of the peaks are then adjusted accordingly.

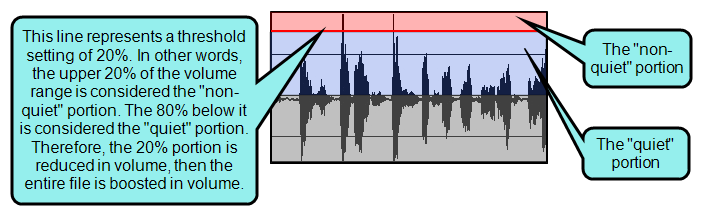
- Dynamics Click this button to increase the volume of quiet sections in the audio. You can use the "Ratio" and "Threshold" sliders in the dialog to determine what constitutes a "quiet section" and how much it will be boosted. Based on your settings, the "non-quiet" section will be compressed (i.e., its volume will be decreased), and then the volume in the entire file will be boosted.
Threshold Drag this slider to specify the area that is the "non-quiet" portion. It is measured in terms of percentage, starting with the top (i.e., the loudest point). Everything below this area will be considered the "quiet" portion.

- Ratio Drag this slider to specify how much the "non-quiet" portion of the audio file will be compressed (i.e., its volume will be decreased). For example, a setting of 2.0 means that the area will be made twice as quiet; a setting of 3.0 means that the area will be made three times as quiet. After this "non-quiet" portion of the file is compressed, the entire audio file is adjusted accordingly, thus making the "quiet" portion louder.
- In the Adjust Volume dialog, click OK.
- In the Sound Editor, click OK.
- If using the Movie Properties dialog, click OK. The Object and Frame Properties window panes require no further action.
- Click
") to save your work.
to save your work.