Moving Keyframes
For all object keyframe types, you can move individual keyframes to new locations in the timeline by using the Object Properties window pane or the Timeline window pane. You also have the option to move position keyframes manually in the Frame Editor.
[Menu Proxy — Headings — Online — Depth3 ]
How to Move Keyframes
- Open the movie.
-
Do one of the following:
To Move Individual Keyframes in the Keyframe Properties Window Pane
- In the Frame Editor, click an object that contains one or more keyframes.
-
In the Timeline window pane (View > Timeline), do one of the following:
- For all standard object types, click Frame View. Any action objects converted to objects will also be in this view.
- For action object types, click Action View. Any objects converted to action objects will also be in this view.
- Scroll down to the object's keyframe bar (e.g., opacity, text).
-
Click on a keyframe (diamond) within the keyframe bar.
The Keyframe Properties window pane opens.
-
In the Keyframe Properties window pane, set the Time field to a new point in time at which the object will change to this state.
To Move Individual Keyframes In the Timeline Window Pane
- In the Frame Editor, click on an object that contains one or more keyframes.
-
In the Timeline window pane (View > Timeline), do one of the following:
- For all standard object types, click Frame View. Any action objects converted to objects will also be in this view.
- For action object types, click Action View. Any objects converted to action objects will also be in this view.
- Scroll down to the object's keyframe bar (e.g., opacity, text).
- Click on a keyframe (diamond) within the keyframe bar.
-
Drag the keyframe to a new location in the keyframe bar.
To Move Position Keyframes in the Frame Editor
-
Click
") to save your work.
to save your work.
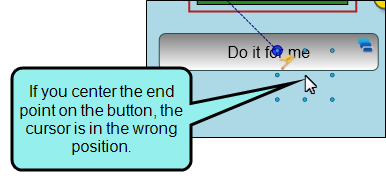
Tip When applying position keyframes to an object or effect, the position keyframe location is placed at the upper left corner of the object. Depending on the type of path you are drawing, you may want to slightly adjust the object's trajectory to account for the space between the upper left corner of the object and the middle of the object.
For example, if you have a cursor object and you need it to "click" a button, you may want to position the trajectory slightly above and to the left of the button, so it appears that the cursor is in the middle of the button.

Tip If you resize an object bar, the keyframes associated with that object do not automatically adjust to reflect the object bar's new size. As a result, some keyframes may play before or after the object's start or end time, and will not appear in the output. Remember to check your keyframes when adjusting your object timing.
What’s Next?
If necessary, you can continue enhancing the movie. Otherwise, you can finalize the movie by building and distributing it. See Editing a Movie and Building Movie Output Using the Interface.

