Setting Timing for Objects
Not only can you control the timing of frames, but you can also do the same for individual objects within frames by using the Object Properties window pane or the Timeline window pane. You can specify the start time of the object as well as how long it plays. In the Timeline window pane, you can visually arrange the timing and order of frame objects.
[Menu Proxy — Headings — Online — Depth3 ]
How to Set the Timing for an Object in the Timeline Window Pane
- Open the frame.
- Open the Timeline window pane. Do one of the following, depending on the part of the user interface you are using:
Ribbon Select View > Timeline.
- Keyboard Shortcut Press CTRL+T on the keyboard.
The Timeline window pane opens.
- In the Timeline window pane, click Frame View.
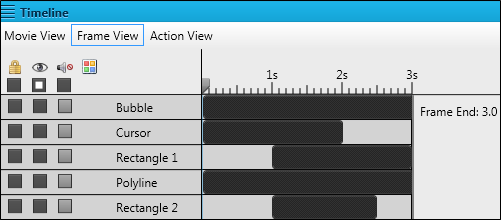
- Click at the beginning or end of an object bar and drag it to the right or the left. You can drag the left edge of an object to determine its starting point, and the left edge to set its ending point. In this example, the Timeline window pane shows that there are five objects in the frame.

- The first object is a callout that starts playing at the beginning of the frame and plays to the end of the frame.
- The second object is a cursor that starts playing at the beginning of the frame and stops after 2 seconds.
- The third object is a rectangle that plays for 2 seconds, starting at 1 second in and stopping at the end of the frame.
- The fourth object is a polyline that starts playing at the beginning of the frame and plays to the end of the frame.
- The final object is another rectangle shape that plays for 1.5 seconds, beginning 1 second after the start of the frame and ending .5 seconds before the end of the frame.
Note Mimic's live preview only displays the objects present at that point on the timeline. So in the example above, if the timeline scrubber is at .5 seconds, you would see the bubble, cursor, and polyline. The two rectangles would not appear until the scrubber hit the 1 second mark.
Note If you cannot drag the object bar in the timeline, you may need to select the Time Span check box in the Object Properties window pane.
- Click
") to save your work.
to save your work.
How to Set the Timing for an Object in the Object Properties Window Pane
- Open the frame.
-
In the Frame Editor, double-click the object whose timing you want to set.
The Object Properties window pane opens.
- Expand the General section.
- Change the settings in any of the following fields.
- Time Span If you want the object to be displayed for a specific period of time, leave the check mark in this box. If you want to disable timing for the object, click this check box to remove the check mark. Disabling the timing is useful if you want to ensure that the object continues to display as long as the frame does.
- Start Enter the number of seconds after the start of the frame that you would like the object to first be displayed. If you want the object to display from the very start of the frame, leave 0 in this field.
- Duration Enter the number of seconds you would like the object to be displayed in the frame.
- Click to save your work.
What’s Noteworthy?
Tip If you resize an object bar, the keyframes associated with that object do not automatically adjust to reflect the object bar's new size. As a result, some keyframes may play before or after the object's start or end time, and will not appear in the output. Remember to check your keyframes when adjusting your object timing.
What’s Next?
If necessary, you can continue enhancing the movie. Otherwise, you can finalize the movie by building and distributing it. See Editing a Movie and Building Movie Output Using the Interface.

