The color fill tool lets you fill an area with a color of your choosing. You can use this tool on objects or on the canvas.
[Menu Proxy — Headings — Online — Depth3 ]

How to Fill an Object or Area
The color fill tool lets you quickly fill areas of an image with a color.
- Open the image.
- From the Edit ribbon or local toolbar, click
 to select a color.
 - In the local toolbar, use the Fill Tolerance drop-down
 to adjust the tool's sensitivity to slight variations in color. Use a low tolerance if you want to select very specific areas of the image. Use a high tolerance if you want to select an area where there are very slight differences in a color, or if you want to intentionally select large sections of an image.
 - (Optional) Zoom in on the image to select fill very specific sections, such as a line or a border.
- Click the object or canvas area you want to fill.
-
Click
 to save your work.
Example
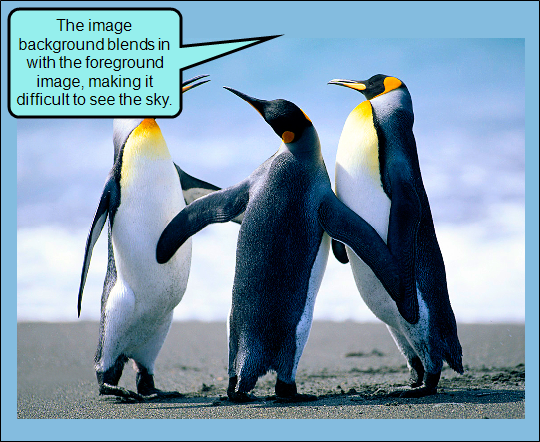
You have an image that has a blue background. You'd like to change the background to yellow to make the image easier to see, but you have no way to recapture the image.
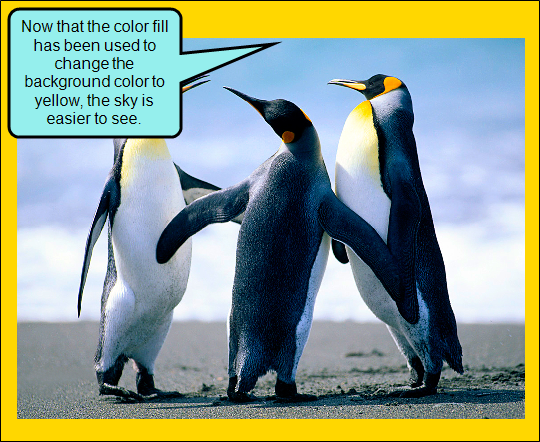
Using the color fill tool, you can pick the new color, then click within the area of the color you want to replace. The new color replaces the existing color.
How to Fill Using the Selection Rectangle
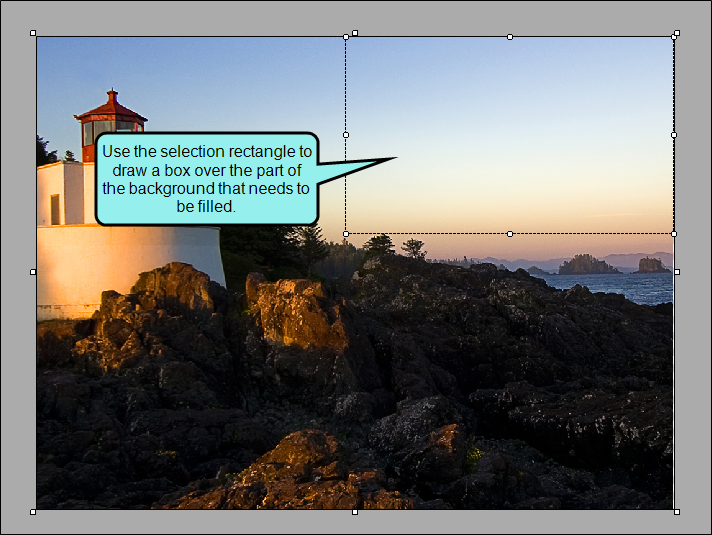
You can use the selection rectangle to set a boundary for the fill area. This lets you limit the area where you can fill to the area within the rectangle's borders.
- Open the image.
- From the Edit ribbon or local toolbar, click
 .
. - Click on the part of the canvas you want to fill and drag the mouse until the rectangle covers the section of the canvas you want to fill.
- From the Edit ribbon or local toolbar, click to select a color.
- In the local toolbar, use the Fill Tolerance drop-down to adjust the tool's sensitivity to slight variations in color. Use a low tolerance if you want to select very specific areas of the image. Use a high tolerance if you want to select an area where there are very slight differences in a color, or if you want to intentionally select large sections of an image.
- (Optional) Zoom in on the image to fill very specific sections, such as a line or a border.
- Click on the object or canvas area you want to fill.
Example
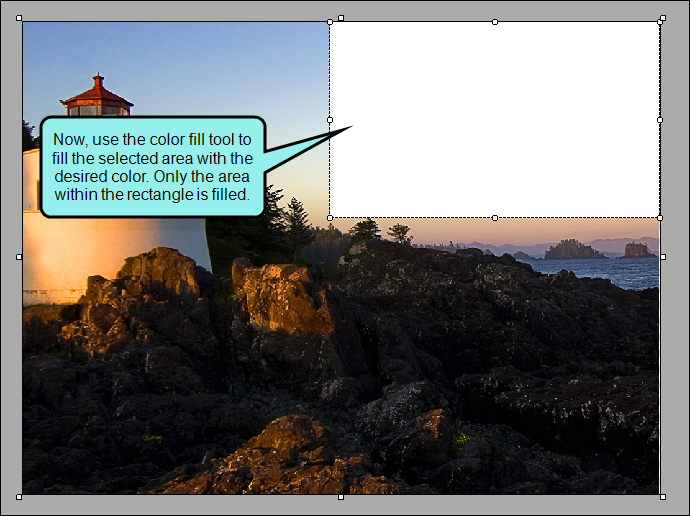
You have a picture with a large background image. The background image is detailed, and you need a solid background area for text to stand out. You can use the selection rectangle to create a uniform, square shape to use for your text.
Then, use the color fill tool to fill the area with the desired color. Depending on the detail of your image, you may need to set the tolerance to a higher level.
How to Fill Using the Magic Wand
You can use the magic wand to select a specific area. This lets you limit the area where you can fill to the magic wand's selection.
- Open the image.
- From the Edit ribbon or local toolbar, click
 .
. -
Click on the part of the canvas you want to fill. The magic wand adds a semi-transparent overlay onto the surface of the selection.
Note After making the first selection using the magic wand, you can continue to add selections by holding down the SHIFT key while clicking in new areas. All areas that are part of the selection will display a semi-transparent overlay on top of the existing image.
- From the Edit ribbon or local toolbar, click to select a color.
- In the local toolbar, use the Fill Tolerance drop-down to adjust the tool's sensitivity to slight variations in color. Use a low tolerance if you want to select very specific areas of the image. Use a high tolerance if you want to select an area where there are very slight differences in a color, or if you want to intentionally select large sections of an image.
- (Optional) Zoom in on the image to fill very specific sections, such as a line or a border.
- Click on the object or canvas area you want to fill.
Example
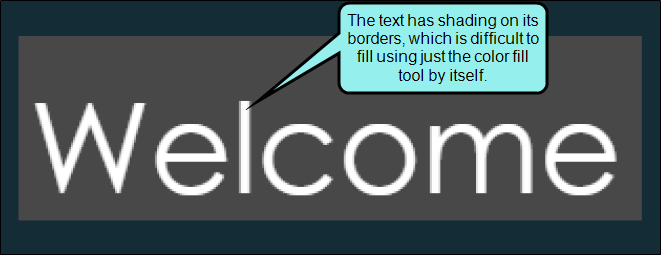
Your background image includes text. Because the text is set smoothly onto the image, pixels at the edges of the letters go from lighter to darker. This makes using the color fill tool by itself more difficult; you'd have to click on each of those pixels to color each letter entirely.
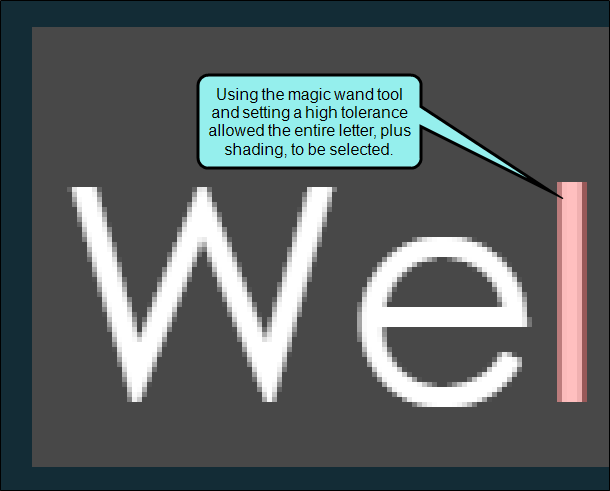
Instead, select the part of the image you want to correct using the magic wand tool. Use the tolerance drop-down to select a higher level of tolerance for the wand. This will allow the wand to ignore slight color variations and select a larger area.
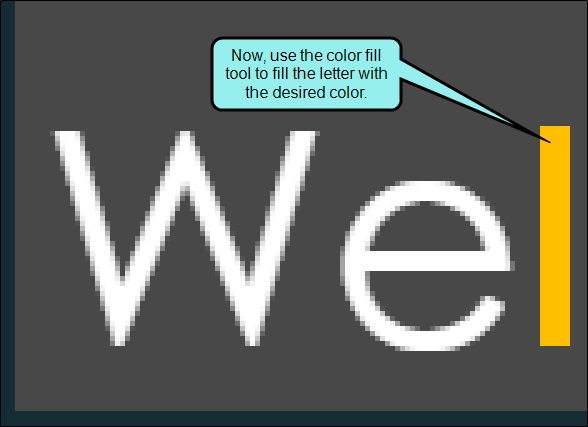
Once you're satisfied with the selection, use the color fill tool to replace the selected areas with a solid color.
Note If you are using a drawing or selection tool and Auto-Adjust is enabled, you will not be able to use the tool outside of the true canvas. The cursor changes to a no symbol  to indicate areas outside of the true canvas boundaries where drawing and selection tools are disabled.
Note If the background scale is set to anything other than 1.000, the canvas tools (magic wand, selection rectangle, color fill, pencil, eraser, and flatten) will not be available. Be sure to make changes to the canvas before making adjustments to the background scale.