You can apply condition tags to objects that have been added to images. You do not need to apply conditions to each and every object in an image, but rather only to those objects that should be included in some outputs but excluded from other outputs. If a particular object should always be included in the image, there is no need to apply a condition tag to it.
Placing condition tags on objects is especially useful if you are saving the image to multiple profile targets (e.g., one copy of the image might be set to include certain objects, and another copy of the image might be set to exclude those objects).
[Menu Proxy — Headings — Online — Depth3 ]

How to Apply Conditions to Objects in an Image
- Open the image.
- Double-click the object to which you want to apply one or more condition tags. The Properties dialog for that object opens.
- Click the Conditions tab. All of the available condition tags—those that you have created, as well as those from a linked Flare project—are shown on the right.
- For each condition tag that you want to apply to the object, click the check box next to the tag.
- Click OK.
-
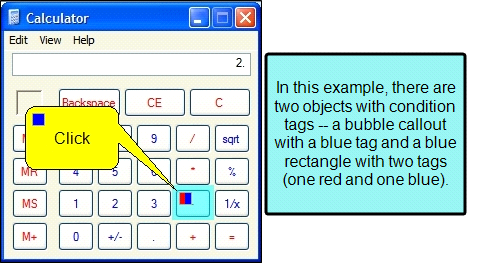
Click
 to save your work. A small square displays on the object, and it shows the color of the condition tag. If you applied more than one condition tag to the object, each color is shown. (If you do not see square, click
  in the local toolbar at the bottom of the Capture Editor.)
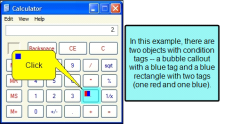
Note The colored squares are simply used to let you know which objects have condition tags applied to them. Those squares will not display in the final output.
What’s Next?
Although you have applied condition tags, the image will still contain all of your objects (whether one has a condition tag applied to it not). To ensure that objects with certain condition tags are excluded from your output, you need to associate condition tags with the image. See Associating Conditions With Images.