


You can insert images into
How to Insert an Image
- Open the document or topic.
- In the XML Editor place your cursor where you want to insert the image.
-
Do one of the following, depending on the part of the user interface you are using:
- Ribbon Select Insert > Image.
- Keyboard Shortcut Press CTRL+G.
- Right-Click Right-click in the editor and select Insert > Image. This context menu option is available only when your cursor is located in certain places in the editor (e.g., not in a drop-down effect).
- Select the General tab.
-
Select an image file to insert.
You can select an image file already in the document by finding and choosing it in the Select File Area. Use the buttons in the local toolbar to view all files in a list, view files in their folder structure, etc.
You can click
 to find and select an image file outside of the document.
If you want to link to an image stored on a website, you can enter the path directly into the field.
If you want to select an image file that you recently inserted, click the down arrow in the field next to
and select the file from the list. -
(PDF Images Only) If you selected a PDF file to insert as an image, the Preview section shows a Page field. In this field, select the specific page you want to insert from the PDF file.

For more about inserting PDF files as images, see PDF Files as Images.
-
(Optional) If you want to apply a specific style class to the image, you can select it from the Style Class field. For more information see Styles and Stylesheets and Resizing Images.
Example You have created in your stylesheet a class of the img style called "button" (i.e., img.button) and you have set a maximum size on that style class. The idea is that you want to use that style class whenever you insert an image of a button, ensuring that the image always displays in a very small size. Rather than using the default parent img style when you insert the image, you select img.button from the Style Class drop-down.
- (Optional) In the Screen Tip field you can type a phrase that will appear when the end user hovers over the image.
-
(Optional) In the Alternate Text field you can type alternate text to display when the image is not available, such as when a disabled individual is using a screen reader.
-
(Optional) Use any of the other tabs to provide additional settings for the image.
Position Tab
You can use this tab to adjust the positioning of the image on the page. This includes the ability to wrap text around an image or float an image outside the frame holding the regular flow of text. See Using Floats for Positioning Elements.
Note You can also use absolute position (i.e., text wrap) on images via the context (right-click) menu. See Using Absolute Positioning on Elements.
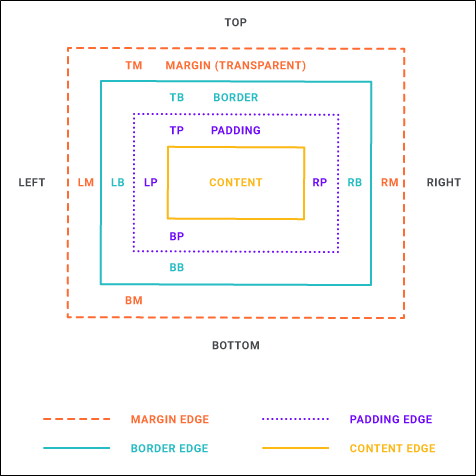
Borders & Margins Tab
You can use this tab to set borders, margins, or padding for the image. See Adding Borders to Images, Adding Margins to Images, and Adding Padding to Images.
Background Tab
You can use this tab to add background settings (e.g., color, image) for the image. See Adding Backgrounds to Images.
- Click OK. The image is added.
- Click
") to save your work.
to save your work.
The Insert Image dialog opens.

Note This feature is not supported for MadCap Lingo review package (LIREV) files.