


You can insert images into
[Menu Proxy — Headings — Online — Depth3 ]
How to Insert an Image—Dialog Method
The following steps show you how to insert an image into a content file (e.g., topic, snippet), adding the image file to the project as well if necessary. If instead you follow the steps for adding an image to a project, the image file is added to the project, but not inserted into a topic.
- Open the content file.
- In the XML Editor place your cursor where you want to insert the image.
-
Do one of the following, depending on the part of the user interface you are using:
- Ribbon Select Insert > Image.
- Keyboard Shortcut Press CTRL+G.
-
Local Toolbar Click the face of the
 button.
 - Right-Click Right-click in the editor and select Insert > Image. This context menu option is available only when your cursor is located in certain places in the editor (e.g., not in a drop-down effect).
- Select the General tab.
-
Navigate to the image that you want to insert and select it. By using the buttons in the local toolbar, you can view all image files in a list, view files in their folder structure, and use other options. If you want to add one of your 20 most recently used images to the project, you can select an image from the Recently Used Images group. If you want to add one of your pinned—or favorite—images to the project, you can select an image from the Pinned Images group. You also can click
 to find and select an image file outside of the project.
Shows all of the files

Shows or hides the folders that the files are stored in.

Shows or hides the files. If you click this button when the Show Folders button
 is selected, the area splits into two. The folder is shown on the left side, and the files and subfolders within it are shown on the right.
If the Show Files button
 is the only one selected, you can click this button to move up one folder level.
Lets you filter the kinds of files shown below. Depending on the task you are performing, this field may already be populated with the most appropriate file type(s).
If you want to link to an image stored on a website, rather than adding it to your project, you can enter the path directly into the field.

Example When you insert an image, the dialog might look something like this:

Note If you select an image outside the project, that file is then copied and placed inside the project. The image file is stored in the Resources\Images folder of the Content Explorer.
-
(PDF Images Only) If you selected a PDF file to insert as an image, the Preview section shows a Page field. In this field, select the specific page you want to insert from the PDF file.

For more about inserting PDF files as images, see PDF Files as Images.
-
(Optional) If you want to apply a specific style class to the image, you can select it from the Style Class field.
For more information see Styles and Stylesheets and Resizing Images.
Example You have created in your stylesheet a class of the img style called "button" (i.e., img.button) and you have set a maximum size on that style class. The idea is that you want to use that style class whenever you insert an image of a button, ensuring that the image always displays in a very small size. Rather than using the default parent img style when you insert the image, you select img.button from the Style Class drop-down.
- (Optional) In the Screen Tip field you can type a phrase that will appear when the end user hovers over the image.
-
(Optional) In the Alternate Text field you can type alternate text to display when the image is not available, such as when a disabled individual is using a screen reader.
For more information see Accessibility.
-
(Optional) In the Tab Index field you can enter a value to specify the order in which users can tab through images in a topic. So when a user presses the TAB key the first time in a topic, the image with an index value of 1 will be selected first, the image with a value of 2 will be selected next, and so on. If you want to skip an image, enter -1 in that field.
Example You have a table with two columns and two rows, with an thumbnail image in each cell. You want users to be able to quickly browse through them using the TAB key, so that they can select an image and then press ENTER to temporarily enlarge the thumbnail to full size. Without tab indexes set, the images will be selected in a horizontal order as the user presses the TAB key (i.e., the image in the first cell is selected first, followed by the image in the cell to the right, followed by the image in the first cell of the second row, and finally the second image in the second row).

However, you want the images do be selected downward (i.e., selecting those in the first column before those in the second column). Therefore, you edit each image and enter the appropriate tab index value on it.

Note This feature is supported only in web outputs—HTML5, Clean XHTML, WebHelp, WebHelp Plus.
- (Optional) Select Apply the alternate text and screen tip to all image references if you want the same alternate and screen tip text to be used everywhere the image is used in the project. However, this option will not affect new insertions of the image in the project; you would need to add the alternate or screen tip text to those images manually.
-
(Optional) Use any of the other tabs to provide additional settings for the image.
Size and Print Size Tabs
You can use these tabs to resize the image. If you want to provide only one group of settings for the image, select the Size tab. If you want to provide two groups of settings, use both the Size and Print Size tabs. The Size tab is for targets that are using the default medium or a custom medium. The Print Size tab is for targets that are using the print medium.
Position Tab
You can use this tab to adjust the positioning of the image on the page. This includes the ability to wrap text around an image or float an image outside the frame holding the regular flow of text. See
Note You can also use absolute position (i.e., text wrap) on images via the context (right-click) menu.
Thumbnail Tab
You can use this tab to create a thumbnail version of the image in the output.
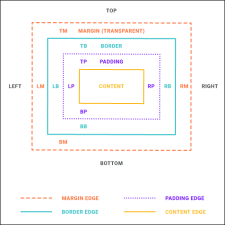
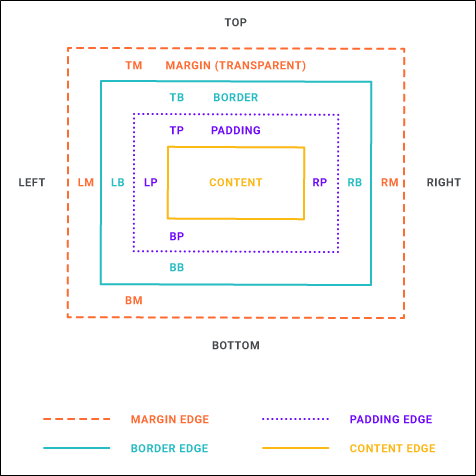
Borders & Margins Tab
You can use this tab to set borders, margins, or padding for the image.
Background Tab
You can use this tab to add background settings (e.g., color, image) for the image.
- Click OK.
- Click
") to save your work.
to save your work.


How to Insert an Image—Drag and Drop Method
You can insert images by dragging and dropping the image file from the Content Explorer or File List window pane to the XML Editor.
With this method, you can specify any necessary advanced settings for that image only after it is inserted (to do this, right-click on the inserted image and select Image Properties).
-
Open the Content Explorer or File List window pane.
If necessary, make sure you float and position the window pane or editor
- Click and drag the image file from the Content Explorer or File List window pane to the location where you want it in the XML Editor and drop it.
- Click to save your work.
How to Insert an Image—Toolbar Method
- Open the content file.
- Place your cursor where you want to insert the image.
-
In the local toolbar at the top of the XML Editor click the down arrow next to
. This expands the Insert Image drop-down, where you can see your pinned images and the 20 most recently used images. - Navigate to the image that you want to insert and select it.
- Click to save your work.
What’s Noteworthy?
Note If you need to insert an image that does not appear in the Pinned Images or Recently Used Images groups, you can select More Images to open the Insert Image dialog.

Note Images must appear in the Recently Used Images group before they can be pinned. If the image you want to pin does not appear in the Recently Used Images group, you can add it to a content file by dragging it from the Content Explorer or using the Insert Image dialog.
Note The Recently Used Images and Pinned Images groups show the relative path location of each image. Hover over any image to see its full file path.
Note You can expand or collapse the Recently Used Images and Pinned Images groups by clicking the arrows next to each group name.
Note The previous steps are for inserting an image file that already exists. However, you can also capture an image and insert it into a topic at the same time if you also have MadCap Capture installed. See Inserting Screen Capture Images.
Note You can also make any image in your online Help interactive by linking it to another topic, bookmark within a topic, or an external file such as a website.
Note If you import Microsoft Word documents containing embedded images into a project, Flare places copies of those image files in subfolders within the Resources > Images folder. This is done in order to avoid naming conflicts with embedded images from other Word documents that you might import. The subfolders are named after the Word documents being imported.
Note If you are using the "generate web-safe images" option in WebHelp targets, images that link to external locations, such as websites, are not affected by that option. See Generating Web-Safe Images.
Note You can include images in topics that you send for review.
Note You can use a global setting in the XML Editor tab of the Options dialog (File > Options). This automatically adds an empty alt tag to images when you insert them into a topic or snippet (unless you specifically add an alt tag to an image).
