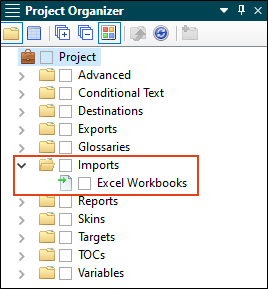
You can import Microsoft Excel files into Flare projects. They can be imported into existing projects or when creating a new project. The spreadsheet content will be added to tables in Flare when the import is finished.

[Menu Proxy — Headings — Online — Depth3 ]
How to Import Excel Files
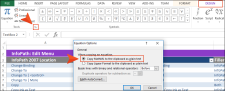
- Select Project > Import > MS Excel Workbooks.
-
In the wizard, choose either Import into a new project (and complete the fields below) or Import into this project. However, if you do not have a project currently open, the file(s) will automatically be imported into a new project.
- Project name Type a name for the new Flare project that will be created after you perform the import.
- Project folder Accept the default location for the new project or click
 to find and select a folder.
 -
Output type Select the primary target for your project.
A target is a file that generates output from your project. You want your output to look and behave in a certain way, but not all authors have the same audience or work for the same company with the same needs and the same computer networking setup. Therefore, Flare lets you choose the best type of output(s) for your needs. A target file is used for each instance of an output type. And you can have many targets in your project (e.g., eight targets using PDF, two targets using HTML5).
This page of the wizard lets you select a primary target as you get your project off the ground. This means that—although you can use more than one target for your project—you might use one target most of the time. By selecting a primary target, you will be able to use shortcut buttons to build, view, and publish its output more quickly. Also, when you open topics in the XML Editor, they will be displayed by default with the styles and other specifications associated with the primary target. However, you can use the Layout and Medium drop-downs in the local toolbar of the XML Editor to view topics with other settings.
Do not worry if you're not yet sure of the best output type for your project. No matter which output type you select now, you can always change the primary target later.
- Click Next.
-
Click
 to choose Excel files. You can select XLS, XLSX, or CSV files. When finished, click Next. (You can also select other options as necessary.)
This opens the file that is selected in the list.
Link Generated Files to Source Files
This creates a connection between the original files and the files that are created as a result of the import. This is useful if you want to continue editing the content outside of Flare, instead of editing in the Flare project. Flare recognizes when changes have been made to the source documents and reminds you to reimport the documents to ensure the Flare project also reflects the changes. If you use this option, a link icon
 is added to the top of a linked file in the Flare interface. This lets you know that you need to edit the source file, rather than editing this file. If you remove the connection to the source file, this icon no longer displays on the file. Please note that if you have bound the project to source control, the icons used for source control take precedence over the link icon.
This removes the selected file(s) from the list.

This moves the selected file higher in the list (if you have more than one file to import). The file at the top is used for the name of the content folder holding the imported topics in Flare. Also, the order determines how the imported files are arranged in the Flare TOC that is created as a result.

This moves the selected file lower in the list (if you have more than one file to import).
-
Select from various options as necessary, then click Next. Open the full topic for option details.
-
Import Worksheets as Select the type of Flare file where you want your spreadsheets to be imported.
- Topics Flare will convert your content and place worksheets into topics. Title text on a worksheet tab will become a heading in the Flare topic.
- Snippets Flare will convert your content and place each worksheet into a separate snippet.
If you selected “Snippets” above, you can also choose from the following options:
- Include tab titles as headings Any title text on your worksheet tabs will become headings in the Flare snippets.
- Create a topic with snippets Flare will create a topic and place the snippets within it. Otherwise, only the snippets will be created.
- Organize worksheets into different folders per workbook Select this option if you are importing multiple workbooks and want the resulting files to be stored in separate folders in Flare. If you do not select this option when importing multiple workbooks, the files will all be placed in the same folder in Flare.
- Import hidden rows/columns This includes any hidden rows and columns in the import. Otherwise, they will not be part of the imported content.
-
Use first row as column header Select this option if you want Flare to convert the first row of every spreadsheet into column headers in the Flare tables. If you do not select this option, the first row will be treated like all the other rows.
-
Import equations based on settings When importing Excel files that contain equations, you can select this option to convert them to MathML (the web standard) or images. If you disable this option, equations from Excel are not converted to Flare.
Note The conversion of equations to MathML versus images depends on whether you have Excel installed:
- If Excel is Installed Equations will be imported as MathML.
- If Excel is not Installed Equations will be imported as PNG images.
Note There is an option in Excel that must be enabled in order for equations to be imported into Flare. In Excel, select an equation that you’ve inserted, open the Design ribbon, and in the Tools section, click the small option in the lower-right. Then in the dialog, select Copy MathML to the clipboard as plain text.
Note If you choose to convert equations to MathML, they are automatically stored in snippets in Flare. Otherwise, equations will be converted to images. A snippet or image displaying an equation is automatically placed below the worksheet (in the topic or snippet where the worksheet was converted to a table).
Note To use this feature, the equation must have been created in Microsoft Excel 2010 or newer.
-
Import charts as Any charts in your spreadsheets will be imported as images. Use this field to select the type of image format to be used.
Note An image displaying an imported chart is automatically placed below the worksheet (in the topic or snippet where the worksheet was converted to a table).
- Split topics or snippets by maximum rows You can select this option if you have spreadsheets with a lot of rows and want to divide them into multiple topics or snippets (rather than one very long topic or snippet). After enabling this option, enter the number of rows that you want to allow in each topic or snippet before a new topic or snippet is created.
- Auto-reimport before 'Generate Output' If you selected “Link Generated Files to Source Files” earlier in the wizard, you will likely make future content changes in the source files. When you make such changes, the source files need to be reimported into the project so that they can be included in the output. You have the option of reimporting the files manually. However, you can also tell Flare to do this for you automatically, so that you do not have to. Select this option if you want Flare to automatically reimport files when you attempt to build output.
-
-
Use the next page to specify how you want the formatting of the Excel files to be treated upon import. Choose whether the imported files should retain their look and feel from Excel, or if you want to associate them with a table stylesheet that you’ve already created in Flare. When finished, click Next.
-
Preserve MS Excel Styles This retains any formatting from your spreadsheets so that you can continue to use that look and feel in Flare.
If you have Excel installed, all styles (factory and custom) and local formatting are retained in Flare. If you do not have Excel installed, only custom styles and local formatting are preserved; factory styles are not retained. Also, if you are using more than one table style in a worksheet, only one of them will be retained in Flare.
- Don't Preserve MS Excel Styles This does not keep the formatting used in the Excel spreadsheets. You can click in the field below this if you want to associate the imported spreadsheets with a table stylesheet that you’ve already created in Flare. If you do not choose a table stylesheet, the files will be imported with plain text.
-
-
You can use this page to exclude certain worksheets, or even specific rows and columns, from the import. By default, all workbooks, worksheets, rows, and columns are selected for import. You can click the corresponding check boxes to remove check marks, which excludes items from the import. If you click on a particular worksheet, the area to the right displays the rows and columns within it. You can then remove check marks for any rows or columns that you want to exclude.
Note If your worksheets have any hidden rows or columns that you did not include in the import, you may see that those rows or columns are skipped on this page. For example, you might see columns A, B, C, and E (where D is hidden).
- Click Finish. The Accept Imported Documents dialog opens. The files that will be created as a result of the import are listed on the left. A preview of each file can be seen to the right when you click the file.
- When you are finished previewing the files to be created, click Accept.

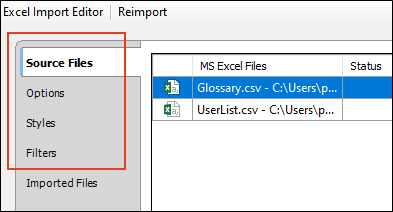
Excel Import Editor—Import and Re-Import
If you add an Excel import file
When you double-click this file, it opens in the Excel Import Editor. This editor contains most of the same fields and options as the Import Microsoft Excel Wizard.
After completing or changing any of these fields, you can click Reimport in the toolbar.

What’s Noteworthy?
Note There is a limit of 256 columns per worksheet that can be imported from Excel into Flare.
Note The Imported Files tab in the Import Editor displays the files that have been imported previously.
Note Flare supports Microsoft Excel 2010 and newer versions. However, if you have an older version of Excel, you can open the Options dialog (File > Options), select the General tab, and choose Import Excel Files Without MS Office.
Note A link icon ![]() displays on tabs in the XML Editor next to file names that are imported from and linked to another file or Flare project. However, if you are also using the built-in source control technology, the source control icons have a higher precedence and will therefore be displayed instead.
displays on tabs in the XML Editor next to file names that are imported from and linked to another file or Flare project. However, if you are also using the built-in source control technology, the source control icons have a higher precedence and will therefore be displayed instead.
What’s Next?
Now you can move on to any of the other basic steps:
- Step 2: Adding Content and Features
- Step 3: Designing
- Step 4: Developing Targets
- Step 5: Building and Publishing Output
Note You do not necessarily need to follow all of the above steps (and their substeps) in the exact order given. For example, as you add topics to a project, you may want to start applying styles and formatting to them right away, before adding other features to the project, such as a glossary. However, the above sequence probably makes the most overall logical sense. For example, you must start a project before adding content and features (i.e., topics, content, cross-references, etc.) to it.
