After you have created a project, added and formatted content, and developed a target, you are ready to build and publish the final output. Your output might be online (similar to a website) or print-based (such as a PDF). Of course, you can build the output at any point during the development process, but if you make additional changes to content, targets, or the look and feel, you will need to build the output again to make sure the changes are included in the files that you deliver to your end users.
[Menu Proxy — Headings — Online — Depth3 ]
Building Targets
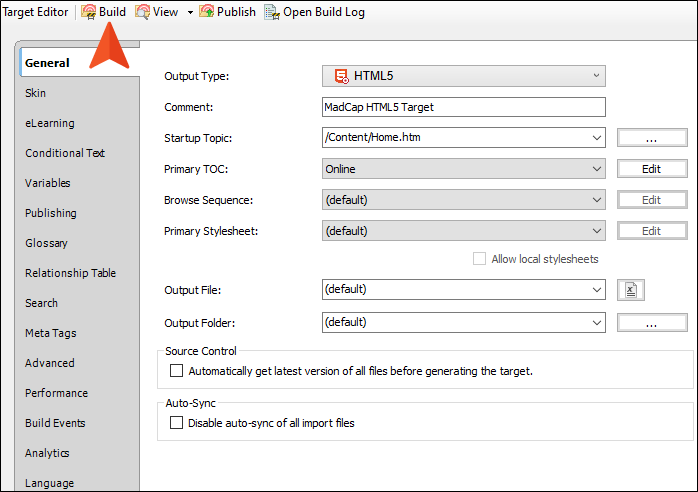
You can generate Flare output by clicking the Build button in a target, or in various other ways.
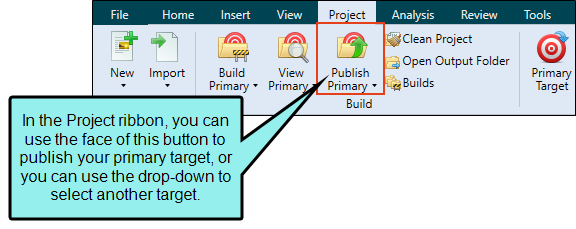
Publishing Targets
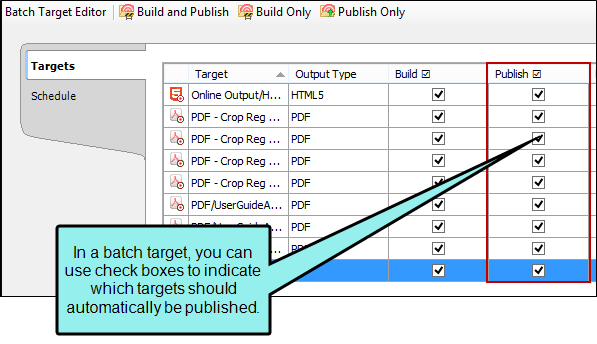
You can publish Flare output to different places in various ways. This includes manually, or automatically using different options, including publishing to MadCap Central.
- From the Project ribbon select Open Output Folder.
- Copy and paste the output files wherever you want.
- MadCap Central
- Elasticsearch
- File System (Computer or Network Folder)
- File Transfer Protocol (Web Server)
- Secure File Transfer Protocol (Web Server)
- Source Control
- Salesforce®
- ServiceNow®
- Syndicate
- Zendesk
Where Output Files are Initially Stored
When you build a target, Flare creates output files and places them in a folder named after the target, which is stored in a subfolder of your project called "Output." For example, let's say your project is stored here: C:\MyProject. In that case, after you generate output, the files would be stored here:
C:\MyProject\Output\MyName\TargetName
Depending on the output type associated with the target, the generated output might consist of many files.
Files to Be Distributed
The number of files that are generated and should be distributed depends on the output type you are creating and the settings that you provide when developing your project.
|
ONLINE |
|
OTHER |
LEGACY |
|||
|---|---|---|---|---|---|---|
|
HTML5 |
|
Word |
Clean XHTML |
Eclipse Help |
EPUB |
HTML Help |
|
All output files1 |
One .pdf file |
One or more files2 |
All output files (content)1 |
All output files3 |
One .epub file |
One .chm file |
|
1The main entry file has an .htm extension. 2The file format (.xml, .doc, .docx, .xps, or .pdf) that is generated depends on your target settings. When you build Word output, Flare may create an extra folder called Resources (if your project contains ancillary files, such as images). If you want to embed images in your Word document, you can use an option on the Advanced tab of the Target Editor 3Flare generates an XML-based plug-in file (plugin.xml) that specifies the context Help (csh.xml), index (index.xml), and table of contents (toc.xml) files that Eclipse needs to load your Flare content in the Eclipse Help system. |
||||||
Frequently Asked Questions
Following are some common questions about building and publishing output.
What Files are Produced When You Build Output?
This varies depending on the output format. Some formats will produce a single output file, such as a PDF. Other formats might produce many files and folders. To see the exact files and folders that are produced when you generate a target, select the Project ribbon. Then in the Build section select Open Output Folder.
Also, a log file is created whenever you build a target and is stored by default with the rest of the output. This file provides important information about the build, such as whether any warnings occurred in the process
What Happens to Old Files When You Rebuild a Target?
In Flare, the previously generated files are all removed when you rebuild a target. These are then replaced by the newly generated files. Therefore, if you want to preserve files from an older build, you will need to open Windows Explorer and copy those files to another location so that they are not overwritten by new files.
However, the situation is different if you are using MadCap Central to generate output. In Central, each build is preserved until you delete it.
What Happens to Old Files When You Republish Output?
This depends on how you choose to publish your output.
If you manually replace previously published files with new ones, it is generally best to delete all of the old files and then upload or paste the new ones in the same location.
If you use a destination file, you have the option in the Destination Editor of uploading only files that have changed since the previous publication. You also have the option of automatically removing stale files (i.e., those that were removed in your local project since that last publication).
What If You Want Different Outputs to Contain Different Content?
The best way to accomplish this is through the use of conditions. A condition is a single-sourcing feature that you can apply to files or different areas of your content. Conditions can determine whether certain information displays in some outputs but not in others. You can also control whether content displays on a certain device or screen size. It is just one of the many single-sourcing features that you can use in Flare. See Conditions.
Which Topics Show Up in the Output?
Suppose you have hundreds of topics, and you want some to show up in some outputs, but not in others. How do you control which topics are included in a given output? It depends on whether you are generating online or print-based output.
Online Output
When you build online output, all of the topics in the project will be included in the output unless you use one of the following methods to include or exclude them. If you do not use one of these methods, every topic will be included in the output, even if you add only some of them to the TOC (e.g., readers will be able to locate topics that are not in the TOC by using the search feature).
-
Applying Condition Tags at the Folder or File Level You can place condition tags on folders or topic files in the Content Explorer, then include or exclude those conditions in the targets. By placing a condition on a folder, it will automatically become associated with all topics within it.
Note You can place condition tags on files in the Project Organizer as well, but these conditions do not affect which files are included in the output. Rather, these conditions are useful for importing files from one Flare project into another.
- Include Specifically Linked Content Another method is to use an option in the Target Editor to include only content files that are linked in some way. First, you include files that are directly or indirectly referenced from the target. This means that if the target is using particular files such as a TOCs, template page, and so on, other files linked directly or indirectly from them will be part of the output. Second, you can include only files that are linked from the TOC.
Print-Based Output
If you are creating a print-based output, only the topics included in your "outline TOC" (i.e., the TOC file in the Project Organizer) will be included in the output. In addition, you can place condition tags on outline TOC entries and use them to further separate content for different outputs (i.e., if you have other targets using that same outline TOC).
Can I Limit Who Sees the Output?
Yes. You can produce private output that requires a user to log in with an email and Central password. Without credentials, people cannot see the output. It is possible to set private output for all output types supported by Central. Also, accessing private output is not limited to people in your company. Central has a free viewer user type that you can use to add any of your customers to your Central license, and then give them access to live private output. See MadCap Central and Flare and Private Outputs on MadCap Central.
What Does the MadCap Doc Team Do With Output?
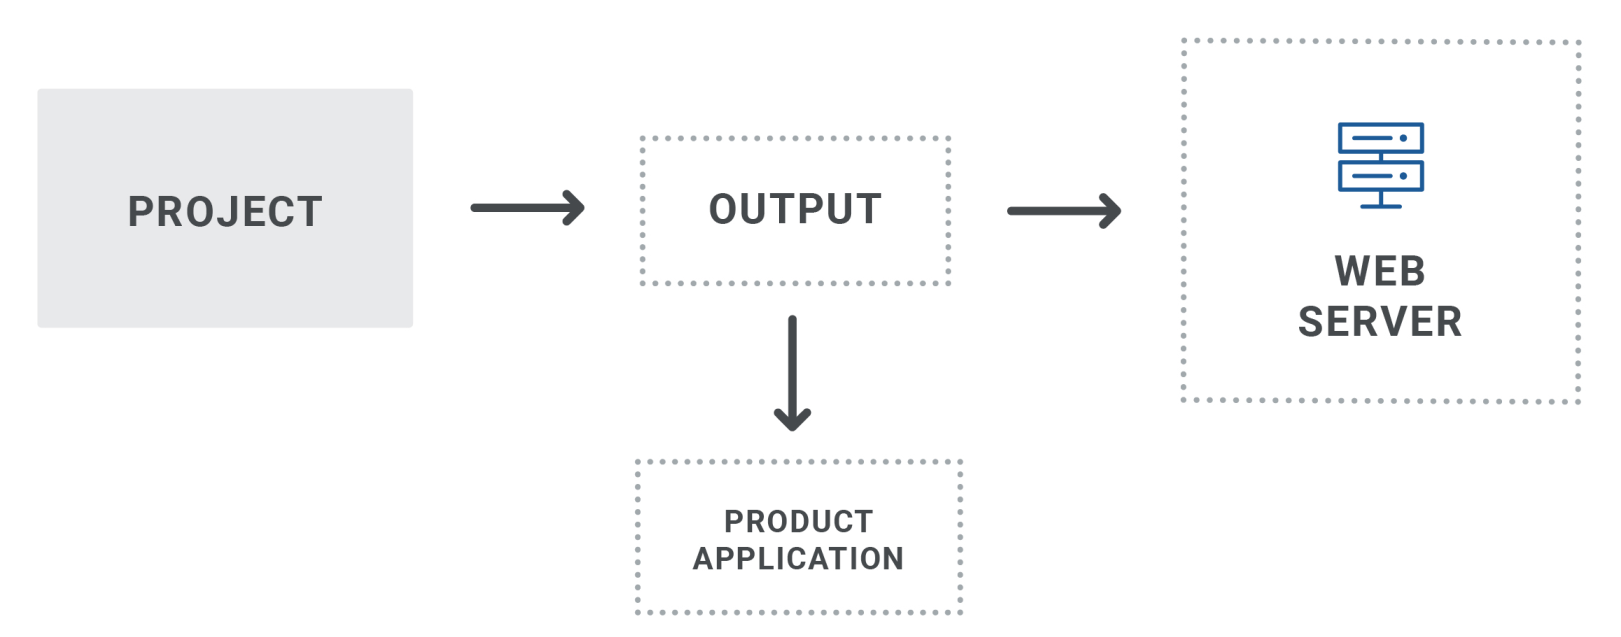
We use multiple methods for publishing our output:
- MadCap Central Our main “Shared” project is bound to Central. From there, we build some output (for various branches) and publish it on the Central server. Also, we create vanity URLs for targets, which lets us control the final URL for our output. For details, see help.madcapsoftware.com/central.
- Web Server We also publish HTML5 and PDF output on a web server.
- Product Application Each MadCap Software application has both local Help and server Help. The server Help is HTML5 output that we can update any time, since it is separate from the application. The local Help is HTML5 output that is installed with each application (if the end user chooses to install it). This output is updated only when updates occur for the application itself. After generating the local Help, we check it in to Microsoft Team Foundation Server using Visual Studio. Our developers then point to this output, integrating it in to the application.
What’s Noteworthy?
Warning Do not publish your output into your source folders (Content or Project). It is always best to publish output outside your main project folder altogether. Otherwise, you might lose your source files.
Warning If your computer's anti-virus (AV) software scans the Output folder during the build process and you experience one or more "Build Failed" errors, the AV software may be preventing the build process from accessing the output files. To avoid this, you can temporarily turn off or disable your AV scan. You may also be able to exclude the Output folder, add Flare to an exceptions list, or postpone/reschedule scans to a different time. See your AV vendor for information.
Tip You do not need to build the target to see how a particular topic will look in the final output. You can always preview topics as you develop your project by clicking  in the local toolbar of the XML Editor. If you click the face of the button, the preview is shown based on the format specified in the primary target. If you click the down arrow, you can select any of the targets in your project from a menu. The preview is then displayed using the output format specified in that target. In addition, you can continue to edit the topic with the Preview window pane open. The preview will automatically update as you save changes to the topic.
Tip Before building output, you might find it useful to run some of the analysis tools in Flare to check for issues, such as broken links. This way you can obtain a more thorough assessment of the project before generating output. See Analysis and Reports.


