


After you create condition tags in a Flare project, you can apply them to your content.
You can apply condition tags to many different elements in your project, such as files that make up the project (e.g., topic, image, stylesheet, glossary, skin, target files), full paragraphs, text within paragraphs, table rows and columns, table of contents (TOC) entries, glossary terms, index keyword markers, and more.
[Menu Proxy — Headings — Online — Depth3 ]
How to Apply a Condition—Quick Steps
- For most elements, you can right-click and select Conditions (or Properties > Conditional Text for files).
-
Select the condition tag set and choose the condition(s) you want to apply and click OK.
- Click
") to save your work.
to save your work.
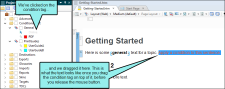
If the animation below is cut off, you can see the complete animation by clicking the link under it to open the full topic.
How to Apply Conditions to Selected Text Within a Paragraph
- Open the content file.
- Highlight the text to which you want to apply the condition tag.
- Do one of the following, depending on the part of the user interface you are using:
- Ribbon Select Home > Conditions.
- Keyboard Shortcut Press CTRL+SHIFT+C.
- Right-Click Right-click on the text and from the context menu select Conditions.
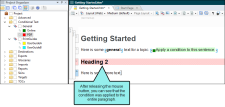
Drag-and-Drop In the Project Organizer, open the Conditional Text folder and expand the appropriate condition tag set. Click on the condition tag and drag it to the selected text in the XML Editor. (You can apply only one condition at a time to text using this method. However, you do not need to continue with any of the other steps below.)
Example — Selected Text
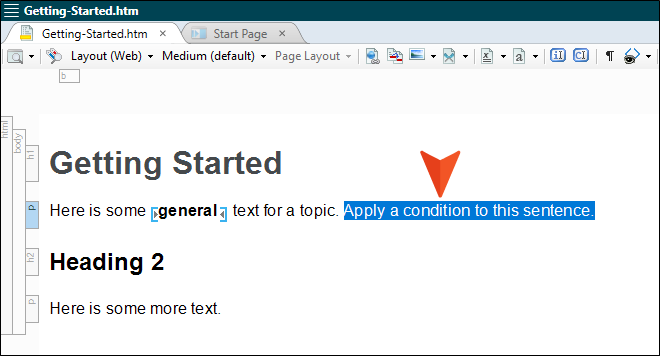
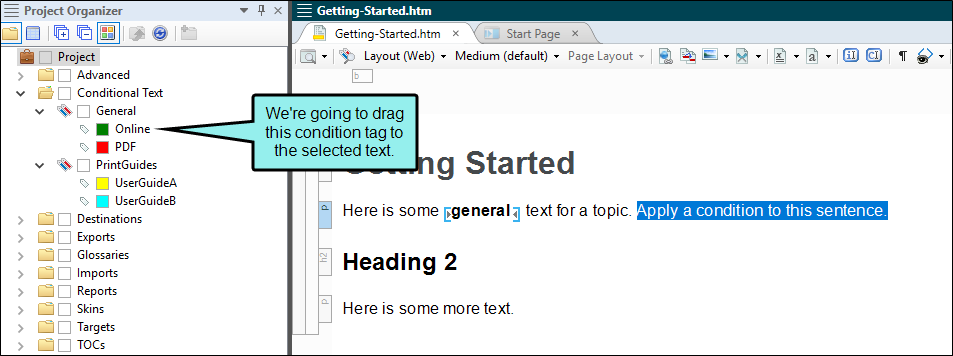
You want to apply a condition tag to selected text in a paragraph. First, in the XML Editor you would select the text in question.

Then in the Project Organizer, you open the Conditional Text folder and expand the appropriate condition tag set.

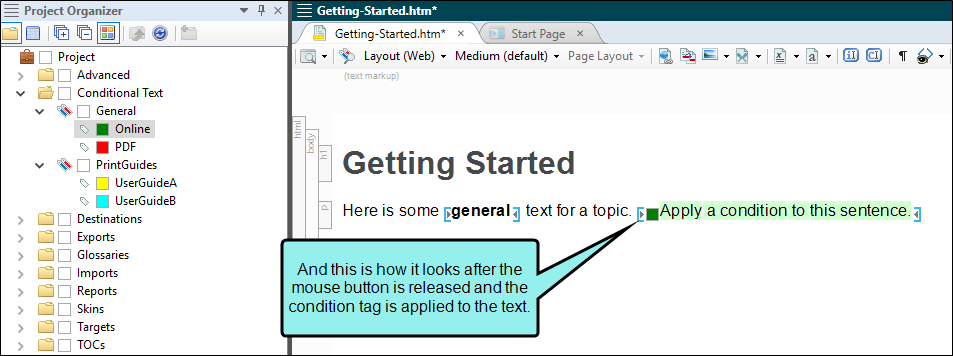
Finally, you click on the condition tag and drag it to the selected text in the XML Editor.

The Condition Tags dialog opens, with the first condition tag set selected and the associated condition tags shown on the right.
- If you want to see condition tags for a different condition tag set, select it.
- For each condition tag that you want to apply to the text, click the check box next to the tag. A check mark appears in the box.
- Click OK.
-
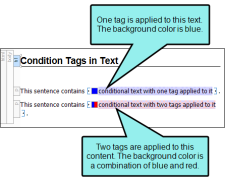
There are a couple of ways to tell whether a selection of text has one or more condition tags applied to it. In the bottom local toolbar of the XML Editor, click either of the following two toggle buttons to turn the tag indicators on and off.

Click this button at the bottom of the XML Editor to show or hide shading of the text itself. For example, if your condition tag has blue associated with it and you click this button to show the indicator, the content becomes shaded with a lighter version of blue. If more than one condition tag is applied to the content, the shading appears in a pattern that shows all of the applied condition tag colors.

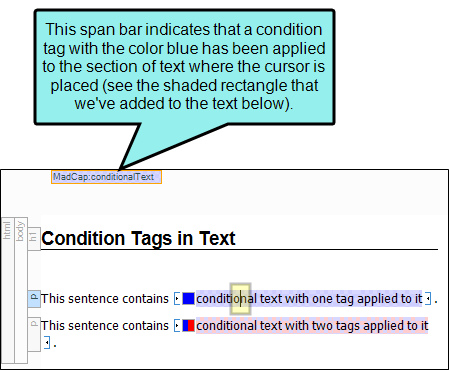
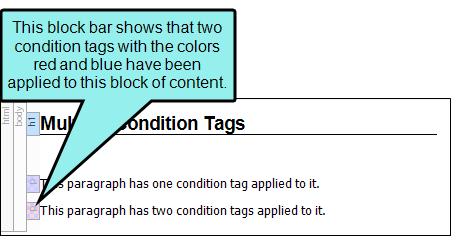
You can turn off the condition toggle button mentioned above. Then make sure this button (located at the bottom of the XML Editor) is enabled to show or hide the span bar above the topic. When the cursor is in the paragraph containing the applied tag, the span bar is shaded with a lighter version of the tag color. This is a good feature to use if you find the shading of the actual text distracting.

- Click to save your work.


How to Apply Conditions to an Entire Block of Content
Topics usually contain several blocks of XML content. For example, there are HTML blocks, body blocks, paragraph blocks, table blocks, and heading blocks. You can apply a condition tag to any block of content in your topics.
- Open the content file.
- Click on the text to which you want to apply the condition tag. (There is no need to highlight it.)
- Do one of the following, depending on the part of the user interface you are using:
- Structure Bars
- If the tag block bars are not shown to the left of the content, click
 at the bottom of the editor.
 Right-click on the tag bar for the block of content to which you want to apply the condition tag.
- In the context menu, select Conditions.
- If the tag block bars are not shown to the left of the content, click
- Ribbon Select Home > Conditions.
- Keyboard Shortcut Press CTRL+SHIFT+C.
- Right-Click Right-click on the text and from the context menu select Conditions.
- Drag-and-Drop/Structure Bars Click on the condition tag and drag it to the selected text in the XML Editor.
- If the tag block bars are not shown to the left of the content, click at the bottom of the editor.
- In the Project Organizer, open the Conditional Text folder and expand the appropriate condition tag set.
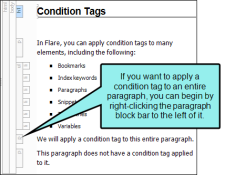
- Click on the condition tag and drag it to the structure bar representing that paragraph in the XML Editor. (You can apply only one condition at a time to text using this method. However, you do not need to continue with any of the other steps below.)
Example — Structure Bars
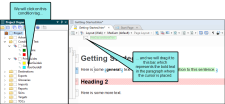
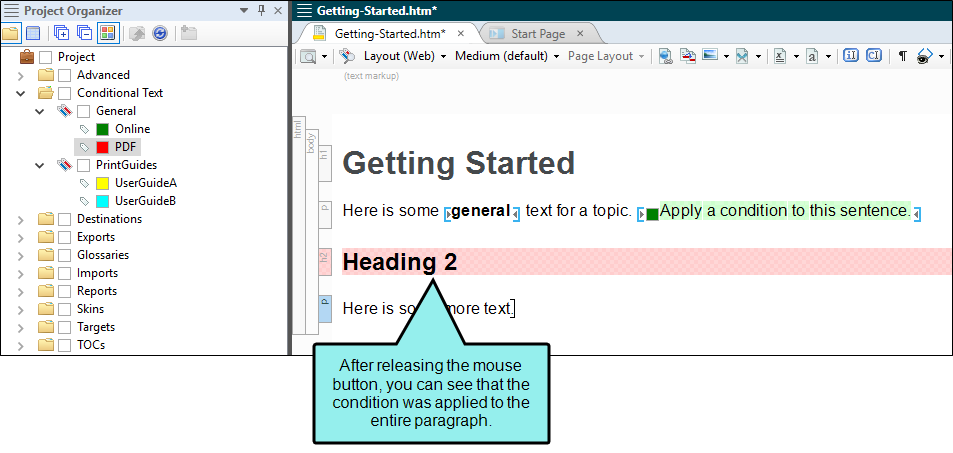
You want to apply a condition tag to an entire paragraph, such as a heading in a topic. First, in the Project Organizer, you open the Conditional Text folder and expand the appropriate condition tag set.
Then you click on the condition tag and drag it to the structure bar representing that paragraph in the XML Editor.

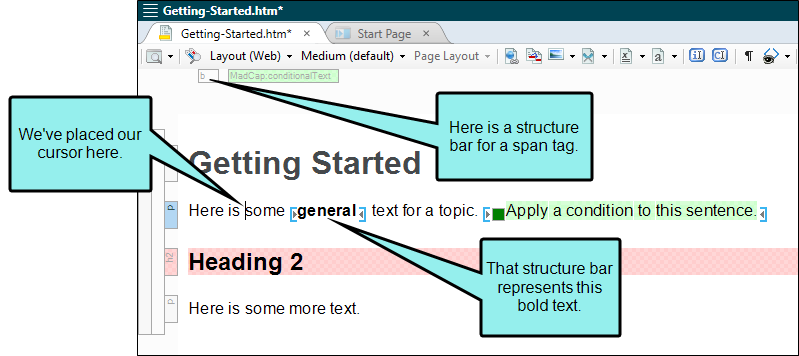
Now let's say you want to apply a condition tag to content that contains a span tag (i.e., a style to be used at the character level, rather than at the block level, such as bold text).
First, in the XML Editor you would place your cursor somewhere in the paragraph where the span tag has been applied.

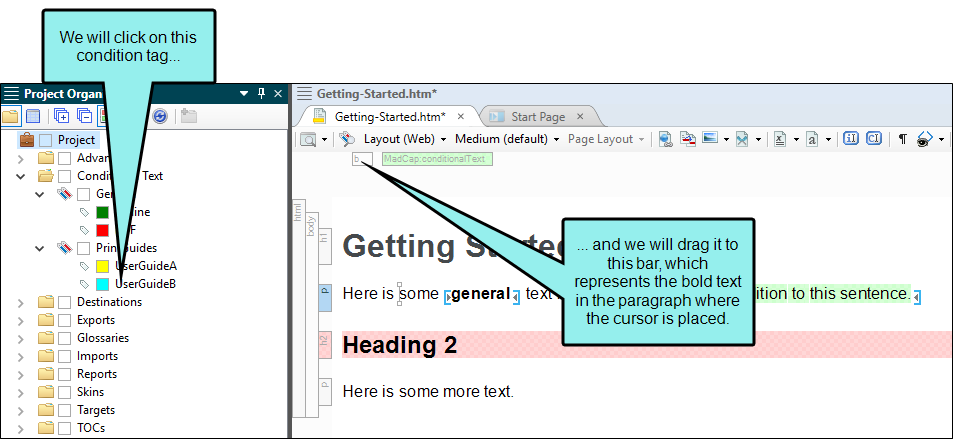
Then in the Project Organizer, you open the Conditional Text folder and expand the appropriate condition tag set.
Finally, you click on the condition tag and drag it to the structure bar representing the span tag in the XML Editor.
- If the tag block bars are not shown to the left of the content, click
The Condition Tags dialog opens, with the first condition tag set selected and the associated condition tags shown on the right.
- Structure Bars
- In the context menu, select Conditions. The Condition Tags dialog opens, with the first condition tag set selected and the associated condition tags shown on the right.
- If you want to see condition tags for a different condition tag set, select it.
- For each condition tag that you want to apply to the block of content, click the check box next to the tag. A check mark appears in the box.
- Click OK.
-
There are two ways to tell whether a block of content has condition tags applied to it. In the bottom local toolbar of the XML Editor, click one of the following toggle buttons to turn the tag indicators on and off:
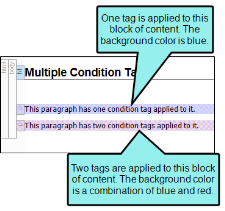
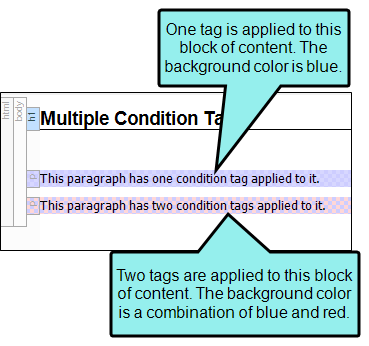
Click this button at the bottom of the XML Editor to show or hide shading of the text itself. For example, if your condition tag has blue associated with it and you click this button to show the indicator, the content becomes shaded with a lighter version of blue. If more than one condition tag is applied to the content, the shading appears in a pattern that shows all of the applied condition tag colors.

You can turn off the condition toggle button mentioned above. Then make sure this button (located at the bottom of the XML Editor) is enabled to show or hide the tag block bar to the left of the topic. The tag bar is shaded with a lighter version of the tag color. This is a good feature to use if you find the shading of the actual content distracting.

- Click to save your work.


How to Apply Conditions to Content or Project Files
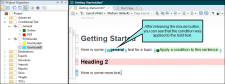
You can apply conditions to entire files in your project. This includes any file contained in the Project Organizer (such as glossary or target files) or the Content Explorer (such as topic, image, stylesheet, snippet, and page layout files). You can apply condition tags when you create an element (i.e., in the Add File Dialog), or after the element has been created.
To Apply Conditions to Newly Created Files
- Create a new file (e.g., topic, alias file, image). The Add File Dialog opens.
- Expand the Attributes section at the bottom of the dialog.
- If you want to apply condition tags to the file, expand the Attributes section at the bottom of the dialog. Next to the Condition Tags field, click
 and select the conditions you want to apply.
 -
Click OK.
To Apply Conditions to One File at a Time
- Open the Project Organizer or Content Explorer.
- Locate the file to which you want to apply a condition tag. In the Project Organizer, files are stored in various folders. In the Content Explorer, topic files are located by default at the top level (unless you place them in subfolders that you’ve created); other files are traditionally located in subfolders within the Resources folder, although they can be stored in custom folders as well. For example, snippet files are usually located in a subfolder called "Snippets."
- Right-click the file and from the context menu select Properties. The Properties dialog for the file opens.
- Click the Conditional Text tab. The first condition tag set is selected and the associated condition tags are shown on the right.
- If you want to see condition tags for a different condition tag set, select it.
- For each condition tag that you want to apply to the file, click the check box next to the tag. A check mark appears in the box.
-
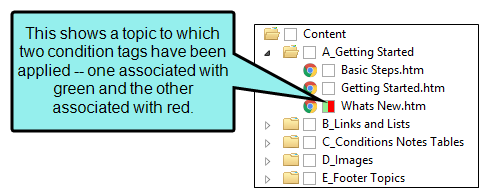
Click OK. The square next to the file name in the Project Organizer or Content Explorer now takes on the color of the condition tag. If you applied more than one condition tag to the file, each color is shown. (If you do not see squares, click
 in the local toolbar.)
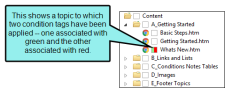
To Apply Conditions to Multiple Content Files Using the File List Window Pane
- Do one of the following, depending on the part of the user interface you are using:
- Ribbon Select View > File List.
- Keyboard Shortcut Press CTRL+SHIFT+J.
The File List window pane opens.
- (Optional) From the Filter list in the window pane, select the type of files to view.
- Select the files to which you want to apply condition tags. You can hold the SHIFT key to select a range, or you can hold the CTRL key to select individual items.
- In the local toolbar, click
 . The Properties dialog opens.
 - Click the Conditional Text tab. The first condition tag set is selected and the associated condition tags are shown on the right.
- If you want to see condition tags for a different condition tag set, select it.
- For each condition tag that you want to apply to the files, click the check box next to the tag. A check mark appears in the box.
- Click OK. The squares next to the file names in the File List window pane now take on the color of the condition tag. If you applied more than one condition tag to the file, each color is shown.
To Apply Conditions to Multiple Project or Content Files Using the Split View Feature
- Open the Project Organizer or Content Explorer.
- Click the Show Files button
 . The Project Organizer or Content Explorer splits into two halves (left and right).
 - On the left side of the split Project Organizer or Content Explorer, select the folder containing the files to which you want to apply condition tags.
- On the right side of the split Project Organizer or Content Explorer, select the files. You can hold the SHIFT key to select a range, or you can hold the CTRL key to select individual items.
- In the toolbar click . The Properties dialog opens.
- Click the Conditional Text tab. The first condition tag set is selected and the associated condition tags are shown on the right.
- If you want to see condition tags for a different condition tag set, select it.
- For each condition tag that you want to apply to the files, click the check box next to the tag. A check mark appears in the box.
- Click OK. The square next to the file name in the Project Organizer or Content Explorer now takes on the color of the condition tag. If you applied more than one condition tag to the file, each color is shown in the square. (If you do not see squares, click in the local toolbar.)
- To hide the split view, click the Show Files button again.
- Click to save your work.
Note Notice that folders also have blank squares next to them. This means that you can apply condition tags to everything contained in any folder by following the same steps above.
Note You can include and exclude content files (e.g., topics, images) in your output through the use of conditions.
However, you cannot do this for project files (e.g., TOCs, skins). Applying a condition to a project file is used only for Global Project Linking (see Global Project Linking).
Although applying a condition to a glossary file itself does not affect the output, you can apply conditions to terms within a glossary. Applying conditions to glossary terms will affect the output. See How to Apply Conditions to Glossary Terms.
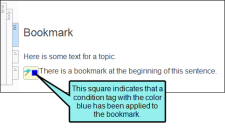
How to Apply Conditions to a Bookmark
- Open the content file.
-
Right-click on the bookmark.
Note If you cannot see the bookmark, make sure the markers are shown in the topic. To turn markers on, click the down arrow next to the Show tags button
 in the XML Editor. Then select Show Markers.
 - In the context menu, select Conditions. The Condition Tags dialog opens, with the first condition tag set selected and the associated condition tags shown on the right.
- If you want to see condition tags for a different condition tag set, select it.
- For each condition tag that you want to apply to the bookmark, click the check box next to the tag. A check mark appears in the box.
-
Click OK. A square with the color of the condition tag is displayed next to the bookmark.
- Click to save your work.

How to Apply Conditions to a Browse Sequence Entry
You can include or exclude a specific browse sequence entry (book, topic, external link) from a target.
- Open the Project Organizer.
- Expand the Advanced folder.
- Double-click the browse sequence that you want to open. The Browse Sequence Editor opens to the right.
-
Do one of the following:
Drag and Drop
This is the quickest method. However, you can only apply one condition at a time.
- If the tag block bars are not shown to the left of the content, click at the bottom of the editor.
- In the Project Organizer, open the Conditional Text folder and expand the appropriate condition tag set.
- Click on the condition tag and drag it to the appropriate entry in the editor.
Properties Dialog
This method is best for applying multiple conditions at the same time.
- In the editor, select the entry to which you want to apply the tag.
- In the local toolbar, click . The Properties dialog for the entry opens.
- Click the Conditional Text tab. The first condition tag set is selected and the associated condition tags are shown on the right.
- If you want to see condition tags for a different condition tag set, select it.
- For each condition tag that you want to apply to the entry, click the blank square next to the tag. A check mark appears in the square.
- Click OK.
The square next to the browse sequence entry in the Browse Sequence Editor now takes on the color of the condition tag. If you applied more than one condition tag to the browse sequence entry, each color is shown in the square.
If you cannot see the squares next to the browse sequence entries, click
in the local toolbar to show the condition indicators. - If the tag block bars are not shown to the left of the content, click
- Click to save your work.
How to Apply Conditions to Glossary Terms
- Open the Project Organizer.
- Expand the Glossaries folder.
- Double-click the glossary that you want to open. The Glossary Editor opens to the right.
- Select the term. If you want to apply the same condition(s) to multiple terms, hold down your SHIFT or CTRL key and select the terms.
- In the local toolbar click
 . The Properties dialog opens.
 - Select the Conditional Text tab. The first condition tag set selected and the associated condition tags are shown on the right.
- If you want to see condition tags for a different condition tag set, select it.
- For each condition tag that you want to apply to the entry, click the blank square next to the tag. A check mark appears in the square.
-
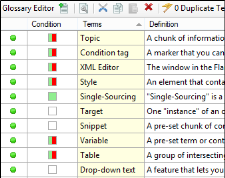
Click OK. The Condition column indicates whether a term has conditions applied to it.
- Click to save your work.

How to Apply Conditions to an Image
- Open the content file.
- Right-click the image.
- In the context menu, select Conditions. The Condition Tags dialog opens, with the first condition tag set selected and the associated condition tags shown on the right.
- If you want to see condition tags for a different condition tag set, select it.
- For each condition tag that you want to apply to the image, click the check box next to the tag. A check mark appears in the box.
- Click OK. A square with the color of the condition tag is displayed next to the image.
- Click to save your work.
How to Apply Conditions to an Image Map
- Open the content file.
- Right-click the image containing the image map.
- In the context menu, select Image Map.
- Click on an object on the image (e.g., rectangle) being used as a link. In the local toolbar, click
 . The Condition Tags dialog opens. (You can also open the Conditions dialog by selecting Edit > Conditions or using the CTRL+SHIFT+C shortcut on your keyboard.)
 - If you want to see condition tags for a particular condition tag set, select it.
- For each condition tag that you want to apply to that section of the image, click the check box next to the tag. A check mark appears in the box.
- Click OK. A square with the color of the condition tag is displayed on that section of the image.
- Click OK in the Image Map Editor.
- Click to save your work.
How to Apply Conditions to an Index Keyword Marker
- Open the content file.
-
In the XML Editor, right-click on the index keyword marker.
Note If you do not see the marker, click the Show tags drop-down arrow
and select Show Markers. - In the context menu, select Conditions. The Condition Tags dialog opens, with the first condition tag set selected and the associated condition tags shown on the right.
- If you want to see condition tags for a different condition tag set, select it.
- For each condition tag that you want to apply to the index keyword marker, click the check box next to the tag. A check mark appears in the box.
-
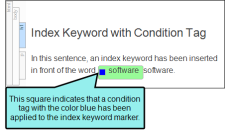
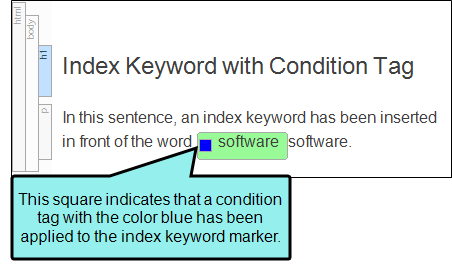
Click OK. A square with the color of the condition tag now displays next to the index marker in the topic.
- Click to save your work.
How to Apply Conditions to a Link
- Open the content file.
- Make sure the span bars are visible at the top of the XML Editor. If they are not, click
 at the bottom of the local toolbar to show them
 -
Right-click on the span bar above the topic that corresponds with the link.
Note If you first click on the link in the topic, the corresponding span bar is highlighted above. For hypertext links, the span bar is labeled "a." For cross-references, the span bar is labeled "MadCap:xref."
- In the menu, select Conditions. The Condition Tags dialog opens, with the first condition tag set selected and the associated condition tags shown on the right.
- If you want to see condition tags for a different condition tag set, select it.
- For each condition tag that you want to apply to the link, click the check box next to the tag. A check mark appears in the box.
- In the Exclude Action section, select one of the options.
- Remove Deletes the link text from the output.
Unbind Removes the link from the content in the output, but leaves the text.
Example You are creating both online and PDF output from your project. You might have some content where you have inserted hyperlinks, and you want this content to be included in both the online and PDF output. However, let's say that a particular hyperlink connects to another topic that you are not including in the PDF. When you generate the online output, everything is fine. But when you generate the PDF, an error is displayed in the log because the compiler cannot find the topic referenced in the hyperlink.
The way to avoid seeing the error (and to avoid users experiencing a broken link in the output) is to apply a condition tag (e.g., "OnlineOnly") to the hyperlink and select the option in the dialog to unbind the link. If you then exclude that condition tag from your print target, you will still see the hyperlink text in the PDF, but the link will be removed. Therefore, you will no longer receive an error and the link will not be broken.
- Click OK.
- Click to save your work.
How to Apply Conditions to a Micro Content Phrase
- From the Content Explorer, find and open the micro content file.
- On the left side of the Micro Content Editor, right-click a phrase, and from the context menu select Properties. (Alternatively, you can select the phrase and click in the local toolbar or press F4.)
- In the Properties dialog, select the Conditional Text tab. The first condition tag set is selected and the associated condition tags are shown on the right.
- If you want to see condition tags for a different condition tag set, select it.
- For each condition tag that you want to apply to the file, click the check box next to the tag. A check mark appears in the box.
-
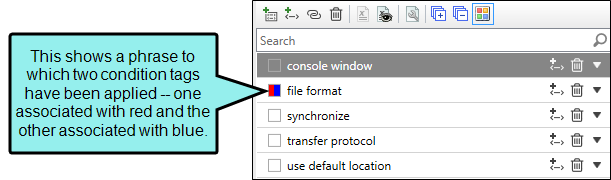
Click OK. The square next to the file name in the Micro Content Editor now takes on the color of the condition tag. If you applied more than one condition tag to the file, each color is shown. (If you do not see squares, click
in the local toolbar.)
How to Apply Conditions to a Slideshow
- Open the content file.
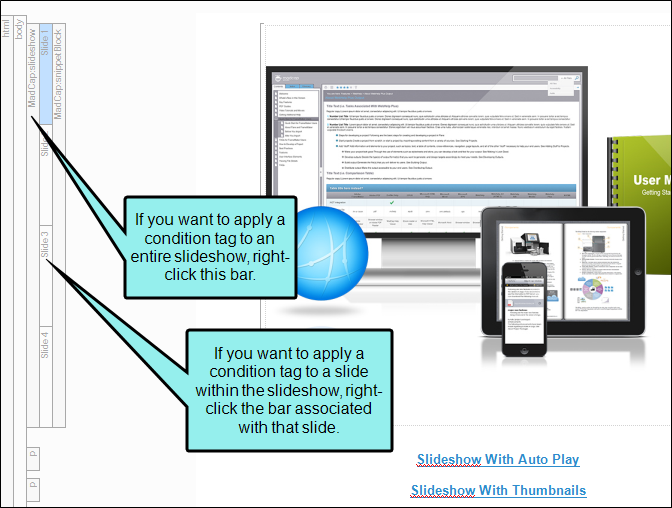
- If the tag block bars are not shown to the left of the content, click at the bottom of the editor.
-
Right-click on the tag bar for the slideshow to which you want to apply the condition tag. If you want to apply the tag to the entire slideshow, select the MadCap:slideshow bar. If you want to apply the tag to a specific slide, select the Slide bar.

- In the context menu, select Conditions. The Condition Tags dialog opens, with the first condition tag set selected and the associated condition tags shown on the right.
- If you want to see condition tags for a different condition tag set, select it.
- For each condition tag that you want to apply to the slideshow, click the check box next to the tag. A check mark appears in the box.
- Click OK.
-
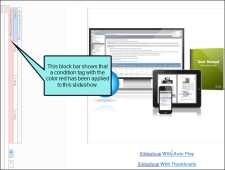
There are two ways to tell whether a slideshow has condition tags applied to it. In the bottom local toolbar of the XML Editor, click one of the following toggle buttons to turn the tag indicators on and off:
Click this button at the bottom of the XML Editor to show or hide shading of the text itself. For example, if your condition tag has blue associated with it and you click this button to show the indicator, the content becomes shaded with a lighter version of blue. If more than one condition tag is applied to the content, the shading appears in a pattern that shows all of the applied condition tag colors.
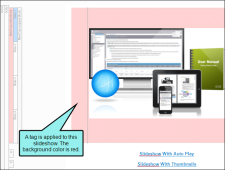
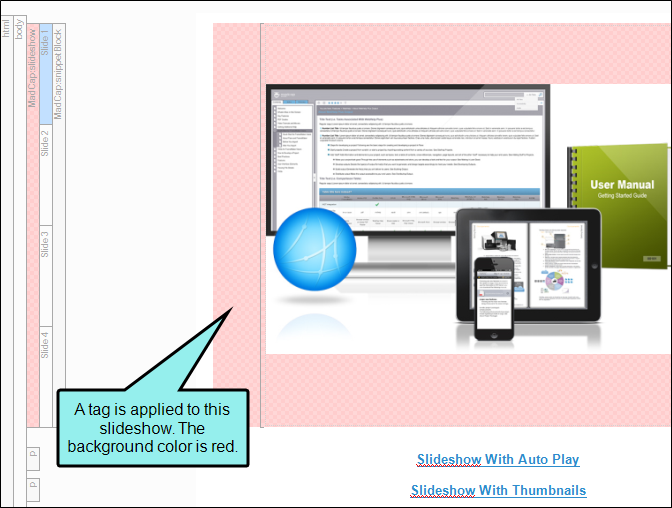
You can turn off the condition toggle button mentioned above. Then make sure this button (located at the bottom of the XML Editor) is enabled to show or hide the tag block bar to the left of the topic. The tag bar is shaded with a lighter version of the tag color. This is a good feature to use if you find the shading of the actual content distracting.
- Click to save your work.

How to Apply Conditions to a Snippet
- Open the content file.
- Right-click on the snippet.
- In the context menu, select Conditions. The Condition Tags dialog opens, with the first condition tag set selected and the associated condition tags shown on the right.
- If you want to see condition tags for a different condition tag set, select it.
- For each condition tag that you want to apply to the snippet, click the check box next to the tag. A check mark appears in the box.
- Click OK. The color of the condition tag is applied to the snippet.
- Click to save your work.
Note Not only can you apply a condition tag to a snippet, but you can also create snippet conditions. Snippet conditions are just regular condition tags that you can apply to content within snippets and then include or exclude them at the snippet or topic level (rather than at the target level). They are especially useful when the majority of the snippet content is identical everywhere the snippet is used, but there are some small differences in some places. This lets you use one snippet for many purposes, rather than having to create multiple snippets to account for the small exceptions. See Using Snippet Conditions.
How to Apply Conditions to a TOC Entry
You can include or exclude a specific TOC entry (book, topic, external link) from a target.
- Open the Project Organizer.
- Expand the TOCs folder.
- Double-click a TOC. The TOC Editor opens to the right.
-
Do one of the following:
Drag and Drop
This is the quickest method. However, you can only apply one condition at a time.
- If the tag block bars are not shown to the left of the content, click at the bottom of the editor.
- In the Project Organizer, open the Conditional Text folder and expand the appropriate condition tag set.
- Click on the condition tag and drag it to the appropriate entry in the editor.
Properties Dialog
This method is best for applying multiple conditions at the same time.
- In the editor, select the entry to which you want to apply the tag.
- In the local toolbar, click . The Properties dialog for the entry opens.
- Click the Conditional Text tab. The first condition tag set is selected and the associated condition tags are shown on the right.
- If you want to see condition tags for a different condition tag set, select it.
- For each condition tag that you want to apply to the entry, click the blank square next to the tag. A check mark appears in the square.
- Click OK.
The square next to the TOC entry in the TOC Editor now takes on the color of the condition tag. If you applied more than one condition tag to the TOC entry, each color is shown in the square.
If you cannot see the squares next to the TOC entries, click
at the bottom of the local toolbar to show the condition indicators. - If the tag block bars are not shown to the left of the content, click
- Click to save your work.
Important Placing a condition on a TOC or browse sequence entry does not remove the linked file from online output. In order to prevent a topic from being found in the output (e.g., via search or context-sensitive Help), you must place the condition on the topic file itself.
How to Apply Conditions to a Variable
- Open the content file.
- Right-click on the variable.
- In the context menu, select Conditions. The Condition Tags dialog opens, with the first condition tag set selected and the associated condition tags shown on the right.
- If you want to see condition tags for a different condition tag set, select it.
- For each condition tag that you want to apply to the variable, click the check box next to the tag. A check mark appears in the box.
-
Click OK. A square with the color of the condition tag is displayed next to the variable.
Note If you cannot see the colored box, make sure the markers are shown in the topic. To turn markers on, click the down arrow next to the Show tags button
in the XML Editor. Then select Show Markers.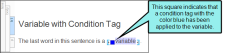
- Click to save your work.

What’s Noteworthy?
Note Normally you would apply a condition to a piece of content or a file. But in Flare you can also set conditions on styles and then apply those styles to content. This is simply another alternative and might be more efficient for some authors. You might even find that you use both methods in your projects.
Also see Styles and Stylesheets, Editing Styles in a Regular Stylesheet, and Applying Styles to Content.
Note You can quickly see how a topic (as well as a snippet or template page) will look in the final output by previewing it. The Preview window pane is dynamic, allowing you to keep the preview open while you work and see changes as you make them in the XML Editor. When you use the preview feature, you can select any target in your project. The topic will be previewed with the condition tag settings from that target. You can quickly see what the topic looks like with certain condition tags included and others excluded.
What’s Next?
Although you have applied condition tags to content, any targets that you build will still contain all of your content (whether something has a condition tag applied to it not). To ensure that content with certain condition tags are excluded from your output, you need to associate condition tags with targets. See Associating Conditions With Targets.


