You can apply styles to content in your files
[Menu Proxy — Headings — Online — Depth3 ]
How to Apply Styles From a Regular Stylesheet
When you insert or create certain content in a topic (or in another content file), the parent tag for that type of element is automatically applied. For example, when you create a bulleted list, the <ul> (unordered list) and <li> (list item) tags are added around the content. The following steps show you how to select a particular style for content—perhaps a class or ID of a primary style (e.g., li.indented) or another tag altogether (e.g., if you are on a <p> tag, you can change it to an <h2> tag).
- Open the content file for which you want to apply styles.
-
When applying styles to content, you are likely to use one of several methods, depending on the type of style you are applying. Make sure your preferred method is available (e.g., open the Styles window pane).
Methods for Applying Styles
Following are the primary tools used when applying a style to content.
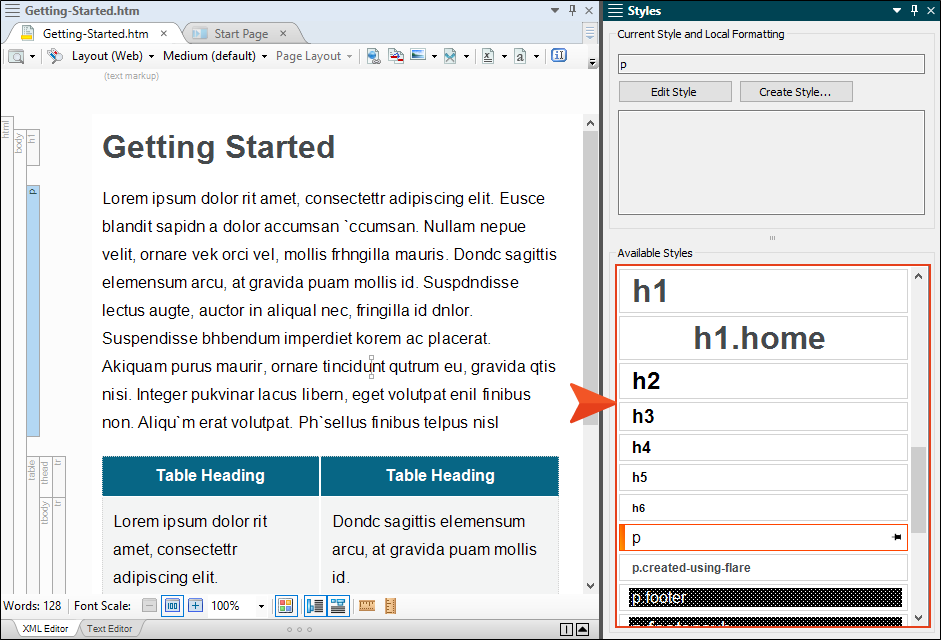
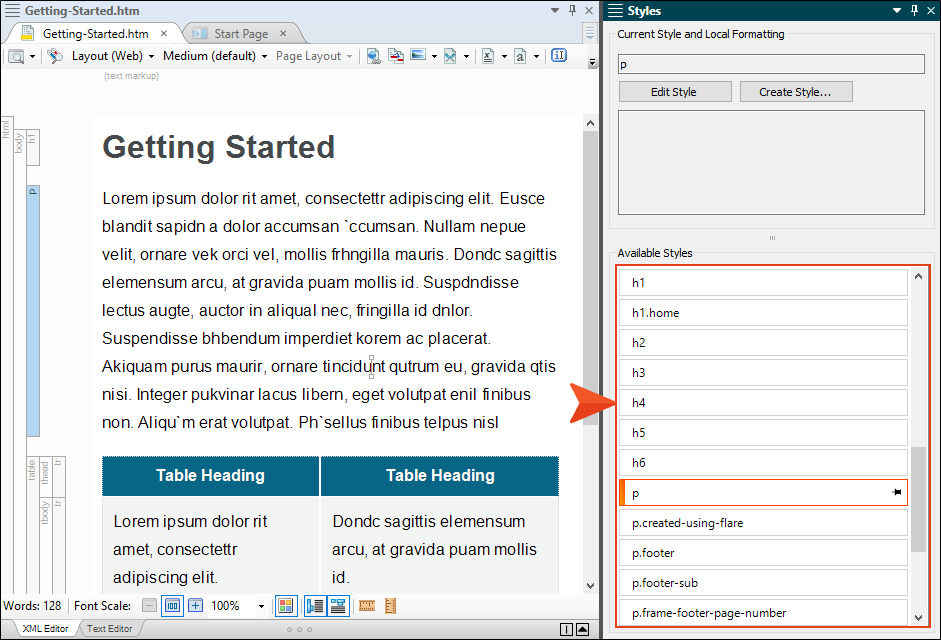
Styles Window Pane
Select Home > Style Window, or press F12. The Styles window pane opens, showing styles from your stylesheet.
Styles Drop-Down Field
Select Home > Style (drop-down).
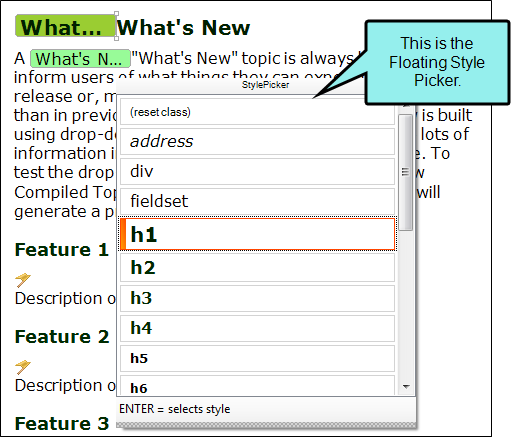
Floating Style Picker
Press CTRL+SHIFT+H. The Style Picker displays, showing style classes from the stylesheets that are associated with the topic.

Structure Bars
In the local toolbar at the bottom of the XML Editor, click one of the buttons

 to turn on the structure bars. Depending on the button that you click, structure bars are displayed either to the left of the topic or table content, or above it.
Markers
In the local toolbar of the XML Editor, click the down arrow in the Show tags button
 and select Show Markers.
When You Don't See the Style You Need
When applying styles to content, you may notice from time to time that the style you are looking for is not available from the drop-down list or Styles window pane when you try to select it.
This can occur if the style exists in a particular medium (e.g., print) but not in the default medium. So if you are working in the XML Editor with the medium set to default and you attempt to apply that style to content, you won't see it in the selection list with all of the other styles. To correct this, make sure the style exists in the default medium as well.
Another possible reason for this has to do with the location of the cursor in the topic. Flare realizes where the cursor is placed and knows that only certain styles should be applied at that location.
Example — Lists
Your cursor is on a regular paragraph and you want to apply a list style to it in order to turn it into the beginning of a bulleted list. Because it is not yet a list item, but rather a simple paragraph, you won't see your list style in the Styles window pane when you try to select it. Instead, you see several paragraph styles. In order to use the list style, you first need to turn the paragraph into a bulleted list item, by opening the Home ribbon and clicking the bullet button
 .
.You might notice that if you have your cursor in a list, you only see li (list item) styles in the window pane, but not the broader ol (ordered list) and ul (unordered list) styles. To see these other styles, click at the very beginning of a list item. Then press the left arrow key. This should switch the Style window pane from showing li styles to the ol and ul styles. If you have your structure bars on, you'll see why this happens. When you initially click in a list, the li block bar is highlighted, so Flare assumes you want to do something with that style level. After you press your left arrow key enough, the next level up (ol or ul) becomes highlighted. And if you keep pressing the left arrow key, Flare highlights the next level of style (e.g., body). Whatever is highlighted in the structure bar should become available as styles in the Style window pane.
Example — Paragraph and Character Styles
You've selected multiple paragraphs, or your cursor is simply placed somewhere within a paragraph. In that case, only block-level styles (such as paragraph styles) are shown in the Styles window pane.
But if you select only a portion of a paragraph, only character styles are shown in the Styles window pane. So if you expect to be able to choose a block-level style, such as a paragraph style, you can't; because only a portion of the paragraph is selected, Flare thinks you want to choose a character-level style.
If you still do not see your style available for selection, try closing and re-launching Flare.
Generic Classes and Identifiers
You may also notice that most style names are displayed simply with characters, as you would expect. However, you also might notice that some have a period (.) or hash (#) in front of them.
- Styles Beginning With Periods These are generic style classes.
- Styles Beginning With Hash Tags These are generic identifiers (IDs).
- Styles Beginning With Periods These are generic style classes.
-
Click on or select the content, then use one of the methods to select the style, depending on the type of content you are editing. See the full topic for details on the various types of content. In the file, do one of the following, depending on the type of content to which you are applying a style.
Characters (i.e., selected text)
- Highlight all characters within a paragraph that you want to be affected by the style, without selecting the entire paragraph.
- From the Home ribbon, Styles window pane, or Floating Style Picker, select the character style.
Dynamic Effects (e.g., drop-down text, expanding text, togglers, popups)
Do one of the following, depending on the part of the user interface you are using:
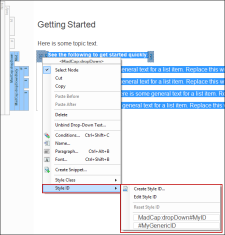
Marker (Right-Click)
- Hover over the appropriate marker in the content file until the cursor is an arrow
 .
. -
Right-click the marker and select Style Class > [Name of Style].

If you want to choose an ID, you can select Style ID > [Name of ID].
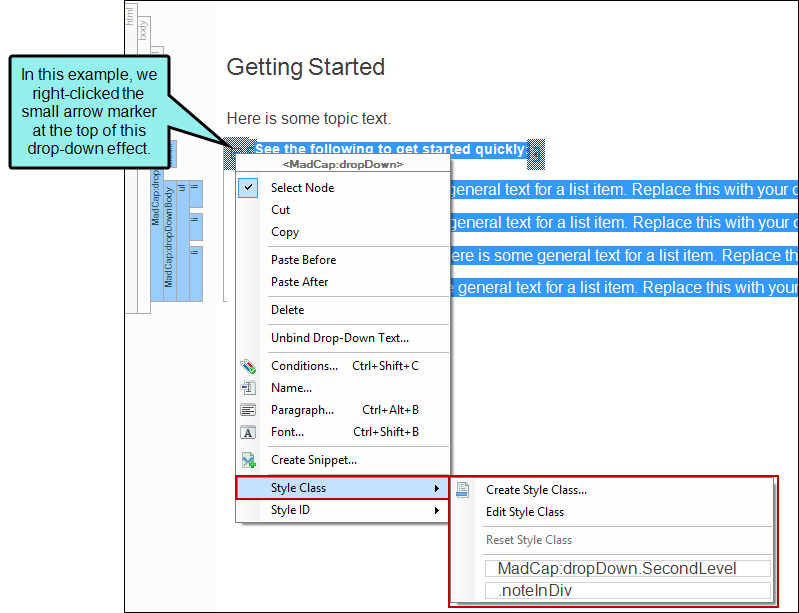
Structure Bar (Right-Click)
- Right-click in the structure bar for the part of the dynamic effect you want to change (e.g., hotspot, body, head).
-
In the context menu, select Style Class > [Name of Style].
If you want to choose an ID, you can select Style ID > [Name of ID].
Footnotes
Do one of the following, depending on the part of the user interface you are using:
Marker (Right-Click)
- Hover over the appropriate marker in the content file until the cursor is an arrow .
-
Right-click the marker and select Style Class > [Name of Style].
If you want to choose an ID, you can select Style ID > [Name of ID].
Structure Bar (Right-Click)
- At the top of the XML Editor, right-click the span bar representing the footnote. A span bar for a footnote has a "MadCap:footnote" label.
-
In the context menu, select Style Class > [Name of Style].
If you want to choose a style ID, you can select Style ID > [Name of ID].
Note The style you set for the footnote number in the document also controls the style for the number and text in the footnote at the end of the document.
Note If you want to style the footnote numbers (in the document or in the footnote at the end of the document) or comment, you can edit the properties of the MadCap|footnote style in the stylesheet.
Note If you want to style the container in which the footnote appears at the end of the document (e.g., padding, border, location), you can use the MadCap|footnoteBlock and MadCap|footnotesBlock styles in the stylesheet.
Headings
-
Click somewhere in the paragraph to be used as the heading.
Note If you highlight the text, make sure you highlight the entire paragraph. Otherwise, you will not be able to select a heading style, but rather a character style only. The exception to this is when you highlight portions of multiple paragraphs at the same time; in that case, you will be able to select a heading style to be applied to all of those paragraphs.
-
From the Home ribbon, Styles window pane, or Floating Style Picker, select the style.
Alternatively, you can right-click the structure bar and select Style Class > [Name of Style].
If you want to choose an ID, you can select Style ID > [Name of ID].
Links (e.g., cross-references, text hyperlinks)
- In the XML Editor, click inside the link.
- At the top of the XML Editor, right-click the span bar representing the link. For example, hyperlink span bars have an "a" label, and cross-reference span bars have a "MadCap:xref" label. When you click on the link in the topic, the appropriate span bar at the top of the XML Editor will change color to indicate that it goes with the link. If your span bars are not turned on, click in the local toolbar of the XML Editor.
-
In the context menu, select Style Class > [Name of Style].
If you want to choose a style ID, you can select Style ID > [Name of ID].
Lists
-
Click somewhere in the list.
Note If you highlight the text, make sure you highlight the entire line. Otherwise, you will not be able to select a list style, but rather a character style only. The exception to this is when you highlight portions of multiple list items at the same time; in that case, you will be able to select a list style to be applied to all of those items.
- Do one of the following, depending on whether you want to apply a style to the entire list container or individual list items
- Entire List Container
- Right-click the ol (ordered list) or ul (unordered list) structure bar.
In the context menu, select Style Class > [Name of Style].
If you want to choose a style ID, you can select Style ID > [Name of ID].
Individual List Items
Do one of the following:
- From the Home ribbon, Styles window pane, or Floating Style Picker, select the style.
Right-click the li (list item) structure bar and select Style Class > [Name of Style].
If you want to choose an ID, you can select Style ID > [Name of ID].
- Entire List Container
Paragraphs
-
Click somewhere in the paragraph.
Note If you highlight the text, make sure you highlight the entire paragraph. Otherwise, you will not be able to select a paragraph style, but rather a character style only. The exception to this is when you highlight portions of multiple paragraphs at the same time; in that case, you will be able to select a paragraph style to be applied to all of those paragraphs.
- Do one of the following, depending on the part of the user interface you are using:
- From the Home ribbon, Styles window pane, or Floating Style Picker, select the style.
Right-click the p (paragraph) structure bar and select Style Class > [Name of Style].
If you want to choose an ID, you can select Style ID > [Name of ID].
Responsive Layouts
For responsive layouts
The main reason that you might apply a style to the responsive layout grid itself is to choose a different div style that was created by another responsive layout. Applying the other div style will likely change the configuration of the current responsive layout.
- Right-click the appropriate div structure bar.
-
Select Style Class > [Name of Style].
If you want to choose an ID, you can select Style ID > [Name of ID].
Reusable Content (e.g., variables, proxies)
Do one of the following, depending on the part of the user interface you are using:
Marker (Right-Click)
- Hover over the reusable item in the topic until the cursor is an arrow .
-
Right-click and select Style Class > [Name of Style].
If you want to choose an ID, you can select Style ID > [Name of ID].
Structure Bar (Right-Click)
Depending on the type of resuable content, you might also be able to use a structure bar.
- Right-click the structure bar (on the left side of the XML Editor) or span bar (at the top of the XML Editor) for the reusable item.
-
In the context menu, select Style Class > [Name of Style].
If you want to choose an ID, you can select Style ID > [Name of ID].
Slideshows
- Right-click the structure bar (either for the slideshow itself or for a slide within it).
-
Select Style Class > [Name of Style].
If you want to choose an ID, you can select Style ID > [Name of ID].
Tables
You can apply styles to tables in various ways:
- For some table styles (e.g., caption, th), you can click somewhere on the appropriate text in the table and select the style or class from the Styles window pane, or Floating Style Picker.
- You can manually apply specific styles to tables by selecting the table cells, clicking Table > Cell Content Style, and choosing the style to be used for those cells.
- If you have created a table stylesheet, you can apply it to an entire table by right-clicking the structure bar, then selecting Table Style > [Name of Table Style].
Text Boxes
For text boxes
When you insert a text box, it uses a div tag in the content file. So you can change the look of a text box container by selecting another div style class.
- Right-click the div structure bar being used for the text box.
-
Select Style Class > [Name of Style].
If you want to choose an ID, you can select Style ID > [Name of ID].
- Click
") to save your work.
to save your work.

Show or Hide Style Previews in User Interface
When you attempt to apply a style to content using the Style drop-down in the Home ribbon, the Styles window pane, or the floating Style Picker, previews of the various styles are shown by default. This gives you an idea of how each style looks before you apply it to the content.
If you prefer not to see style previews in these areas of the user interface, you can open the Options dialog (File > Options) and disable the preview on the XML Editor tab. Remove the check mark from Show style previews in UI.
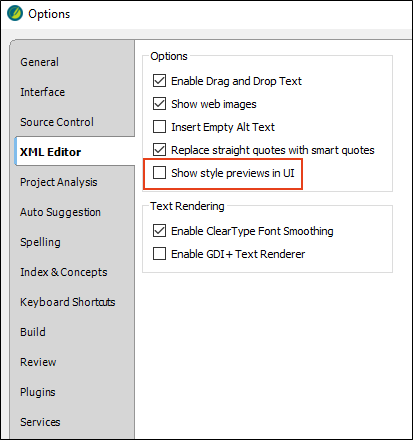
With this option disabled, all of the styles will be presented as plain text when you select them.
What’s Noteworthy?
Tip It is likely that you will have certain styles that you tend to use more than others. You can pin these styles in various places of the Flare interface so that they are always easily accessible.
Note Normally you would apply a condition to a piece of content or a file. But in Flare you can also set conditions on styles and then apply those styles to content. This is simply another alternative and might be more efficient for some authors. You might even find that you use both methods in your projects.


