A batch target is a file that points to multiple targets and stores information such as whether to build or publish targets, as well as scheduling commands. After creating the file, you can specify its settings in the Batch Target Editor.
A batch target file has an .flbat extension and is stored in the Project Organizer under the Targets folder.
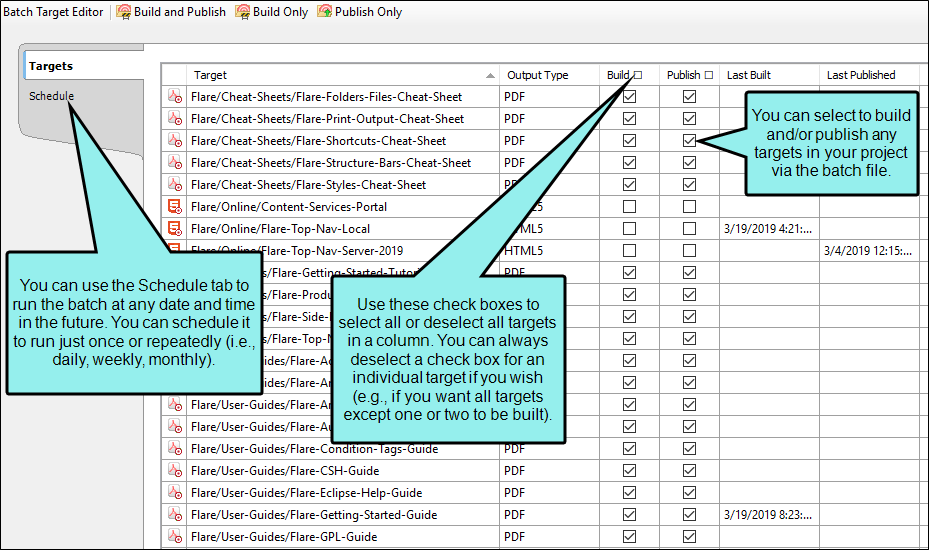
Example You have a project with 17 targets and you need to build and publish 12 of those targets at the beginning of each day. Rather than manually building and generating each of these targets, you can use a batch target. Within this batch target, you can select the check boxes at the top of the Build and Publish columns. This automatically selects the check boxes for each target. Then you can manually deselect the 5 targets you do not wish to build or publish. Furthermore, you can use the Schedule tab in the batch target to specify that the batch should be run each night at 2 a.m. When you arrive at the office each morning, the outputs for those 12 targets will already be generated and placed in the appropriate publishing destination folders.
[Menu Proxy — Headings — Online — Depth3 ]
Batch Generate Interface vs. Command Line
The batch target in the Flare interface is similar to the command line feature
How to Create a Batch Target
- Do one of the following, depending on the part of the user interface you are using:
- Ribbon Select Project > New > Batch Target.
- Right-Click In the Project Organizer, right-click on the Targets folder and from the context menu select Add Batch Target.
The Add File dialog opens.
- In the File Type field at the top, make sure Batch Target is selected.
- In the Source area, choose to create the new file based on a template or an existing file.
- New From Template Choose either a factory template file or one of your own custom template files as a starting point. The new file will take on all of the settings contained in the template. If you want to use the factory template provided by Flare, expand the Factory Templates folder and click on a template file. If you want to use your own custom template file, expand the appropriate folder and click on a file.
- New From Existing Choose an existing file of the same type as a starting point for your new file. As with template files, your new file will take on all of the settings contained in the file you select. To use this option, click
 , use the Open File dialog to find a file, and double-click it.
- New From Template Choose either a factory template file or one of your own custom template files as a starting point. The new file will take on all of the settings contained in the template. If you want to use the factory template provided by Flare, expand the Factory Templates folder and click on a template file. If you want to use your own custom template file, expand the appropriate folder and click on a file.
- (Optional) If you want to place the file into a subfolder previously created in the Content Explorer or Project Organizer, in the Folder field click and select the subfolder. Otherwise, keep the default location.
- In the File Name field, type a new name for the batch target.
- (Optional) If you want to apply condition tags to the file, expand the Attributes section at the bottom of the dialog. Next to the Condition Tags field, click and select the conditions you want to apply. Click OK.
- (Optional) If you want to apply file tags, expand the Attributes section at the bottom of the dialog. Next to the File Tags field, click and select the file tags you want to apply. Click OK.
- Click Add. The target is added to the Targets folder in the Project Organizer.
- A message asks if you want to create a scheduled task. Click Yes. The Batch Target Editor opens to the right.
-
The Targets tab in the editor displays all of the non-batch targets already contained in your project. Click the Build and/or Publish check boxes next to the targets that you want to be affected when the batch runs. You can also click the check boxes at the top of each column; this selects all of the check boxes in that column. Clicking the top check box again deselects all of the check boxes in the column.
Note In order for targets to be published when the batch runs, you must also create and associate a publishing destination with the target(s).
-
Click
") to save your work.
to save your work.
(Optional) How to Schedule Build or Publish Processes
After you create a batch target in the Flare user interface, you can start that batch whenever you need to (i.e., tell it to start building and/or publishing the related targets). However, you also have the option of creating scheduled tasks. You might do this if you want your targets to be generated or published automatically overnight. Scheduled builds are created using the Windows Task Scheduler. However, the user interface in Flare makes it easier for you to create scheduled tasks without leaving the application. If you use this scheduling feature, you do not need to have Flare open at the time the batch runs.
When a scheduled task runs, the command prompt window opens on your computer and minimizes while the batch runs. This window closes automatically when the batch process is finished. If any errors or warnings occur during the process, a report is automatically saved so you can review the messages. You can then open the error report file from the Reports folder in the Project Organizer.
- From the Targets folder in the Project Organizer, open the batch target file.
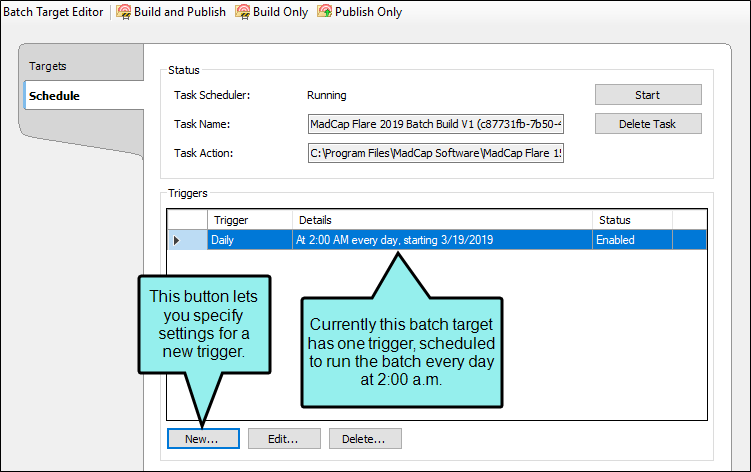
- In the Batch Target Editor, click the Schedule tab.
- If a message indicates that you must create a scheduled task, click Yes.
-
At the bottom of the tab, click New.

The New Trigger dialog opens.
-
In the Settings area, select how often you want the trigger in the batch to be run. You can also click in the Start fields to change the beginning date and/or time:
- If you select One Time, click in the Start fields to change the beginning date and/or time.
- If you select Daily, a field displays so that you can specify a certain number of days for the process to recur.
- If you select Weekly, a field displays so that you can specify a certain number of weeks for the process to recur. In addition, check boxes are available so that you can select certain days of the week for the process to run.
- If you select Monthly, additional fields are displayed so that you can select certain months for the process to run, even on specific days during particular months.
- (Optional) In the Advanced Settings area, you can set any of the following.
- Repeat task every You can specify if you want the trigger for the batch to run periodically after a certain number of minutes or hours.
- For a duration of You can specify how long you want the trigger for the batch to be repeated.
- Expire You can specify whether the trigger for the batch should stop running after a certain date.
- Enabled By default the trigger for the batch will be enabled. However, you can disable the trigger if necessary. The trigger will remain in the batch file (even though it will not run while being disabled). You can re-enable it in the future if you want.
- Click OK.
Tip Because scheduled tasks in batch targets use Windows Task Scheduler, the settings in that utility are applied. By default, scheduled tasks will run only if you are logged on. However, you can change this setting in Windows Task Scheduler so that the batch runs whether you are logged on or not. The steps on working with Windows Task Scheduler may be different depending on your operating system.
Note If you create a scheduled task in a batch target, a .job file may automatically created in Windows Task Scheduler. If you delete the batch target from within Flare, the .job file is automatically removed from Windows Task Scheduler. However, if you delete the project or batch target from Windows (outside of Flare), the .job file might remain in Windows Task Scheduler. Therefore, you may need to remove the .job file manually from there.
(Optional) How to Manually Start Build or Publish Processes
Although you can schedule a batch target to run at a specific time, you can always open the batch target and manually start the batch.
- From the Targets folder in the Project Organizer, open the batch target file.
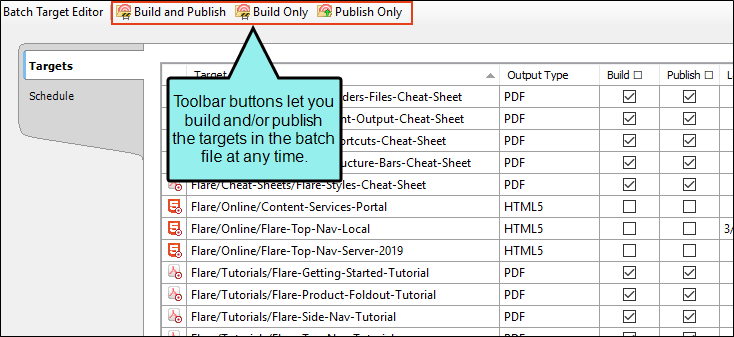
- In the local toolbar of the Batch Target Editor, click any of the following.
 Builds and publishes the selected targets (if they have check marks in the Build and Publish boxes in the batch target).
 Builds the selected targets (if they have check marks in the Build box in the batch target).
 Publishes the selected targets (if they have check marks in the Publish boxes in the batch target).
Note When you click the Publish Only option, Flare makes sure that each selected target already has generated output files. If so, those targets are published. If output has not yet been generated, Flare builds the target and then publishes its output files.

- (Optional) For each target in the batch, a row is added to the Builds window pane, showing the progress of the target as it is generated. If the target generates successfully, the color of the Progress columns changes from light to dark green, and the Status column displays "Finished." You can then select that row and in the local toolbar click View Output.
- (Optional) For each target a log file is generated and saved automatically at the root level of the output folder for that target, whether or not there are errors or warnings. You can tell if errors or warnings have occurred by looking at the appropriate columns in the Builds window pane. You can then select that row and in the local toolbar click Open Build Log.
What’s Noteworthy?
Warning If your computer's anti-virus (AV) software scans the Output folder during the build process and you experience one or more "Build Failed" errors, the AV software may be preventing the build process from accessing the output files. To avoid this, you can temporarily turn off or disable your AV scan. You may also be able to exclude the Output folder, add Flare to an exceptions list, or postpone/reschedule scans to a different time. See your AV vendor for information.
Note You can also select a target row in the Builds window pane and click Rebuild Target to generate the output again.
Note When you publish output using a batch target, changed files are replaced and stale files are always removed.
Note You cannot use scheduled tasks for batch targets if you are working in trial mode.
What’s Next?
After the batch runs, you can do any of the following.

