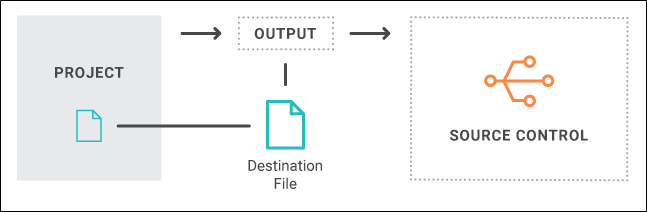
You can create a destination file using Source Control if you want to publish output files to a source control server, such as TFS or Subversion.
[Menu Proxy — Headings — Online — Depth3 ]
How to Create a Destination File Using Source Control
- Open the Project Organizer.
- Open an existing destination file or add a new one.
- In the Destination Editor, click in the Type drop-down field, and select Source Control.
- In the Directory field, enter the folder where the output files will be published. You should enter a location that is not your project's output folder. This is because you do not want to inadvertently overwrite or delete your published files.
- (Optional) You can the Comment field to provide a description of the destination so that its purpose is clear.
-
Complete the Source Control section.
See the full topic for details.
-
Create or detect a source control binding.
If Your Project Is Already Bound to Source Control
-
Click Detect to search for existing source control bindings on the current destination folder. If they exist, Flare will automatically fill in the fields using this information.
Note Source control providers are scanned in the following order:
- Git
- Subversion
-
Perforce Helix Core
- Microsoft Team Foundation Server (TFS)
-
Click New to create a new bind destination. The Bind Destination dialog opens.
To Set a Bind Destination—Git
-
From the drop-down, select Git.
-
If you are going to bind to a remote repository, select Remote Repository, then enter the address of the repository in the field. If you want to work locally, you can leave this box unselected. You can enter an HTTP URL or an SSH URL.
Note You may need to obtain this information from your system administrator.
- If you want to push to the remote repository when you bind the project, select the Push on bind check box. This will push the initial project files to the repository when you bind the project.
- In the Name field, enter your name.
- In the Email field, enter your email address.
-
From the Save Per drop-down, select how you want to save your files.
- User Saves the files in your local folder. Select this option if you are working with other tools (e.g., Tortoise) or if you want to use the same user identity across multiple projects.
- Project Saves the files locally to your project. Select this option if you want to use different identities for each project.
- (Optional) In the Comment field, you can enter any internal comments.
-
Click OK.
- (Optional) If you entered an HTTP address, enter your user name and password in the Log In dialog. Click OK when you are finished.
-
(Optional) If you entered an SSH URL, the Certificate Specification dialog opens. In the dialog, do the following and click OK when you are finished:
- In the Public key field, enter your public SSH key, or use
 to browse for the key on your network.
 - In the Private key field, enter your private SSH key, or use to browse for the key on your network.
- If you want Flare to remember your key information so you do not need to enter it again later, select the check box next to Save certificate information.
- In the Public key field, enter your public SSH key, or use
To Set a Bind Destination—Perforce Helix Core
- From the drop-down, select Perforce Helix Core.
- In the Server field, enter the server address.
- Next to the User field, click .
- Select a user and click OK. (Users are set up separately in Perforce Helix Core.)
-
From the Type drop-down, select whether you want to bind to a stream or a depot. A depot contains multiple streams.
If You are Binding to a Stream
-
Next to the Stream field, click New.
If the Log In dialog opens, complete the User name and Password fields and click OK.
The New Stream dialog opens.
- From the Stream Type drop-down, select the type of stream you want to use. Most streams are mainline streams.
-
Next to the Streams Depot field, click Browse.
The Browse Depots dialog opens.
- Select a depot. This is essentially a folder or directory in Perforce Helix Core that contains multiple streams, one of which will be your Flare files.
- Click OK.
- (Optional) In the New Stream dialog, you can complete any of the other fields as necessary. For information about these fields, please refer to the documentation provided with Perforce Helix Core.
- Click OK.
If You are Binding to a Depot
-
Next to the Depot field, click New, or select an existing depot using the drop-down arrow.
If you clicked New, the New Depot dialog opens.
- In the Name field, enter a name for the depot.
- (Optional) In the Description field, enter a description for the depot.
- Click OK.
-
Next to the Path field, click
.If the Log In dialog opens, complete the User name and Password fields and click OK.
The Browse Source Control Folders dialog opens.
- Select the location where you want to bind the project.
- Click OK.
-
- (Optional) In the Comment field, you can enter any internal comments.
- (Optional) If you want the files in the project to be checked out when you are finished, click Keep files checked out.
-
Click OK.
To Set a Bind Destination—Subversion
- From the drop-down, select Subversion.
- In the Server field, enter the IP address.
- Next to the Destination Path field, click . The Browse Source Control Folders dialog opens.
- Click on the Subversion folder to which you want to bind the Flare project.
- Click OK.
- (Optional) In the Comment field, you can enter any internal comments.
-
Click OK.
To Set a Bind Destination—TFS
- From the drop-down, select Microsoft Team Foundation Server.
-
In the Server field, enter the name of the computer or the IP address of the server. You can also click
to select a "Team Project Collection." If you click this button, the Select Team Foundation Server Project Collection dialog opens, and you can do the following.- To add a server, click
 . The Add Team Foundation Server dialog opens.
 - Enter the name or URL of the server.
- Enter the path and port number.
-
Select the protocol (HTTP or HTTPS).
Note You may need to obtain this information from your system administrator. Click OK in the dialogs until you return to the main wizard page.
Note Be sure to specify the path deeper than the server name. For example:
.../tfs/DefaultCollection
or
.../tfs/SourceCollection
If you do not know this information, contact your system administrator.
Note If you run into issues in this dialog, chances are your user permissions do not have access to all of the collections on the TFS server. Please try to enter in the server/collection path manually.
- To add a server, click
- Next to the Destination Path field, click . The Browse Source Control Folders dialog opens.
- Click on the Team Foundation Server folder to which you want to bind the Flare project.
- Click OK.
- (Optional) In the Comment field, you can enter any internal comments.
- (Optional) If you want the files in the project to be checked out when you are finished, click Keep files checked out.
-
Click OK.
Note If your selected destination folder is already bound to source control and you are having difficulties with source control detection, you may need to unbind the destination folder using your source control tool and create a new source control destination.
-
If Your Project Is Not Bound to Source Control
-
Click New to create a new source control binding. The Bind Destination dialog opens.
To Set a Bind Destination—Git
-
From the drop-down, select Git.
-
If you are going to bind to a remote repository, select Remote Repository, then enter the address of the repository in the field. If you want to work locally, you can leave this box unselected. You can enter an HTTP URL or an SSH URL.
Note You may need to obtain this information from your system administrator.
- If you want to push to the remote repository when you bind the project, select the Push on bind check box. This will push the initial project files to the repository when you bind the project.
- In the Name field, enter your name.
- In the Email field, enter your email address.
-
From the Save Per drop-down, select how you want to save your files.
- User Saves the files in your local folder. Select this option if you are working with other tools (e.g., Tortoise) or if you want to use the same user identity across multiple projects.
- Project Saves the files locally to your project. Select this option if you want to use different identities for each project.
- (Optional) In the Comment field, you can enter any internal comments.
-
Click OK.
- (Optional) If you entered an HTTP address in Step ii, enter your user name and password in the Log In dialog and click OK when you are finished.
-
(Optional) If you entered an SSH URL in Step ii, the Certificate Specification dialog opens. In the dialog, do the following and click OK when you are finished:
- In the Public key field, enter your public SSH key, or use to browse for the key on your network.
- In the Private key field, enter your private SSH key, or use to browse for the key on your network.
-
If you want Flare to remember your key information so you do not need to enter it again later, select the check box next to Save certificate information.
Note SSH keys allow you to establish a secure connection between your computer and your Git source control provider (likewise, using an SSH URL is more secure than an HTTP URL; you need to use SSH keys if you want to use an SSH URL). If you do not have a public and private SSH key, your can generate these keys using your Git source control provider (e.g., Gitlab). Follow the directions provided by your source control provider to add these keys to your Git account. Once you generate these keys, they are typically found in the C:\Users\[username]\.ssh folder on your computer.
Public keys typically have a .pub extension. Private keys use the same file name as the public key, but without the file extension.
Example Use the following as guides when setting up your URLs and keys.
SSH URL
Copygit@gitlabomnibus.mycompany.corp:MyUserName/myproject.gitHTTP URL
Copyhttp://gitlabomnibus.mycompany.corp/MyUserName/myproject.gitSSH Private Key
CopymycompanySSHkey_id_rsaSSH Public Key
CopymycompanySSHkey_id_rsa.pub
- In the Public key field, enter your public SSH key, or use
To Set a Bind Destination—Perforce Helix Core
- From the drop-down, select Perforce Helix Core.
- In the Server field, enter the server address.
- Next to the User field, click .
- Select a user and click OK. (Users are set up separately in Perforce Helix Core.)
-
From the Type drop-down, select whether you want to bind to a stream or a depot. A depot contains multiple streams.
If You are Binding to a Stream
-
Next to the Stream field, click New.
If the Log In dialog opens, complete the User name and Password fields and click OK.
The New Stream dialog opens.
- From the Stream Type drop-down, select the type of stream you want to use. Most streams are mainline streams.
-
Next to the Streams Depot field, click Browse.
The Browse Depots dialog opens.
- Select a depot. This is essentially a folder or directory in Perforce Helix Core that contains multiple streams, one of which will be your Flare files.
- Click OK.
- (Optional) In the New Stream dialog, you can complete any of the other fields as necessary. For information about these fields, please refer to the documentation provided with Perforce Helix Core.
- Click OK.
If You are Binding to a Depot
-
Next to the Depot field, click New, or select an existing depot using the drop-down arrow.
If you clicked New, the New Depot dialog opens.
- In the Name field, enter a name for the depot.
- (Optional) In the Description field, enter a description for the depot.
- Click OK.
-
Next to the Path field, click
.If the Log In dialog opens, complete the User name and Password fields and click OK.
The Browse Source Control Folders dialog opens.
- Select the location where you want to bind the project.
- Click OK.
-
- (Optional) In the Comment field, you can enter any internal comments.
- (Optional) If you want the files in the project to be checked out when you are finished, click Keep files checked out.
-
Click OK.
To Set a Bind Destination—Subversion
- From the drop-down, select Subversion.
- In the Server field, enter the IP address.
- Next to the Destination Path field, click . The Browse Source Control Folders dialog opens.
- Click on the Subversion folder to which you want to bind the Flare project.
- Click OK.
- (Optional) In the Comment field, you can enter any internal comments.
-
Click OK.
To Set a Bind Destination—TFS
- From the drop-down, select Microsoft Team Foundation Server.
-
In the Server field, enter the name of the computer or the IP address of the server. You can also click
to select a "Team Project Collection." If you click this button, the Select Team Foundation Server Project Collection dialog opens, and you can do the following.- To add a server, click . The Add Team Foundation Server dialog opens.
- Enter the name or URL of the server.
- Enter the path and port number.
-
Select the protocol (HTTP or HTTPS).
Note You may need to obtain this information from your system administrator. Click OK in the dialogs until you return to the main wizard page.
Note Be sure to specify the path deeper than the server name. For example:
.../tfs/DefaultCollection
or
.../tfs/SourceCollection
If you do not know this information, contact your system administrator.
Note If you run into issues in this dialog, chances are your user permissions do not have access to all of the collections on the TFS server. Please try to enter in the server/collection path manually.
- To add a server, click
- Next to the Destination Path field, click . The Browse Source Control Folders dialog opens.
- Click on the Team Foundation Server folder to which you want to bind the Flare project.
- Click OK.
- (Optional) In the Comment field, you can enter any internal comments.
- (Optional) If you want the files in the project to be checked out when you are finished, click Keep files checked out.
-
Click OK.
Note If your selected destination folder is already bound to source control and you are having difficulties with source control detection, you may need to unbind the destination folder using your source control tool and create a new source control destination.
-
-
- Review your source control settings.
Provider Type This is the source control provider.
- Database This is the current source control database.
- Database Root This is the root folder in the source control database where source control files will be published.
- Push to Remote (Git) Select this check box if you want to publish your output to a remote repository.
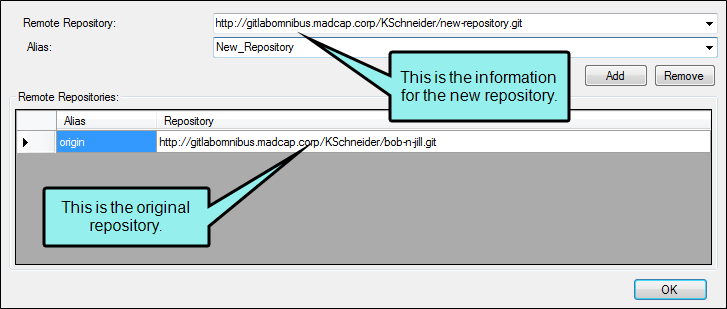
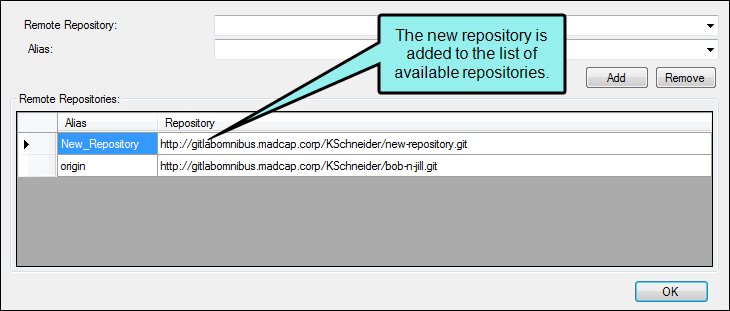
Remote Repository (Git) Select a remote repository from the drop-down. If you need to add or remove a remote repository, click
to open the Remote Repositories dialog.To Add a Remote Repository
In the Remote Repository field, enter the address of the new repository.
Note You may need to obtain this information from your system administrator.
In the Alias field, enter a name for the new repository. This is the name that will appear in the Remote drop-down when you need to select a remote repository.
Note Repository names cannot include spaces.
Click Add to add the new repository to the list of available repositories.
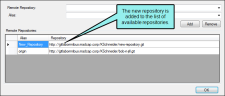
Click OK.
To Remove a Remote Repository
- From the Remote Repository list, select the repository you want to delete.
- Click Remove. The repository is removed from the list of available repositories.
Click OK.
-
-
Select Login Credentials and enter the user name and password required for accessing the server to which you are publishing. This field is enabled only after you enter the host name.
Note Login credentials are enabled after binding. If you are using Git, they are enabled if you selected the Push to Remote option.
- (Optional) In the View URL field, you can enter an address corresponding to your publish destination. This field is for your own internal purposes, and is simply a quick way for you to open the output associated with the destination by clicking the button to the right.
-
(Optional) You can select the upload options.
- Upload Only Changed Files Select this option if you want Flare to republish only the files that have changed. This can save significant time.
- Remove Outdated Published Files Select this option if you want Flare to identify files that were previously published to the destination but are no longer in the source files. Flare will then remove such files from the destination.
- Click
") to save your work.
to save your work.