There are a few different ways to insert an index keyword into a topic or snippet, and each has its own advantages.
Does it matter where you insert an index keyword in a topic? Typically, you want to insert the index keyword at the location closest to where the subject is discussed. One reason for this is to keep index keywords accurate in print-based output. Let’s say you have a very long topic that discusses many subjects and you have inserted all of the index keywords at the top of the topic. In print-based output it is likely that the topic will be spread out to multiple pages. With the index keywords inserted at the top of the topic, the final index will point to the first printed page containing that topic, rather than the exact page where the subject is discussed. However, it is also helpful to insert keywords to your headings in a topic. This helps improve search results.
[Menu Proxy — Headings — Online — Depth3 ]
Drag-and-Drop Method
Use this method to quickly insert an index keyword that already exists
- Advantage It is extremely fast.
- Disadvantage The index keyword that you want to insert must already exist
How to Insert a Keyword Using the Drag-and-Drop Method
- Open the content file.
- Do one of the following, depending on the part of the user interface you are using:
Ribbon Select View > Index Window.
- Keyboard Shortcut Press F9.
-
In the bottom (explorer) area of the Index window pane, click the index keyword and drag it to the location in the topic or snippet where you want to insert it. As you drag the keyword into the topic or snippet, a vertical red bar acts as a guide to help you place the keyword.
-
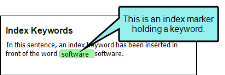
The index keyword is displayed within a marker in front of the word where you added it (as long as markers are turned on).
-
Click
") to save your work.
to save your work.When you build your final output, the keyword is included in the index that end users see. If end users select the keyword in the index, they are pointed to any topic(s) where that keyword was inserted.
Quick Term Method
Use this method to quickly insert the first word located after your cursor as an index keyword.
- Advantage It is extremely fast.
- Disadvantage It is not the method to use if you want to customize your phrase, use a variable, or add a second-level keyword. The word located immediately after the cursor is exactly what will be displayed in the index.
How to Insert a Keyword Using the Quick Term Method
- Open the content file.
- Click before or on the word that you want to insert as an index keyword.
- Do one of the following, depending on the part of the user interface you are using:
- Ribbon Select Insert > Keyword.
- Keyboard Shortcut Press F10 on your keyboard.
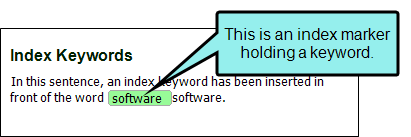
The index keyword is displayed within a marker in front of the word where you added it (as long as markers are turned on).
-
Click
to save your work.When you build your final output, the keyword is included in the index that end users see. If end users select the keyword in the index, they are pointed to any topic(s) where that keyword was inserted.
Index Window Pane Method
Use this method to enter a keyword in the Index window pane.
- Advantage It lets you customize the wording of the phrase in the index, or even use a variable. It also lets you add a second-level index keyword.
- Disadvantage It is not quite as fast as the other methods.
How to Insert a Keyword Using the Index Window Pane Method
- Open the content file.
- Click at the location in the topic or snippet where want to insert an index keyword.
- Do one of the following, depending on the part of the user interface you are using:
- Ribbon Select View > Index Window.
- Keyboard Shortcut Press F9 on your keyboard.
The Index window pane opens.
The window pane is split into two sections—the Terms area at the top and the Explorer area at the bottom. If you want to see more or less of either section, you can click the splitter
 between them and drag it up or down.
- Click in an empty field in the Terms column.
- Type the index keyword as you want it to appear in the index.
If you want to add a second level to the keyword, type a colon after the first term, and then type the second term.
Example If you type Software:MadCap Flare, the term "Software" appears at the first level of the index, and the term "MadCap Flare" appears as a subentry under "Software."
If you want to insert a variable, you can click
 in the Index window pane and use the dialog to choose a variable. The variable will appear as syntax in the field, but in the output the variable definition will be shown.
Note As you type in the Index window pane, notice that the cursor does not lose focus in the XML Editor. It merely turns gray so that you know for certain where you are adding the index keyword. When you return to the XML Editor, the cursor returns to its previous state.
Note If you want to add a keyword that begins with a colon, you need to type a backwards slash \ first, followed by the colon and then the term (e.g., \:My keyword). If you want to add a subkeyword that starts with a colon, you can do the same, although you still need to include the original colon that indicates it is a subkeyword (e.g., My keyword:\:mysubkeyword).
-
Press ENTER.
The index keyword is displayed within a marker in front of the word where you added it (as long as markers are turned on).
-
Click
to save your work.When you build your final output, the keyword is included in the index that end users see. If end users select the keyword in the index, they are pointed to any topic(s) where that keyword was added.

Index Entry Mode Method
Use this method to accomplish the same thing as the Index window pane method. The difference is that, with this method, you do not need to move your cursor from the topic or snippet to the Index window pane. You simply click at the spot in the text where you want to insert the keyword and start typing. The words you type are added directly into the Index window pane. This is a good method to use if you plan to do a lot of indexing all at once, without performing any other tasks in the topic or snippet.
- Advantage It is extremely fast and lets you customize phrasing and add second-level keywords.
- Disadvantage It is not the best method to use if you want to perform indexing while also adding other content and formatting to topics or snippets.
How to Insert a Keyword Using the Index Entry Mode Method
- Open the content file.
-
In the local toolbar of the XML Editor click
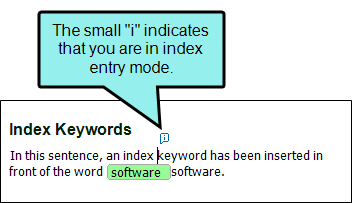
 . The cursor changes, displaying a small boxed "i" next to it.
- Click at the place in your topic where you want to add an index keyword.
-
Type the phrase that you want to add as the index keyword.
As you start typing, the Index window pane opens (if it was not previously opened), and the phrase is added to the first empty field under the Terms column.
If you want to add a second level to the keyword, type a colon after the first term, and then type the second term.
Example If you type Software:MadCap Flare, the term "Software" appears at the first level of the index, and the term "MadCap Flare" appears as a subentry under "Software."
If you want to insert a variable, you can click
in the Index window pane and use the dialog to choose a variable. The variable will appear as syntax in the field, but in the output the variable definition will be shown.Note If you want to add a keyword that begins with a colon, you need to type a backwards slash \ first, followed by the colon and then the term (e.g., \:My keyword). If you want to add a subkeyword that starts with a colon, you can do the same, although you still need to include the original colon that indicates it is a subkeyword (e.g., My keyword:\:mysubkeyword).
Note As you type in the Index window pane, notice that the cursor does not lose focus in the XML Editor. It merely turns gray so that you know for certain where you are adding the index keyword. When you return to the XML Editor, the cursor returns to its previous state.
-
Press ENTER. The index keyword is displayed within a marker in front of the word where you added it (as long as markers are turned on).
- If you want to add more index keywords in the topic, repeat Steps 3-5.
-
Click
to save your work.When you build your final output, the keyword is included in the index that end users see. If end users select the keyword in the index, they are pointed to any topic(s) where that keyword was added.
What’s Noteworthy?
Note If you want to turn off the index entry mode and return to regular editing, click again.
Note If you want to see all of the index keywords that you have inserted in your project, look at the bottom (explorer) area of the Index window pane.
What’s Next?
After you insert index keywords, make sure you do one or both of the following, depending on whether you are generating online and/or print-based output.
- Online Output Enable indexes in the HTML5 Tripane or Standard skin you want to use for the target. See Enabling Indexes in Skins.
- Print-Based Output Create a topic with an Index proxy. See Creating an Index Manually for Print.

